How to use Midjourney: A complete guide to creating stunning AI art
Stevia Putri
Last edited January 27, 2026
Seems like every time you scroll through social media, you see some mind-blowing piece of AI-generated art. From hyper-realistic portraits to sprawling fantasy worlds, the creative possibilities are just exploding. A big name in this space is Midjourney, a tool that's earned a reputation for producing some of the most beautiful and artistic images out there.
If you've been wanting to jump in but aren't sure where to start, you're in the right place. This guide will walk you through everything you need to know, from signing up to crafting prompts that bring your wildest ideas to life.
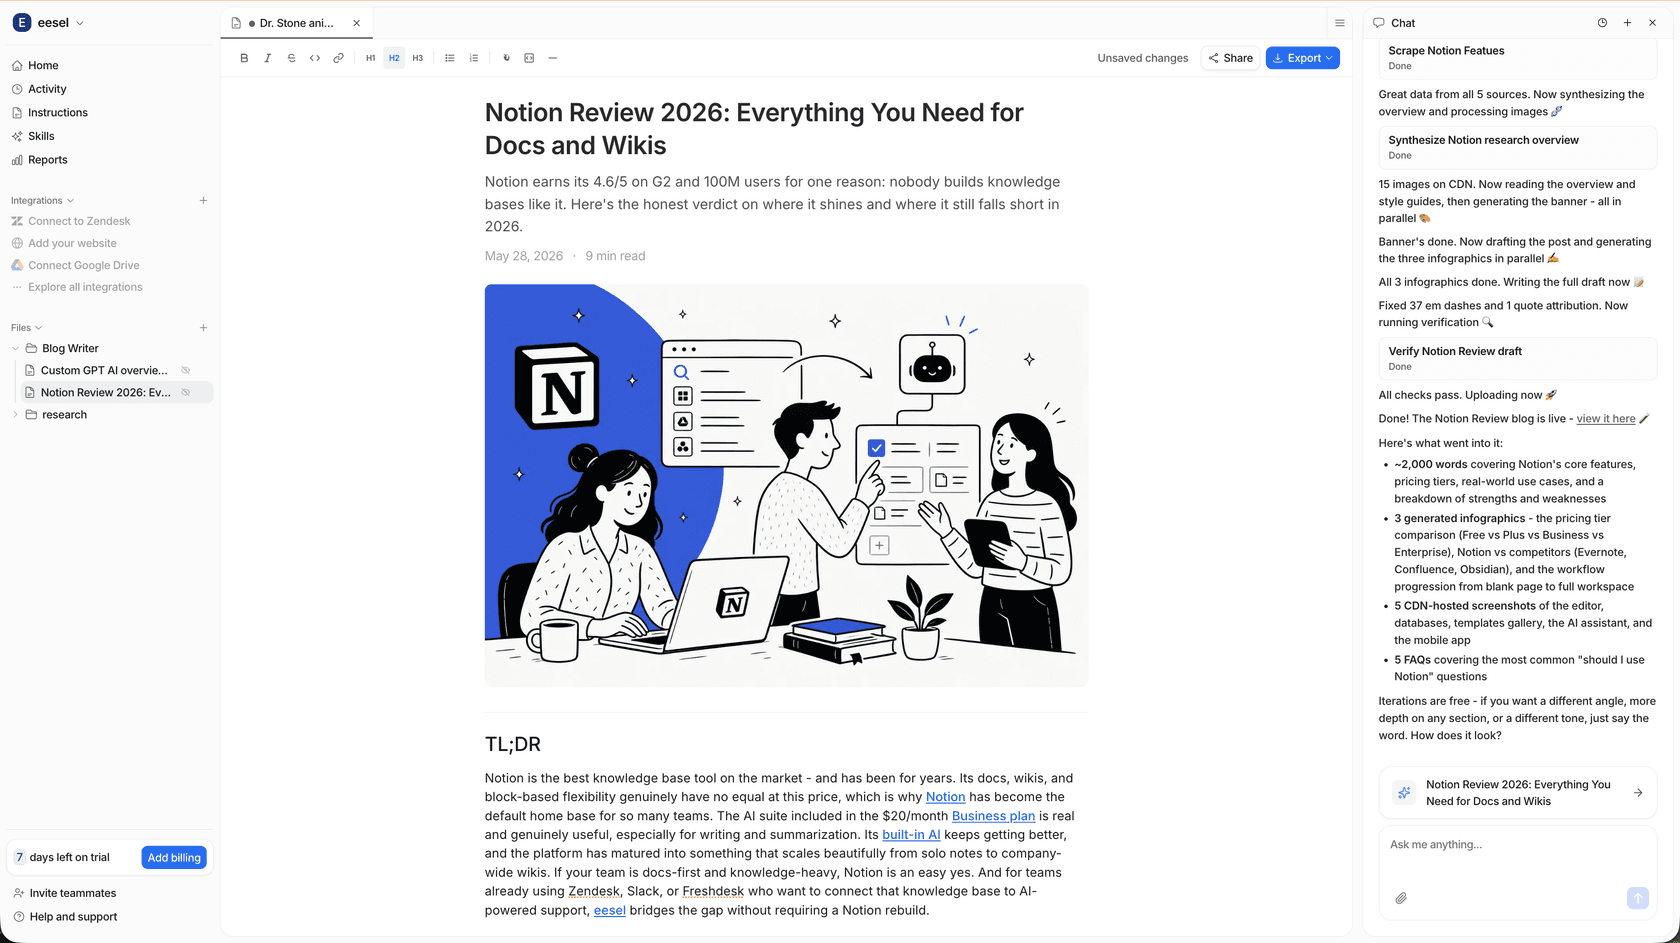
What is Midjourney?
Midjourney is an independent research lab that built an AI tool that turns your text descriptions (or "prompts") into unique images and videos. You just type what you want to see, and it creates it for you.
It originally blew up as a bot on Discord, where users would generate art in public channels, creating a pretty cool, collaborative vibe. Since then, it’s evolved into a much more accessible platform with its own user-friendly web application. This is now the main way most people use the tool, and for good reason.
Midjourney's real strength is its artistic flair. While other AI image generators can feel a bit technical or sterile, Midjourney has a knack for producing results that are stylized, beautiful, and often breathtaking. It feels less like a machine and more like a creative partner.
Getting started with Midjourney
Alright, let's get you set up. It's important to know that Midjourney is a paid service, and you'll need an active subscription to start generating images. Unfortunately, there are no free trials available right now, either on the website or Discord.
Signing up and subscribing
Getting your account ready is pretty straightforward. Just follow these simple steps:
- Head over to the official Midjourney website.
- Log in using your Google or Discord account. This will create your Midjourney profile.
- Once you're in, find the subscription page to pick a plan that works for you. After you subscribe, your account will be activated, and you're ready to go.
A three-step workflow diagram explaining the sign-up and subscription process for how to use Midjourney.
Choosing your platform: Web app vs. Discord
While Midjourney started on Discord, the web app is now the best place to start, especially for beginners.
The Web App This is your main command center for creating and managing your art. The layout is clean and intuitive. You’ll spend most of your time on the "Create" page, where all the action is, and the "Organize" page, which is your personal gallery for everything you've made. It's designed to be a smooth, focused experience.
Discord This is the old-school way to use Midjourney, and it’s still fantastic for seeing what the community is creating in real-time. The shared rooms can be a bit chaotic but also incredibly inspiring. If you want a quieter space, you can always send a direct message to the Midjourney Bot and generate images in a private chat.
Creating your first image with Midjourney
Ready to make something cool? We'll focus on the web app workflow because it's the most direct path for newcomers.
Generating your image grid
- On the Midjourney website, navigate to the "Create" page.
- You'll see a prompt bar at the top of the screen that says "Imagine." This is where you'll type your ideas.
- Type in a description of what you want to see. Let's try something like, "enchanted forest with glowing mushrooms at twilight."
- Hit Enter, and give it a minute. Midjourney will process your request and present you with a 2x2 grid of four unique images based on your prompt.
An infographic illustrating the three main steps of how to use Midjourney to generate your first image grid.
Modifying your creations: Key tools
Once your grid appears, you're not done yet. You have a bunch of powerful tools to refine your images. When you click on one of the four images to enlarge it (this is called "upscaling"), you'll see a new set of options.
Here’s a quick rundown of what they do:
- Vary (Subtle/Strong): This creates four new variations of your selected image. "Subtle" makes small tweaks, keeping it very close to the original, while "Strong" introduces more significant changes for a fresh take.
- Upscale (Subtle/Creative): This doubles the resolution of your image, making it bigger and more detailed. "Subtle" keeps the original details intact, while "Creative" adds new, finer details during the upscaling process.
- Pan: This lets you expand the canvas of your image. You can pan up, down, left, or right to reveal more of the scene beyond the original frame.
- Zoom Out: This pulls the camera back, showing more of the environment around your subject. It's a great way to add context or create a wider composition.
- Editor: This is where the really advanced stuff happens. The editor opens an interface that lets you do things like inpainting (using the "Erase" tool to select and change just one part of an image) and outpainting (which is just another way to Pan).
An infographic explaining the key tools for modifying creations, an essential part of how to use Midjourney.
Saving your final image
Found an image you love? Saving it is super simple. Just click on your upscaled image to see it in full size, then hit the download icon in the top right corner. That's it! The image is now saved to your device.
Mastering Midjourney with effective prompting tips
The real secret to getting amazing results from Midjourney is learning how to write a good prompt. The more detailed and descriptive you are, the better your final image will be.
Be specific and descriptive
Don't be vague. A simple prompt like "a cat" will give you just that, a generic cat. But a detailed prompt can give you a work of art.
'A photorealistic portrait of [Your Description] as a divine angel with large feathered wings and a soft halo, standing on a lush green cliff in Ireland overlooking the Atlantic Ocean, cinematic lighting, 8K resolution'.
Compare "a cat" to this: "close-up photo of a fluffy siamese cat with bright blue eyes, sitting on a sunlit windowsill, soft morning light."
See the difference? The second prompt gives Midjourney details about the subject (fluffy siamese cat, blue eyes), the setting (sunlit windowsill), and the lighting (soft morning light), which results in a much richer and more specific image.
Use images as references
Sometimes, words aren't enough. Midjourney lets you upload your own images to guide the AI, which is an incredibly powerful feature. There are three main ways to do this:
- Image Prompt: Use your image to influence the style, composition, and colors of the final result. It’s like telling the AI, "make something new, but make it feel like this."
- Style Reference (
--sref): This one is a big deal. It lets you borrow the aesthetic of a reference image without copying its content. If you love the vibe of a certain artist or photo, you can use--srefto apply that style to a completely different subject. - Omni Reference (
--oref): This is the newest and most powerful reference tool, designed to keep a character or object consistent across multiple images. If you want to create a series of images featuring the same person,--orefis your best friend. It replaces the older Character Reference (--cref) feature and does a much better job.An infographic comparing Image Prompts, Style References, and Omni References, which is key to learning how to use Midjourney.
Use parameters for more control
Parameters are commands you can add to the end of your prompt to control specific aspects of the image. They usually start with two hyphens (e.g., --ar 16:9). Think of them as technical instructions for the AI.
Here are a few essential parameters to get you started:
| Parameter | Command | Description |
|---|---|---|
| Aspect Ratio | --ar or --aspect | Sets the image dimensions (e.g., --ar 16:9 for widescreen). |
| No | --no | Excludes unwanted elements (e.g., --no people to remove people). |
| Style | --style raw | Reduces Midjourney's default artistic style for more photorealistic results. |
| Stylize | --stylize or --s | Adjusts how artistic the image is. The default is 100, and it ranges from 0 to 1000. |
Midjourney pricing explained
Midjourney's subscriptions are based on "Fast GPU time," which is basically the amount of server processing time you get each month. Generating images uses up this time.
Here’s a quick look at the current subscription plans:
| Plan | Monthly Price | Annual Price (Per Month) | Fast GPU Time | Key Features |
|---|---|---|---|---|
| Basic | $10 | $8 | 3.3 hours/month | General commercial use rights. Good for ~200 images. |
| Standard | $30 | $24 | 15 hours/month | Unlimited Relax Mode generations for images. |
| Pro | $60 | $48 | 30 hours/month | Includes Stealth Mode to keep images private. |
| Mega | $120 | $96 | 60 hours/month | For power users needing maximum Fast GPU time. |
Note: "Relax Mode" on the Standard plan and above allows you to generate unlimited images, but your jobs will be placed in a queue and can take longer to process.
Challenges of using Midjourney for blog content
As cool as Midjourney is, it’s not always the most efficient tool for bloggers and content marketers. When you're trying to produce content at scale, a few challenges pop up.
First, there's the learning curve. While the basics are simple, mastering advanced prompting, parameters, and reference tools takes time and a lot of trial and error. Since every generation uses up your paid GPU time, experimenting can get expensive.
Second, there’s workflow friction. Creating visuals is a totally separate task from writing. You have to switch contexts, generate your images in Midjourney, download them, and then manually upload them into your blog post. This constant back-and-forth breaks your creative flow and just eats up time.
Finally, there's a lack of content integration. Midjourney is a phenomenal image generator, but that's all it does. It only solves one part of the content puzzle. You're still on the hook for doing the research, writing, SEO optimization, and finding other media like YouTube videos or social proof to make your article engaging.
A streamlined workflow: Using eesel AI blog writer for complete content
This is where an integrated solution like the eesel AI blog writer can make a huge difference for content creators. Instead of juggling multiple tools, you can manage the entire process in one place.
Its core function is simple but powerful: it takes a single keyword and turns it into a complete, publish-ready blog post that’s already optimized for search engines. It handles the writing, formatting, and—most importantly—the visuals.
Here’s how it solves the challenges of a disjointed workflow:
- Automatic Asset Generation: The platform automatically creates and inserts relevant images, tables, and infographics directly into the article. No more manual downloading and uploading.
- Context-Aware Visuals: The images it creates aren't random. They're directly related to the surrounding text, ensuring they're always relevant and add real value to your content.
- Built-in Media Integration: Beyond images, it can embed relevant YouTube videos and even pull real Reddit quotes to boost engagement and add social proof to your articles.
- All-in-One Efficiency: You can go from a simple keyword to a fully-formed article—complete with text, images, and embeds—in just a few minutes.
An infographic showing the streamlined workflow of the eesel AI blog writer, a helpful tool for those learning how to use Midjourney for content.
This isn't just theory. This is the exact tool we used at eesel to grow our daily impressions from 700 to 750,000 in just three months by publishing over 1,000 optimized blogs.
For those who prefer a visual walkthrough, watching a tutorial can be a great way to see these concepts in action. The video below provides a comprehensive beginner's guide to getting started with Midjourney, covering everything from the initial setup to crafting your first prompts.
Final thoughts on using Midjourney
Midjourney is, without a doubt, a fantastic tool for creating stunning, one-of-a-kind AI art. With its modern web app, it's more accessible than ever, and learning the art of prompting is a rewarding skill that unlocks unlimited creative potential.
But for bloggers, marketers, and anyone else who needs to produce high-quality content efficiently, the workflow matters. While Midjourney is perfect for bespoke creative projects, an integrated platform like the eesel AI blog writer can be an efficient way to scale your content production without sacrificing quality. It brings the visuals and the text together, right from the start.
Ready to streamline your entire content creation process? Try the eesel AI blog writer and generate your first complete blog post, with text and visuals included, in minutes.
