How to build a custom bot with Zendesk Switchboard: A developer's guide
Stevia Putri
Last edited February 20, 2026
If you need to build a custom bot that integrates directly with Zendesk's messaging infrastructure, you'll need to work with the Zendesk Switchboard. This routing layer within Sunshine Conversations determines which system (your bot, a third-party AI, or human agents) controls each customer conversation.
Building a custom integration gives you maximum flexibility. You control the logic, the handoff rules, and how your bot behaves across different channels. But it also requires development resources and ongoing maintenance.
For teams that want automation without the API complexity, there's a simpler path. We handle bot orchestration automatically without requiring Switchboard configuration. But if you need the full control that native integration offers, this guide walks you through the complete setup.

What you'll need
Before you start, make sure you have:
- Zendesk Suite Professional or higher - Switchboard APIs require at least the Professional plan, which starts at $115 per agent per month
- Sunshine Conversations API credentials - You'll need a Key ID, Secret, and App ID from your Zendesk Admin Center
- Webhook endpoint - A secure HTTPS endpoint where Zendesk can send conversation events
- Development environment - Your bot needs to be hosted somewhere with internet access to receive webhooks and make API calls
If you're not on Suite Professional or don't have development resources available, a managed solution like ours connects through standard Zendesk channels without requiring API configuration.

Understanding Zendesk Switchboard concepts
The Switchboard can feel abstract at first. Let's break down how it actually works.
The switchboard and its integrations
Think of the switchboard as a traffic controller. It sits between your customers and your business systems, routing each conversation to the right destination.
Every system that can handle conversations appears as a switchboard integration. This includes:
- Zendesk AI agents (the native bot, identified as
zd:answerBot) - AI agents Advanced (Ultimate-powered, identified as
ultimate) - Agent Workspace (your human agents, identified as
zd:agentWorkspace) - Third-party bots (marketplace integrations via OAuth)
- Custom integrations (your webhook-based bot)
Source: Zendesk Switchboard documentation
Integration states: active, pending, and standby
Each switchboard integration exists in one of three states for any given conversation:
| State | What it means | Event delivery |
|---|---|---|
| Active | Currently controlling the conversation | Receives all events |
| Pending | About to take control (graceful handoff) | Receives all events |
| Standby | Waiting in the background | Events suppressed by default |
Only one integration can be active at a time. The active integration is the one expected to respond to customer messages. If your bot is on standby, it won't receive conversation:message events.
Source: Zendesk Switchboard documentation
Control transfer operations
Your bot needs to handle four key operations:
| Operation | When to use it |
|---|---|
| passControl | Escalating to another system (typically agents) |
| releaseControl | Conversation is complete, reset to default |
| offerControl | Graceful handoff with shared control temporarily |
| acceptControl | Accepting an offered handoff |
Most of the time, you'll use passControl with the keyword "next" to escalate to whatever integration is configured as your default next responder (usually Agent Workspace).
Source: Zendesk Switchboard documentation
Step 1: Get your Sunshine Conversations API credentials
Your bot will communicate with Zendesk through the Sunshine Conversations API. Here's how to get the credentials you need.
First, log into your Zendesk Admin Center. Navigate to Apps and integrations, then Conversations API. If you haven't created API credentials before, click Create API key.
You'll receive:
- Key ID ( acts as the username for API authentication)
- Secret (acts as the password, store this securely)
- App ID (identifies your Sunshine Conversations app)
Save all three values. You'll use them in every API call your bot makes.
Test your credentials with a simple API call to list your switchboards:
curl https://{subdomain}.zendesk.com/sc/v2/apps/{app_id}/switchboards \
  --user '{key_id}:{secret}'
If you get a JSON response with your switchboard details, your credentials are working.
Source: Zendesk Admin Center documentation
Step 2: Create your custom integration
Before your bot can join the switchboard, it needs to exist as an integration in Sunshine Conversations. This creates the webhook endpoint registration that Zendesk will use to send events to your bot.
Use the Create Integration API:
curl https://{subdomain}.zendesk.com/sc/v2/apps/{app_id}/integrations \
  -X POST \
  --user '{key_id}:{secret}' \
  -H 'content-type: application/json' \
  -d '{
    "type": "custom",
    "name": "my-custom-bot",
    "webhooks": [{
      "target": "https://your-bot-endpoint.com/webhook",
      "triggers": ["conversation:create", "conversation:message"]
    }]
  }'
The response will include an id field. Save this integration ID, you'll need it for the next step.
Source: Zendesk Conversations API reference
Step 3: Add your integration to the switchboard
Having an integration isn't enough. You need to add it to your switchboard so it can actually receive control of conversations.
First, find your switchboard ID:
curl https://{subdomain}.zendesk.com/sc/v2/apps/{app_id}/switchboards \
  --user '{key_id}:{secret}'
Now create a switchboard integration that links your custom integration to the switchboard:
curl https://{subdomain}.zendesk.com/sc/v2/apps/{app_id}/switchboards/{switchboard_id}/switchboardIntegrations \
  -X POST \
  --user '{key_id}:{secret}' \
  -H 'content-type: application/json' \
  -d '{
    "name": "my-custom-bot",
    "integrationId": "{custom_integration_id}",
    "deliverStandbyEvents": false,
    "nextSwitchboardIntegrationId": "{agent_workspace_integration_id}"
  }'
Key parameters explained:
- name: A readable identifier for your bot
- integrationId: The ID from Step 2
- deliverStandbyEvents: Set to
falseunless you need to track conversations you're not actively handling - nextSwitchboardIntegrationId: Usually your Agent Workspace integration ID, this determines where conversations go when your bot escalates
Source: Zendesk Conversations API reference
Step 4: Configure webhooks for your bot
Your bot needs to receive real-time events from Zendesk. The webhook configuration you set up in Step 2 defines where these events go, but your endpoint needs to handle them properly.
Required webhook events
At minimum, your bot should subscribe to:
- conversation:create - New conversation started
- conversation:message - Customer sent a message
- switchboard:passControl - Control was passed to or from your bot
- switchboard:releaseControl - Conversation was released (ticket closed)
Webhook payload structure
Each webhook contains an array of events. Here's what a message event looks like:
{
  "app": { "id": "5ebee0975ac5304b664a12fa" },
  "webhook": { "id": "5f4eaef81e3dcc117c7ba48a", "version": "v2" },
  "events": [{
    "id": "5f74a0d52b5315fc007e798a",
    "createdAt": "2020-09-30T15:14:29.834Z",
    "type": "conversation:message",
    "payload": {
      "conversation": {
        "id": "f52b01137aa6c250bc7251fa",
        "activeSwitchboardIntegration": {
          "id": "67dc32a58d289d63bfeb6346",
          "name": "my-custom-bot"
        }
      },
      "message": {
        "author": { "type": "user" },
        "content": { "type": "text", "text": "I need help with my order" }
      }
    }
  }]
}
Verifying you're in control
Before responding to any message, check the activeSwitchboardIntegration object. If the name doesn't match your bot's switchboard integration name, you should not respond. The conversation is being handled by another system.
Source: Zendesk Receiving Messages documentation
Step 5: Implement control transfer logic
When your bot determines it can't resolve the customer's issue, it needs to escalate to a human agent. This is where passControl comes in.
Basic escalation
To pass control to the next configured integration (typically Agent Workspace):
curl https://{subdomain}.zendesk.com/sc/v2/apps/{app_id}/conversations/{conversation_id}/passControl \
  -X POST \
  --user '{key_id}:{secret}' \
  -H 'content-type: application/json' \
  -d '{"switchboardIntegration": "next"}'
Passing metadata to populate ticket fields
One of the most powerful features is populating Zendesk ticket fields during handoff. Include metadata in your passControl call:
{
  "switchboardIntegration": "zd-agentWorkspace",
  "metadata": {
    "dataCapture.systemField.priority": "high",
    "dataCapture.systemField.tags": "bot-escalated,shipping-issue",
    "dataCapture.systemField.group_id": "360000123456",
    "dataCapture.ticketField.54321": "Order #12345",
    "first_message_id": "603012d7e0a3f9000c879b67"
  }
}
This automatically sets the ticket priority, adds tags, assigns to a specific group, populates a custom field, and controls how much conversation history the agent sees.
Releasing control after resolution
If your bot fully resolves the customer's issue, call releaseControl to reset the conversation:
curl https://{subdomain}.zendesk.com/sc/v2/apps/{app_id}/conversations/{conversation_id}/releaseControl \
  -X POST \
  --user '{key_id}:{secret}' \
  -H 'content-type: application/json' \
  -d '{}'
This clears the active integration. If the customer returns later, they'll start fresh with your default responder.
Source: Zendesk Conversations API reference
Step 6: Test your custom bot integration
Before going live, verify each part of your integration works correctly.
Testing checklist
- Create a test conversation via your Web Widget or messaging channel
- Verify your bot receives the
conversation:createevent - Send a test message and confirm your bot receives
conversation:message - Verify your bot only responds when
activeSwitchboardIntegration.namematches - Test escalation by triggering your passControl flow
- Verify ticket creation in Agent Workspace with correct metadata
- Close the ticket and confirm control returns to your bot after the automation runs
Common testing issues
| Issue | Likely cause |
|---|---|
| Bot not receiving events | Integration not in switchboard, or deliverStandbyEvents is false while not active |
| Double responses | Bot responding even when not in active state |
| Handoff not creating ticket | Wrong nextSwitchboardIntegrationId or malformed passControl payload |
| Metadata not appearing on ticket | Incorrect field key format or field IDs |
Source: Zendesk Agent Workspace documentation

Common patterns and best practices
Channel-specific routing
Different channels often need different default responders. Configure per-channel defaults using the Update Integration API:
curl https://{subdomain}.zendesk.com/sc/v2/apps/{app_id}/integrations/{channel_integration_id} \
  -X PATCH \
  --user '{key_id}:{secret}' \
  -H 'content-type: application/json' \
  -d '{"defaultResponderId": "{switchboard_integration_id}"}'
For example, route WhatsApp conversations directly to agents (high-value channel) while sending Web Widget traffic to your bot first.
Phased rollouts during migrations
If you're migrating from one bot platform to another, run both simultaneously during transition:
- Add both bots as switchboard integrations
- Route specific brands or channels to each bot
- Gradually shift traffic as you validate the new bot
- Remove the old bot integration once migration is complete
Controlling conversation history
By default, Zendesk includes the last 10 messages when creating a ticket. To include the full conversation, track the first message ID when the conversation starts:
{
  "metadata": {
    "first_message_id": "{first_message_id}"
  }
}
Pass this in your passControl call to ensure agents see the complete conversation history.
Troubleshooting common issues
Conversations stuck on the wrong integration
If customers are stuck talking to a bot that should have escalated, check that your bot is calling passControl or releaseControl correctly. Also verify the nextSwitchboardIntegrationId is configured on your bot's switchboard integration.
Metadata not passing to tickets
Field keys must follow exact patterns:
- Standard fields:
dataCapture.systemField.{field_name} - Custom fields:
dataCapture.ticketField.{field_id}
Double-check your custom field IDs in Zendesk Admin Center. They're numeric values, not the field names you see in the UI.
Handoffs failing silently
Enable logging for all webhook events your bot receives. If you're calling passControl but not seeing the switchboard change, verify your API credentials have the correct scopes and your payload JSON is valid.
Unknown active integration state
If you're unsure which integration currently controls a conversation, use the Get Conversation API:
curl https://{subdomain}.zendesk.com/sc/v2/apps/{app_id}/conversations/{conversation_id} \
  --user '{key_id}:{secret}'
Check the activeSwitchboardIntegration property in the response.
A simpler approach to Zendesk bot orchestration
Building and maintaining a custom Switchboard integration requires ongoing development resources. Your team needs to handle webhook infrastructure, API versioning, error handling, and continuous maintenance as Zendesk updates their platform.
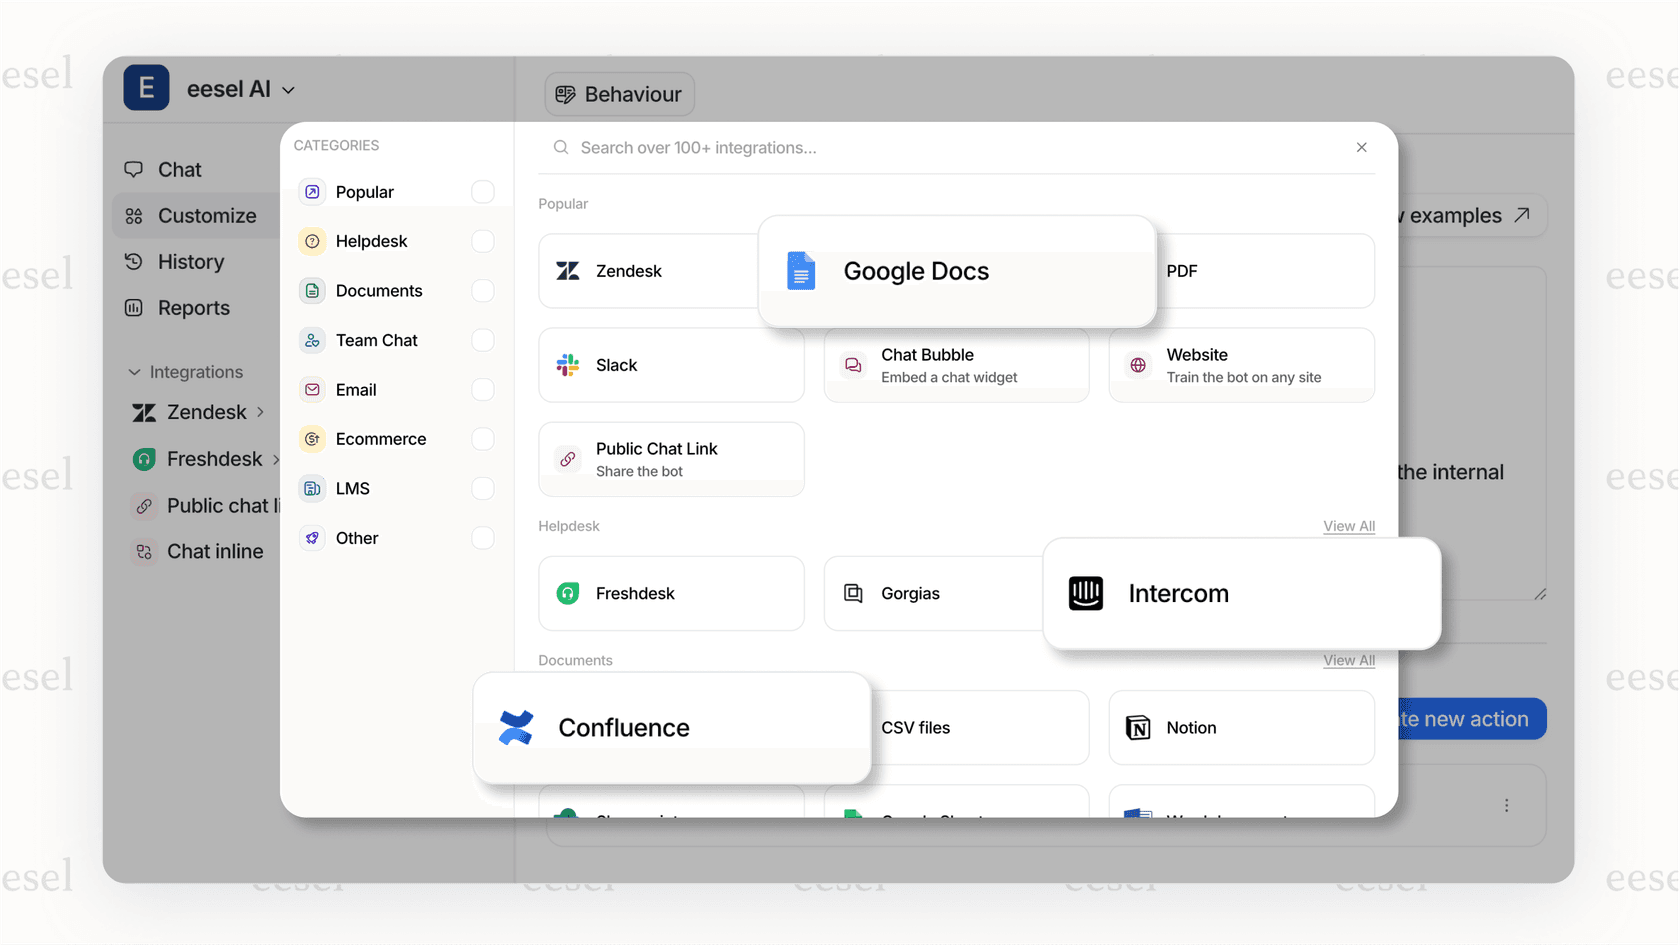
For teams that want automation without the API complexity, we offer a different approach. eesel AI handles orchestration automatically without requiring Switchboard configuration.

Here's how it works:
- No API configuration needed - We integrate through Zendesk's standard channels
- Learns from your content - Our AI trains on your help center, past tickets, and documentation
- Automatic routing - Conversations route based on your rules, without manual switchboard setup
- Plain-English escalation rules - Instead of JSON, you define rules like "Always escalate billing disputes to a human"
Our Business plan includes AI Agent capabilities that respond directly to customers, AI Triage for ticket routing, and bulk simulation to test against past tickets before going live. Plans start at $239 per month (annual billing) with a 7-day free trial.
The right choice depends on your team's technical capacity. Native Switchboard offers maximum flexibility for complex custom logic. Our approach offers faster time-to-value when you want sophisticated automation without the infrastructure work.
Frequently Asked Questions
Share this article

Article by
Stevia Putri
Stevia Putri is a marketing generalist at eesel AI, where she helps turn powerful AI tools into stories that resonate. She’s driven by curiosity, clarity, and the human side of technology.