Building a custom integration with Zendesk Sunshine Conversations lets you create tailored messaging experiences that fit your exact business needs. Whether you want to connect a proprietary CRM, build a specialized bot, or orchestrate complex conversation flows, the Sunshine Conversations API provides the foundation you need.
This guide walks you through everything from initial setup to production deployment. By the end, you'll have a working webhook server that can receive messages, respond intelligently, and hand off to human agents when needed. For official reference, see the Zendesk API documentation.
If you would rather skip the engineering work, eesel's AI agent for Zendesk offers a no-code alternative that connects to Zendesk in minutes and handles conversations autonomously.
Zendesk Sunshine Conversations connects messaging channels to your business applications through webhooks and APIs.
What you'll need
Before diving in, make sure you have the following in place.
Zendesk requirements:
- A Zendesk Suite Professional or Enterprise plan (Sunshine Conversations API access requires these tiers)
- Admin access to your Zendesk account
- At least 1,000 Monthly Active Users (MAUs) included in your plan (additional MAU packs available at $50 per 2,500 MAUs)
Technical requirements:
- A server environment (Node.js recommended for this guide)
- ngrok for local webhook testing
- Basic knowledge of REST APIs and webhooks
- HTTPS endpoint for production
| Plan | Annual Price | Sunshine Access | MAUs Included |
|---|---|---|---|
| Suite Team | $55/agent/month | Basic messaging only | N/A |
| Suite Professional | $115/agent/month | Full API access | 1,000 |
| Suite Enterprise | $169/agent/month | Full API access | 1,000 |
Understanding Sunshine Conversations architecture
Sunshine Conversations is Zendesk's unified messaging platform. Originally Smooch.io (acquired by Zendesk in 2019), it now powers messaging across the entire Zendesk Suite. The architecture is built around a few key concepts you need to understand before building.
Apps: Each app represents a business or brand. You'll create an app in the Admin Center that contains all your conversation data.
Integrations: These are the connections between Sunshine Conversations and external systems. Custom integrations use webhooks to send and receive messages.
Conversations: A conversation is a thread of messages between a user and your business. Conversations persist across channels (a user can start on web chat and continue on WhatsApp).
Switchboard: This controls who "owns" a conversation at any moment. The Switchboard routes conversations between bots, agents, and integrations.
Authentication: The API uses Basic Auth (Key ID as username, Secret as password) or JWT tokens for enhanced security.
The flow works like this: a customer sends a message through any connected channel (web widget, WhatsApp, etc.). Sunshine Conversations receives the message and forwards it to your webhook integration. Your server processes the message, decides how to respond, and sends a reply back through the API. If needed, your integration can transfer control to a human agent via the Switchboard.
Step 1: Create your Sunshine Conversations app and API keys
First, you need to create an app and generate API credentials.
Navigate to the Zendesk Admin Center. Go to Apps and integrations > APIs > Conversations API.
Click Create API Key and give it a descriptive name like "Production Webhook Integration." You'll receive three pieces of information:
- App ID: A unique identifier for your app
- Key ID: Used as the username for API authentication
- Secret Key: Used as the password for API authentication
Store these credentials securely. You'll need them for every API call. The Secret Key is shown only once. If you lose it, you'll need to generate a new key pair.
Set up your environment variables to keep credentials out of your code:
export SUNSHINE_APP_ID="your_app_id"
export SUNSHINE_KEY_ID="your_key_id"
export SUNSHINE_SECRET="your_secret_key"
Step 2: Set up your webhook integration
Now create the webhook integration that will receive message events.
In the Admin Center, go to Integrations > Conversations integrations.
Click Create Integration and select Custom as the type. Configure the following:
Target URL: For local development, use your ngrok URL (we'll set this up in the next step). For production, use your HTTPS endpoint.
Triggers: Select which events you want to receive. At minimum, enable:
conversation:message- Receives all incoming messagespostback- Receives button clicks and quick repliesconversation:start- Notifies when a new conversation begins
Secret: Generate a random string for webhook signature verification. This ensures requests actually come from Zendesk.
Save your Webhook ID (displayed after creation) and the Shared Secret you configured. You'll need both for signature verification.
Step 3: Build your webhook server
Let's build a simple Express.js server that receives and responds to messages.
First, initialize your project:
mkdir sunshine-integration
cd sunshine-integration
npm init -y
npm install express crypto dotenv
Create an index.js file:
require('dotenv').config();
const express = require('express');
const crypto = require('crypto');
const app = express();

app.use(express.raw({ type: 'application/json' }));

// Webhook verification middleware
function verifyWebhook(req, res, next) {
  const signature = req.headers['x-smooch-signature'];
  const secret = process.env.WEBHOOK_SECRET;

  const hash = crypto
    .createHmac('sha256', secret)
    .update(req.body)
    .digest('hex');

  if (hash !== signature) {
    return res.status(401).send('Unauthorized');
  }
  next();
}

// Handle incoming messages
app.post('/webhook', verifyWebhook, async (req, res) => {
  const event = JSON.parse(req.body);

  // Acknowledge receipt immediately
  res.status(200).send('OK');

  // Process the event
  if (event.trigger === 'message:appUser') {
    await handleUserMessage(event);
  }
});

async function handleUserMessage(event) {
  const message = event.messages[0];
  const userId = event.appUser._id;
  const conversationId = event.conversation._id;

  console.log(`Received: ${message.text} from ${userId}`);

  // Simple echo response (replace with your logic)
  await sendMessage(conversationId, `You said: ${message.text}`);
}

async function sendMessage(conversationId, text) {
  const auth = Buffer.from(
    `${process.env.SUNSHINE_KEY_ID}:${process.env.SUNSHINE_SECRET}`
  ).toString('base64');

  const response = await fetch(
    `https://api.smooch.io/v2/apps/${process.env.SUNSHINE_APP_ID}/conversations/${conversationId}/messages`,
    {
      method: 'POST',
      headers: {
        'Authorization': `Basic ${auth}`,
        'Content-Type': 'application/json'
      },
      body: JSON.stringify({
        author: { type: 'business' },
        content: { type: 'text', text: text }
      })
    }
  );

  if (!response.ok) {
    console.error('Failed to send message:', await response.text());
  }
}

app.listen(3000, () => {
  console.log('Webhook server running on port 3000');
});
Create a .env file:
SUNSHINE_APP_ID=your_app_id
SUNSHINE_KEY_ID=your_key_id
SUNSHINE_SECRET=your_secret_key
WEBHOOK_SECRET=your_webhook_secret
Start your server:
node index.js
Step 4: Test locally with ngrok
Since Sunshine Conversations requires a public HTTPS endpoint, use ngrok to expose your local server.
Install ngrok and start a tunnel:
ngrok http 3000
Copy the HTTPS URL (something like https://abc123.ngrok.io). Update your webhook integration in the Admin Center with this URL as the Target URL.
Test your integration by sending a message through the Zendesk Web Widget or any connected channel. You should see the message logged in your server console, and the bot should echo the message back.
Step 5: Configure the Switchboard for bot-to-agent handoffs
The Switchboard controls when your bot handles messages versus when human agents take over. This is essential for production deployments.
Key Switchboard concepts:
- Pass Control: Immediately transfers ownership to another integration
- Offer Control: Shares control until the target accepts
- Release Control: Returns the conversation to its default state
To find your Switchboard ID:
async function getSwitchboardId() {
  const auth = Buffer.from(
    `${process.env.SUNSHINE_KEY_ID}:${process.env.SUNSHINE_SECRET}`
  ).toString('base64');

  const response = await fetch(
    `https://api.smooch.io/v2/apps/${process.env.SUNSHINE_APP_ID}/switchboards`,
    {
      headers: { 'Authorization': `Basic ${auth}` }
    }
  );

  const data = await response.json();
  return data.switchboards[0].id;
}
To escalate to a human agent:
async function escalateToAgent(conversationId, switchboardId, metadata = {}) {
  const auth = Buffer.from(
    `${process.env.SUNSHINE_KEY_ID}:${process.env.SUNSHINE_SECRET}`
  ).toString('base64');

  await fetch(
    `https://api.smooch.io/v2/apps/${process.env.SUNSHINE_APP_ID}/conversations/${conversationId}/switchboard/passControl`,
    {
      method: 'POST',
      headers: {
        'Authorization': `Basic ${auth}`,
        'Content-Type': 'application/json'
      },
      body: JSON.stringify({
        switchboardIntegration: 'zd:agentWorkspace', // Zendesk Agent Workspace
        metadata: {
          priority: 'high',
          topic: metadata.topic || 'general',
          ...metadata
        }
      })
    }
  );
}
When you pass control with metadata, Zendesk automatically populates ticket fields, sets priority, and routes to the appropriate team based on your triggers.
Step 6: Connect messaging channels
Your integration works with any channel connected to Sunshine Conversations. Available channels include:
- Web Widget (built-in)
- WhatsApp Business API
- Facebook Messenger
- Apple Messages for Business
- LINE
- Telegram
- SMS via Twilio or MessageBird
- Android and iOS SDKs
To add a channel, go to Admin Center > Channels > [Channel Name] and follow the authentication steps. Each channel has specific requirements:
- WhatsApp: Requires Meta Business verification and a WhatsApp Business API account
- Facebook/Instagram: Connects through your Facebook Business Manager
- SMS: Requires a Twilio or MessageBird account with a phone number
Once connected, all messages flow through the same webhook endpoint regardless of channel. Your code doesn't need to change to support new channels.
Testing and debugging your integration
Before going live, thoroughly test your integration.
Local development best practices:
- Use ngrok's replay feature to resend webhooks during debugging
- Implement comprehensive logging for every event received and action taken
- Create test conversations and verify the full flow from message to response
Common errors and solutions:
| Error | Cause | Solution |
|---|---|---|
| 401 Unauthorized | Invalid webhook signature | Verify your WEBHOOK_SECRET matches the integration setting |
| 429 Too Many Requests | Rate limit exceeded | Implement retry logic with exponential backoff |
| 403 Forbidden | Invalid API credentials | Check your Key ID and Secret |
| Webhook timeout | Server response > 10 seconds | Acknowledge the webhook immediately, process asynchronously |
Rate limiting: Sunshine Conversations limits API requests to 100 per minute by default. Implement proper handling:
if (response.status === 429) {
  const retryAfter = response.headers.get('Retry-After');
  await delay(retryAfter * 1000);
  // Retry the request
}
Conversation size limits: Conversations have a 30,000 message limit. Archive old conversations to stay under this limit.
Security best practices
Production integrations require additional security measures.
Credential storage: Never commit credentials to version control. Use environment variables or a secrets manager like AWS Secrets Manager or HashiCorp Vault. Zendesk follows industry-standard security practices to protect your data.
Webhook signature verification: Always verify the X-Smooch-Signature header. Without this, anyone can send fake webhooks to your endpoint.
HTTPS only: Sunshine Conversations requires HTTPS for webhook URLs in production. Use a valid SSL certificate.
JWT authentication: For enhanced security, switch from Basic Auth to JWT tokens:
function generateJWT() {
  const header = { alg: 'HS256', typ: 'JWT' };
  const now = Math.floor(Date.now() / 1000);
  const payload = {
    scope: 'app',
    iat: now,
    exp: now + 600 // 10 minutes
  };

  const encodedHeader = Buffer.from(JSON.stringify(header)).toString('base64url');
  const encodedPayload = Buffer.from(JSON.stringify(payload)).toString('base64url');
  const signature = crypto
    .createHmac('sha256', process.env.SUNSHINE_SECRET)
    .update(`${encodedHeader}.${encodedPayload}`)
    .digest('base64url');

  return `${encodedHeader}.${encodedPayload}.${signature}`;
}
API key rotation: Generate new keys periodically and revoke old ones. Sunshine Conversations supports multiple active keys for zero-downtime rotation.
Deploying to production
When you're ready to go live, follow this checklist.
Production deployment checklist:
- Move from ngrok to a permanent HTTPS endpoint
- Implement proper error handling and retry logic
- Set up monitoring and alerting for webhook failures
- Configure log aggregation for debugging
- Test Switchboard handoffs with actual agents
- Verify rate limiting won't impact your use case
- Document your escalation policies
Monitoring recommendations:
Track these metrics to ensure healthy integration:
- Webhook delivery success rate (target: >99%)
- Average response time (keep under 5 seconds)
- Error rate by error type
- Conversation volume by channel
Set up alerts for failed webhook deliveries, high error rates, and approaching rate limits.
Alternative: eesel AI for faster implementation
Building a custom integration gives you complete control, but it requires significant development time and ongoing maintenance. If you need AI-powered messaging without the engineering overhead, consider eesel AI as an alternative.
eesel AI connects directly to Zendesk and handles the entire conversation flow automatically. Instead of building webhooks and Switchboard logic, you simply:
- Connect eesel AI to your Zendesk account (one-click integration)
- Train the AI Agent on your past tickets, help center, and documentation
- Configure escalation rules in plain English ("Escalate billing disputes to the Finance team")
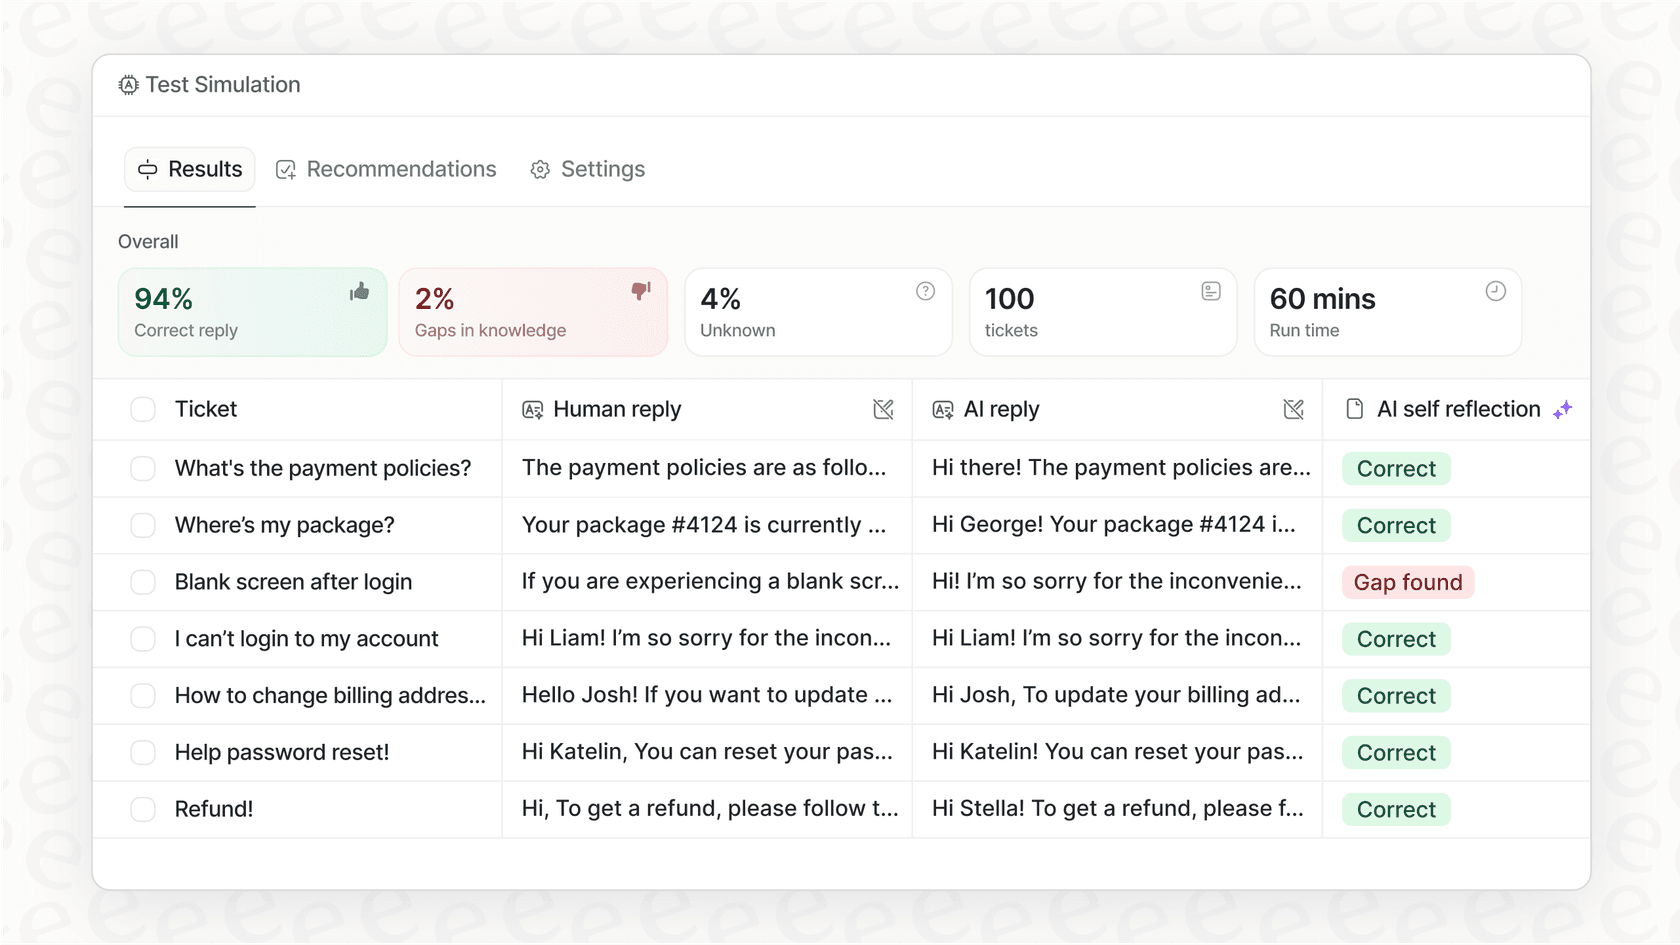
- Test in a sandbox with past tickets before going live
| Aspect | Custom Integration | eesel AI |
|---|---|---|
| Setup time | 2-4 weeks | Minutes |
| Technical expertise required | High (APIs, webhooks) | Low (no-code) |
| AI capabilities | Build your own | Pre-built with LLM |
| Maintenance | Ongoing development | Managed service |
| Pricing model | Zendesk MAU + dev costs | Per-interaction ($239-$639/month) |
Custom integrations make sense when you have proprietary systems that don't fit standard patterns or need highly specialized conversation flows. For most teams looking to add AI messaging to Zendesk, eesel AI delivers faster results with less maintenance. You can see eesel in action or try it free.
Start building with Zendesk Sunshine Conversations
You now have everything you need to build a custom integration with Zendesk Sunshine Conversations. From creating API keys and setting up webhooks to handling the Switchboard and deploying to production, the foundation is in place.
The next steps depend on your specific use case. You might integrate with your CRM to pull customer data, connect to a knowledge base for intelligent responses, or build custom routing logic based on message content.
If the custom route feels like more engineering than your team can take on right now, we can help. Our AI agents integrate with Zendesk in minutes and handle conversations autonomously while escalating to your team when needed. You can try eesel free and test it on past tickets to see exactly how it would perform before going live.