How to publish articles in Zendesk Guide: A complete walkthrough
Stevia Putri
Last edited March 4, 2026
Managing a knowledge base means constantly creating, updating, and refining content. But before your help center articles go live for customers to see, they need to go through a proper publishing workflow. If you're using Zendesk Guide, understanding how to publish articles effectively is essential for maintaining quality control and delivering a good customer self-service experience.
The process sounds straightforward, and it mostly is. But there's a catch. Zendesk restricts some publishing functionality to Enterprise plans only, which can create headaches for teams on lower tiers who need to prepare content updates in advance. This guide walks you through the complete workflow, explains the plan limitations, and shows you how to work around them.
What you'll need
Before you start creating articles in Zendesk Guide, make sure you have the following in place.
A Zendesk account with Guide enabled. Zendesk Guide is the company's knowledge base product, available as an add-on or included in certain Zendesk Support plans. If you're comparing help desk options, you might also want to look at our Freshdesk vs Zendesk comparison.
Appropriate permissions. You need to be a Knowledge admin or an agent with management permissions to create and publish articles. Your administrator controls these permissions from the admin panel.
At least one section created. Articles must belong to a section, which sits inside a category. You'll need your knowledge base structure set up first before you can publish.
Understanding of your plan level. The publishing features available depend on whether you're on Team, Growth, Professional, or Enterprise. Team Publishing and scheduled publishing are Enterprise-only features.
If you're unsure about your permissions, check with your Zendesk administrator. They can grant you the necessary access or create articles on your behalf.
Step 1: Create your article
To start building your knowledge base content, navigate to Guide Admin from your Zendesk dashboard. Click the Add button in the top menu, then select Article.
You'll see the article editor interface, which works similarly to most word processors. The main content area is where you'll write your article, and the toolbar provides formatting options including headers, lists, links, images, and tables. The editor supports both WYSIWYG editing and HTML source editing for advanced users.
Before you start writing, select the section where this article will live. Every article must belong to a section, which is nested inside a category. This structure helps customers navigate your help center and find what they need.

Key things to know:
You can create a maximum of 40,000 total articles across your knowledge base. This limit includes all articles except archived ones and translations. For most teams, this provides plenty of room for growth.
The new article editor supports both WYSIWYG editing and HTML source editing. You can also format text using Markdown if you prefer working with markup. The editor includes features like code blocks, callouts, and embedded media to make your articles more engaging.
Step 2: Configure article settings
Before saving your article, you need to configure several settings in the right-hand panel. These determine who can edit the article, who can see it once published, and where it appears in your help center.
Management permissions control who can edit and publish this specific article:
- Administrators: Only Knowledge admins can edit and publish (default for new articles)
- Agents and admins: All agents and admins can edit and publish
- Editors and Publishers: All agents and admins can edit, but only admins can publish (Enterprise plans only)
Visible to determines who can see the article once published:
- Everyone: Visible to all end users and search engines
- Signed-in users: Only visible to users logged into your Zendesk (rarely used)
- Agents and admins: Internal documentation only
You can also configure labels for search optimization, enable or disable comments, and set an owner who will be notified when the article needs verification. For more on organizing content, check out our guide to best knowledge management software.
Step 3: Save and manage drafts
When you're ready to store your work, click the Save button. This saves your article as a draft, meaning it's stored in Zendesk but not yet visible to your customers.
Drafts are only visible to users who have the appropriate management permissions. This lets you and your team review and refine content before it goes live. You can click Preview at any time to see how the article will appear to end users.
Important distinction: On Team, Growth, and Professional plans, you can only save drafts of new articles. Once an article is published, you cannot create a draft version of updates without immediately overwriting the live content. This is a significant limitation that Team Publishing solves for Enterprise customers.
Step 4: Publish your article
When your article is ready to go live, click the dropdown arrow on the Save button and select Publish. The article immediately becomes visible to everyone based on your "Visible to" settings.
On Enterprise plans, you have additional publishing options:
Schedule publishing lets you set a specific date and time for the article to go live. This is useful when preparing content for a product launch or announcement that needs to go out at a specific moment.
Schedule unpublishing automatically removes the article after a certain date. This works well for time-limited promotions, seasonal content, or temporary announcements that shouldn't remain visible indefinitely.
Team Publishing adds workflow states that let you mark articles as ready for review before publishing. We'll cover this in more detail in the next section.
Understanding Team Publishing (Enterprise only)
Team Publishing is where Zendesk Guide stands out for larger teams. It's an Enterprise-only feature that adds sophisticated content management workflows to your knowledge base.
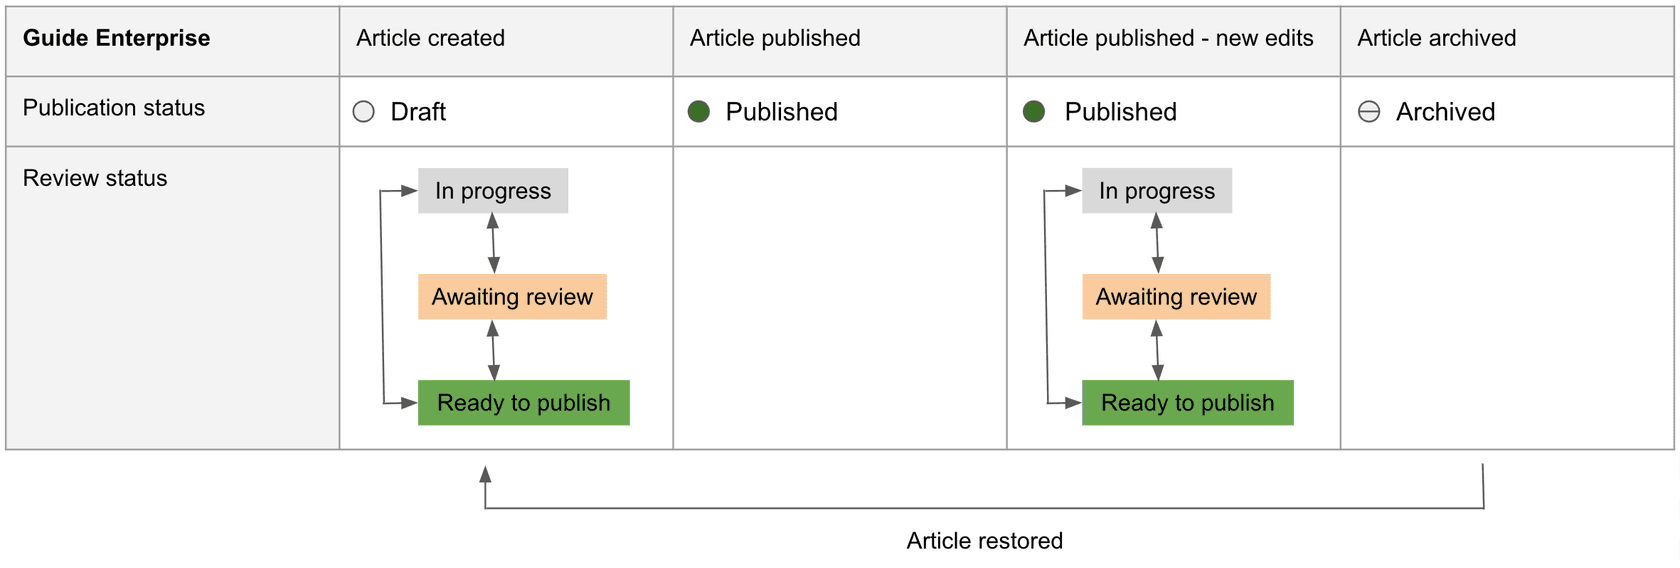
With Team Publishing, articles move through specific workflow states:
In Progress means the article is being created or updated but isn't ready for review. This is the starting state where writers can make changes without affecting the live version.
Awaiting review indicates the article has been updated and is ready for another team member to review. This state triggers notifications to assigned reviewers.
Ready to publish means the article has been approved and is ready to go live, or has been scheduled for a specific date. At this point, the content is finalized.
Published is the live version currently visible in your help center. This is what customers see when they visit your knowledge base.
Archived means the article has been unpublished and removed from search results. Archived content remains in your knowledge base and can be restored if needed.
The key benefit? You can stage content updates for published articles without affecting the live version. This means your team can prepare documentation for a new feature launch, have it reviewed and approved, then publish everything at once when the feature goes live.
Here's what a technical content manager at Squarespace said about it: "We love Team Publishing! The ability to draft and save versions of an article without publishing them live is essential for our workflow. This enables us to conduct reviews more effectively and update our Guide articles in advance of a new feature launch."
Source: Zendesk Guide Enterprise announcement
Tips for managing drafts effectively
Whether you're on Enterprise or not, these practices will help you manage your knowledge base content more effectively.
Establish a clear review process. Even without Team Publishing, define who needs to review content before it goes live. Create a checklist that covers accuracy, tone, formatting, and link verification. Having a documented process ensures consistency regardless of who is creating content.
Use labels to organize articles by status. Create labels like "needs-review" or "scheduled" to track where content stands. Labels make it easy to filter articles and see what needs attention at a glance. You can also use them to identify articles that haven't been updated in a while.
Set article owners for accountability. Assigning an owner ensures someone is responsible for keeping content up to date. The owner receives notifications when the article needs verification and can be contacted if readers flag issues with the content.
Plan content updates around Enterprise limitations. If you're not on Enterprise, batch your updates and communicate timing with your team. Consider creating a maintenance window where you can unpublish, edit, and republish multiple articles without disrupting customers.
Keep a content calendar for scheduled publishing. This is especially important if you're using Enterprise's scheduling features. A calendar helps you coordinate article releases with product launches, marketing campaigns, and seasonal events.
Common mistakes to avoid
After working with many teams on their knowledge base workflows, we've seen the same issues come up repeatedly.
Publishing without previewing first is a common mistake. Always use the Preview button to see exactly how your article will appear to customers. Check formatting, image placement, and link functionality before making content live. What looks good in the editor doesn't always translate perfectly to the customer view.
Forgetting to set proper visibility permissions can expose internal information or hide content that should be public. Double-check whether an article should be visible to everyone, limited to signed-in users, or restricted to agents and admins. This is especially important when publishing process documentation or internal policies.
Not understanding plan limitations before starting leads to workflow disruptions. Know whether your plan supports draft updates to published articles. If you're on Team, Growth, or Professional plans, you cannot stage updates to live content without overwriting it immediately.
Overwriting live content on non-Enterprise plans happens when teams don't realize their changes go live instantly. If you need to update a published article and you're not on Enterprise, consider copying the content first as a backup, or temporarily unpublishing while you make edits.
Missing scheduled publish dates occurs when teams set up future publishing but forget to monitor them. If you use scheduled publishing, set calendar reminders so you don't forget when content is going live. This is particularly important for time-sensitive announcements or feature launches.
Streamline your knowledge base workflow
Managing a knowledge base is ongoing work. You're not just publishing articles, you're maintaining a living resource that needs to stay accurate and helpful.
If you're looking for ways to improve your knowledge base beyond Zendesk's built-in features, consider how AI can help. eesel AI integrates directly with Zendesk as an AI teammate that learns from your past tickets, help center articles, and macros. It can analyze your support conversations to identify gaps in your documentation, suggest new articles based on common customer questions, and even help draft content that matches your team's voice.
Unlike traditional automation tools, eesel works alongside your team. You can start with AI-generated drafts that agents review before sending, then gradually expand to more autonomous support as eesel learns your business. The platform also includes knowledge base insights that show which topics customers ask about most, helping you prioritize article creation where it matters most.

The key is finding a workflow that works for your team size and plan level. Enterprise teams get sophisticated publishing workflows, but even on lower tiers, you can build effective processes with clear guidelines and good communication.
For teams looking to enhance their Zendesk knowledge base with AI capabilities, eesel AI offers a Zendesk integration that learns from your existing content and helps identify gaps. You can also explore our guide on using AI to generate and update support articles for more strategies on keeping your knowledge base current. If you're evaluating AI support options, read our Zendesk AI review for a detailed look at how AI can enhance your support operations.
Frequently Asked Questions
Share this article

Article by
Stevia Putri
Stevia Putri is a marketing generalist at eesel AI, where she helps turn powerful AI tools into stories that resonate. She’s driven by curiosity, clarity, and the human side of technology.


