Customer satisfaction ratings (CSAT) are one of the most direct ways to understand how your support team is performing. When configured properly, they give you actionable insights into what's working and what needs attention. The good news is that setting up CSAT in Zendesk takes just a few minutes, though the impact on your customer insights can be significant.
This guide walks you through everything you need to know about configuring Zendesk account settings for customer satisfaction. We will cover enabling CSAT, customizing your surveys, setting up delivery automation, and making sense of the data you collect. For a broader look at Zendesk configuration, you might also find our guide on general account settings helpful.

What You'll Need
Before you start configuring CSAT, make sure you have the following in place:
- Administrator access to your Zendesk account. Only admins can enable and configure satisfaction settings.
- Zendesk Suite Professional or higher, or Support Professional/Enterprise plan. CSAT surveys are not available on lower-tier plans like Suite Team or Support Team.
- At least one active support channel (email, messaging, or chat) where surveys can be sent.
- Understanding of your support workflow timing so you can set appropriate survey delays.
If you are on a lower-tier plan and CSAT is important to your team, you will need to upgrade to at least Suite Professional ($115 per agent per month when billed annually) to access satisfaction survey features.
Step 1: Enable Customer Satisfaction Ratings
The first step is turning on the satisfaction rating feature in your Zendesk account.
Navigate to Admin Center > Objects and rules > Business rules > Customer satisfaction. This is where all CSAT configuration happens.
You will see an option to choose between legacy CSAT and the new CSAT experience. The new experience offers more customization options and is generally recommended for new setups. However, if you have existing workflows built around legacy CSAT, you may want to stick with that for consistency.
Once you have selected your preferred version, toggle the satisfaction survey feature to On.
Next, configure which channels will send surveys. Zendesk supports CSAT across multiple channels:
- Email surveys are sent automatically after ticket resolution
- Messaging in-chat surveys appear after conversations end
- Voice requires the end user's email address to send the survey
Choose the channels that make sense for your support operation. Most teams start with email since it has the broadest compatibility.

Step 2: Customize Your CSAT Survey
Now that CSAT is enabled, it is time to make it your own. The default survey works, but customization helps you get more relevant feedback.
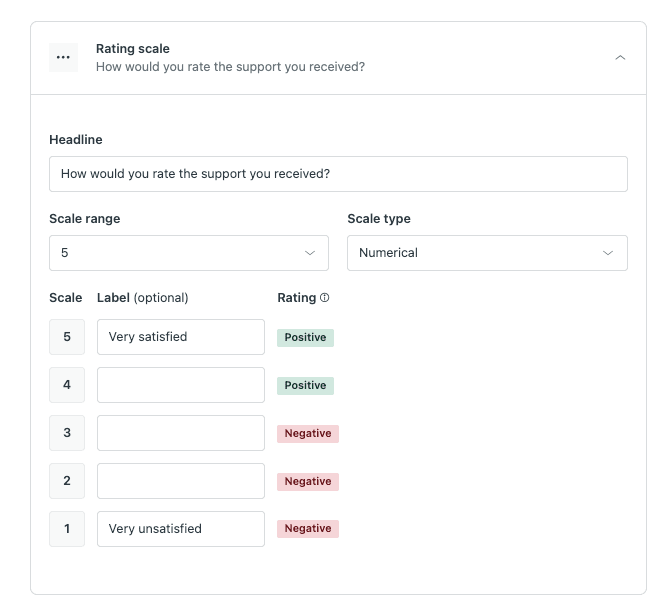
Start by editing the satisfaction question text. Instead of the generic "How would you rate the support you received?" consider something specific to your brand or industry. For example, a software company might ask, "How satisfied are you with the solution provided?"
Next, choose your rating scale. Zendesk offers two options:
- Good/Bad simple binary choice that tends to get higher response rates
- 1-10 scale more granular data but can overwhelm some customers
For negative ratings, you can configure follow-up questions to understand what went wrong. This is where you learn the most. Ask something like "What could we have done better?" and make it optional so you do not discourage responses.
You can also set up satisfaction reasons as dropdown options for negative feedback. Common options include "Issue not resolved," "Response took too long," or "Agent was not knowledgeable." These categories make it easier to spot trends in your data.
Finally, customize survey timing and triggers. The default setting sends surveys 24 hours after ticket resolution, but you can adjust this based on your typical resolution times.
Step 3: Configure Survey Delivery
Timing is everything with CSAT surveys. Send them too soon and customers may not have had time to verify their issue is resolved. Send them too late and the interaction is no longer fresh in their minds.
In the automation settings, you can define exactly when surveys are sent. The standard approach is to trigger the survey when a ticket status changes to "Solved" and then wait a specified delay (typically 24 hours) before sending.
You can also configure reminder settings for customers who do not respond to the initial survey. Use these sparingly. One gentle reminder is usually enough. Multiple reminders can annoy customers and actually hurt satisfaction scores.
Set up agent notifications so your team knows when ratings come in. This helps agents learn from feedback in real-time and gives managers visibility into performance. You can configure notifications to go to the assigned agent, their manager, or both.
Step 4: Display Satisfaction Data
CSAT data is only useful if people can see it. Zendesk gives you several ways to make satisfaction metrics visible.
First, you can enable public satisfaction statistics in your help center. This shows visitors your average rating and recent feedback, building trust with potential customers. The display includes your overall satisfaction score and a breakdown of recent ratings.
To customize how this appears, you can edit the ratings box HTML in your help center theme. This lets you match the display to your brand styling and choose which metrics to highlight.
For internal visibility, set up reporting views that show agents their personal satisfaction metrics. This creates accountability and helps team members track their own performance over time.
Finally, access detailed satisfaction data in Zendesk Explore. The built-in dashboards show trends over time, breakdowns by agent or group, and correlations with other metrics like first response time and resolution time.

Step 5: Analyze and Act on Feedback
Collecting CSAT data is just the beginning. The real value comes from analyzing trends and taking action.
Start by reviewing satisfaction trends in your reporting dashboards. Look for patterns over time. Are scores improving or declining? Do certain days of the week or times of day correlate with better or worse ratings?
Dig into the reasons for negative feedback. If you see a cluster of "Response took too long" ratings, that points to a staffing or workflow issue. If "Issue not resolved" comes up frequently, you may need better escalation procedures or knowledge base content.
Create follow-up workflows for poor ratings. When a customer gives a negative score, someone should reach out to understand what happened and make it right. This turns a bad experience into a relationship-building opportunity.
Share insights with your support team regularly. CSAT data is most valuable when it drives coaching conversations and process improvements. Consider weekly team reviews of satisfaction trends and individual agent scorecards.
Common Configuration Mistakes to Avoid
Even with the right setup, there are pitfalls that can undermine your CSAT program:
-
Sending surveys too soon after resolution. Give customers time to verify their issue is actually fixed. Twenty-four hours is a good starting point for most teams.
-
Using generic survey questions. The default text works, but custom questions that reflect your brand voice get better engagement and more useful feedback.
-
Forgetting to set business hours. If your SLA calculations do not account for business hours, customers may receive surveys at odd times, hurting response rates.
-
Not training agents on how to respond to negative feedback. Agents need to know that negative ratings are learning opportunities, not punishments.
-
Ignoring the data instead of acting on trends. CSAT is only valuable if it drives change. Set up regular reviews and act on what you learn.
Taking Customer Satisfaction Further with eesel AI
Configuring CSAT in Zendesk gives you visibility into customer satisfaction after interactions happen. But what if you could improve satisfaction before the survey is even sent?
This is where eesel AI comes in. Our AI teammate integrates directly with Zendesk to help you deliver better support experiences from the first interaction.
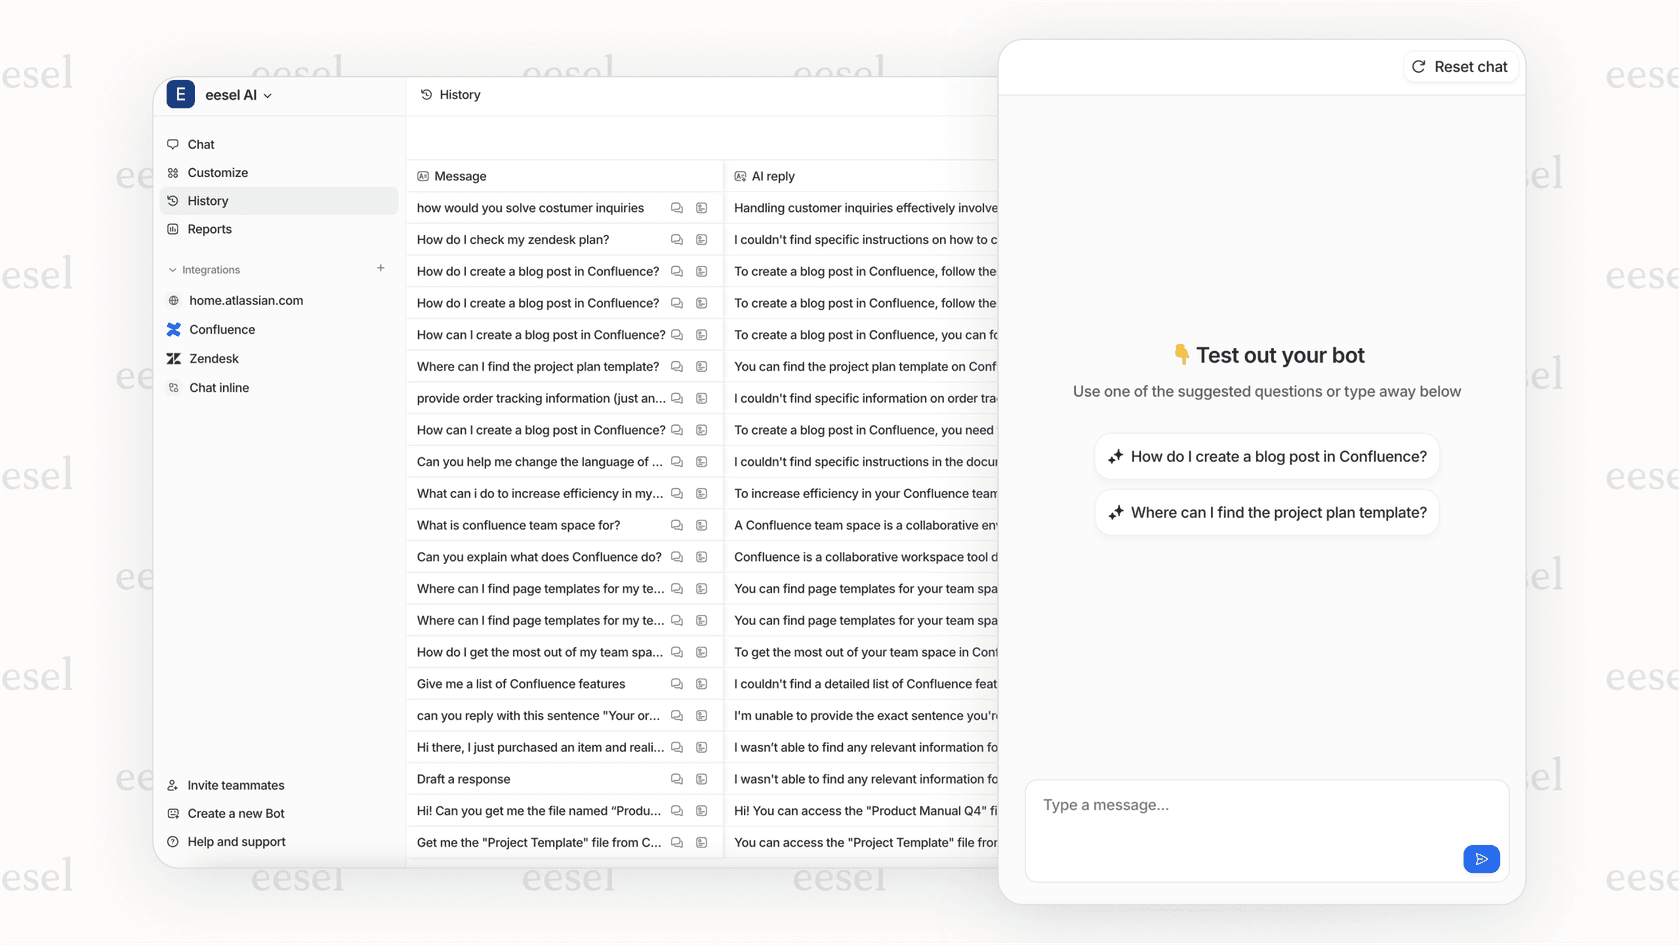
Here is how it works. Our AI Agent learns from your past tickets, help center articles, and macros to handle routine inquiries autonomously. This means customers get faster responses to common questions, which directly improves satisfaction scores.
Our AI Copilot drafts replies for your human agents, helping them respond more quickly and consistently. New agents can perform like veterans from day one because they have AI assistance grounded in your best practices.
The AI also analyzes ticket sentiment in real-time, flagging at-risk conversations before they turn into negative ratings. This gives agents a chance to course-correct while the interaction is still ongoing.
Perhaps most importantly, eesel AI helps reduce ticket volume through better self-service. By providing accurate, contextual answers from your knowledge base, customers often find what they need without ever creating a ticket.
Unlike Zendesk's per-agent pricing, eesel AI pricing is based on interactions, not seats. This means your entire team can benefit from AI assistance without costs scaling linearly with headcount. Plans start at $239 per month (billed annually) and include AI Copilot, Slack integration, and up to 1,000 interactions.

The result is a support operation where CSAT scores improve not just because you are measuring them better, but because the underlying customer experience is genuinely better.