Phone support remains one of the most personal ways to connect with customers. When someone calls your business, the experience they have—from the first ring to the final goodbye—shapes their perception of your brand. Zendesk Talk brings that entire experience into your Zendesk workspace, letting you manage voice conversations alongside tickets, chats, and emails.
Getting your voice setup right matters. A confusing IVR menu or a generic voicemail greeting can frustrate callers before they even reach a human. But when configured well, these same tools can route customers efficiently, answer common questions automatically, and create a professional impression that builds trust.
This guide walks you through configuring the four core components of Zendesk Talk: greetings, voicemail, hold music, and IVR phone trees. Whether you're setting up your first phone line or optimizing an existing configuration, you'll find practical steps and ready-to-use scripts you can implement today.
What you'll need
Before diving into configuration, make sure you have the following in place:
- A Zendesk Support account with Talk enabled
- Administrator permissions in your Zendesk account
- A supported Talk plan (Team, Professional, or Enterprise)
- Audio files for custom greetings, if you plan to use them (MP3, WAV, or OGG format, under 10MB)
- Stable internet connection with at least 80 kbps bandwidth per concurrent call (500 kbps recommended)
Note that IVR functionality requires Talk Professional or Enterprise. If you're on the Team plan, you can still use group routing and voicemail, but multi-level phone menus are not available.
Understanding Zendesk Talk voice components
Think of your phone system as a journey your callers take. Each component plays a specific role in that journey:
Greetings are the voice of your brand. They set expectations, provide information, and guide callers toward resolution. Zendesk Talk offers several greeting types: the main greeting callers hear when they connect, the available agents greeting that plays when someone is about to pick up, the wait greeting for callers in queue, the hold greeting when an agent places them on hold, and the voicemail greeting that invites them to leave a message.
Voicemail captures messages when agents are unavailable or callers prefer not to wait. Every voicemail automatically creates a ticket in Zendesk, complete with the audio recording attached. You can even enable transcription to read the message content without listening.
Hold music fills the silence when callers are waiting. The right music keeps callers patient; the wrong choice can make a short wait feel endless.
IVR (Interactive Voice Response) is your automated receptionist. It presents menu options callers navigate with their keypad, routing them to the right department or providing recorded answers to common questions.
These components work together based on your business hours schedule. You can set different behaviors for when your team is available versus after hours, ensuring callers always get appropriate options.
Setting up voicemail
Voicemail in Zendesk Talk is more than just a recording device. It's a ticket creation engine that ensures no call goes unanswered.
Enabling voicemail for your phone number
To configure voicemail, head to the Admin Center and navigate to Channels, then Talk and email, then Talk. Select the Lines tab and click on the phone number you want to configure. Open the Voicemail tab to see your options.

The Voicemail toggle turns the feature on or off. When enabled, callers can press 1 at any time during the available agents greeting to jump directly to voicemail. They can also reach voicemail if they wait in queue longer than your configured maximum wait time.
You'll see two greeting options: one for when voicemail is on, and one for when it's off. This matters because the greeting should match the experience. If voicemail is enabled, your greeting should invite callers to leave a message. If voicemail is disabled, the greeting should set different expectations, perhaps directing callers to call back during business hours or visit your help center.
Configuring voicemail greetings
Your voicemail greeting is your chance to set clear expectations. A good greeting tells callers what information to include, when to expect a response, and what alternative support channels are available.
To create or select a greeting, you have two options. You can use text-to-speech for a quick, professional greeting without recording audio. Or you can upload a custom recording that matches your brand voice exactly. To upload, go to Admin Center, then Channels, then Talk, then Greetings. Click Add greeting, give it a name, select Voicemail as the type, and upload your audio file.
The optional voicemail transcription feature converts voice messages to text and adds them to the ticket conversation. This costs an additional $0.01 per minute but can save agents time, especially when triaging messages. Transcriptions also enable you to create triggers based on keywords. For example, you could automatically assign any voicemail containing the word "refund" to your billing team.
Setting up business hours voicemail
If you have business hours configured, you can set different voicemail behaviors for in-hours versus after-hours. During business hours, you might want voicemails to go to specific groups based on the time of day. After hours, all voicemails might go to a general queue for the next business day.
When a caller leaves a voicemail, Zendesk creates a ticket immediately. The voicemail audio file attaches to the ticket, and if transcription is enabled, the text appears in the conversation thread. Agents can listen to the message, download it, or read the transcript, then respond via callback, email, or even text message if you've got SMS enabled.
Configuring greetings
Greetings are your opportunity to sound professional, friendly, or whatever tone matches your brand. Zendesk Talk gives you several greeting types to work with.
Types of greetings in Zendesk Talk
Each greeting serves a specific moment in the caller journey:
- Available agents greeting: Plays when agents are online and ready to take calls. This is where you can invite callers to press 1 for voicemail if they prefer not to wait.
- Wait greeting: Plays while callers are in the queue waiting for an agent. Keep this brief and apologetic.
- Hold greeting: Plays when an agent places a caller on hold. This should reassure the caller the agent will return.
- Voicemail greeting: Invites callers to leave a message after the beep.
- IVR greeting: Presents menu options for callers to navigate.
- Callback greetings: Confirm callback requests and set expectations for when the return call will come.
Creating custom greetings
To create a greeting, go to Admin Center, then Channels, then Talk, then Greetings, and click Add greeting. Give your greeting a descriptive name so you can identify it later, like "Support Line - Business Hours" or "After Hours - Voicemail Only."

Select the greeting type that matches how you plan to use it. Then choose your creation method. Text-to-speech is fastest: type your script, select a voice, and Zendesk generates the audio instantly. For custom recordings, upload an MP3, WAV, or OGG file under 10MB. Make sure your recording is clear, with no background noise, and the speaker speaks slowly enough to be understood.
Sample greeting scripts
Here are three scripts you can adapt for your business:
Professional greeting: "Thank you for calling [Company Name]. Your call is important to us. Please hold while we connect you with the next available specialist. If you would prefer to leave a voicemail, press 1 at any time."
Friendly/casual greeting: "Hey there, thanks for calling [Company Name]. We're excited to help you out. Hang tight for just a moment while we grab someone from the team. Don't want to wait? Just press 1 and leave us a message. We'll call you back as soon as we can."
After-hours greeting: "You have reached [Company Name]. Our office is currently closed. Our regular business hours are [hours]. Please leave your name, number, and a brief message, and we will return your call when we reopen. You can also visit our help center at [website] for immediate assistance."
Setting up hold music
Hold music is often overlooked, but it can make or break the waiting experience. The wrong music can irritate callers; the right music can make a five-minute wait feel like two.
Zendesk Talk provides default hold music, but you can upload custom tracks that better match your brand. To upload custom hold music, go to Admin Center, then Channels, then Talk, then Settings, and look for the Hold Music section.
Your audio file should be MP3, WAV, or OGG format, under 10MB. The ideal length is 30 to 60 seconds, as the music loops automatically. Before uploading, listen to the full track yourself. Does it match your brand personality? Is the volume consistent? Would you mind hearing it on repeat?
Here's a pro tip: use a free audio editing tool like Audacity to splice informational messages into your hold music. Every 30 seconds, a brief voiceover could say, "Did you know you can check your order status online at [website]?" or "For faster service, have your account number ready." This turns dead air into a value-add for your customers.
Building your IVR phone tree
IVR, or Interactive Voice Response, is where Zendesk Talk becomes particularly capable. An IVR menu acts as an automated receptionist, routing callers to the right team or providing recorded answers without ever involving a live agent.
Understanding IVR in Zendesk Talk
IVR is available on Talk Professional and Enterprise plans. It lets you build multi-level phone menus that callers navigate using their keypad. A well-designed IVR can deflect common questions, reduce wait times, and ensure callers reach the right agent on the first try.
However, IVR is not always the right choice. Research shows that many consumers find IVRs frustrating when forced to listen to irrelevant options, and some hang up immediately when they encounter one. IVR works best when you have clear departments (sales, support, billing) or common questions that can be answered with a recording (hours, location, account balance).

Creating an IVR menu
To build your IVR, go to Admin Center, then Channels, then Talk, then IVR. Click Add menu to create a new phone tree. Give it a descriptive name like "Main Support Menu" or "Sales and Support Routing."
Every IVR menu starts with a Main menu level. You can add additional menu levels for more complex routing. For example, pressing 1 from the main menu might take callers to a "Technical Support" submenu with options for different product lines.
Select an IVR greeting that presents your menu options clearly. Remember, callers must listen to the entire greeting before they can press a key, so keep it concise. State the option, then the keypress: "For sales, press 1. For support, press 2. For billing, press 3."
Configuring menu routes
Each menu option needs an action assigned to it. Click Add Route to create a new option, then select a keypress (0-9) or Default. The Default route catches callers who do not press a key after three repetitions of the greeting, or who press invalid keys four times.
Zendesk Talk offers several action types:
- Voicemail: Routes the call to voicemail. You can assign voicemail tickets to a specific group.
- Group: Routes to one or more agent groups. The primary group receives calls first; if no one is available, the call overflows to secondary groups.
- Number: Forwards the call to an external phone number. Note that forwarded calls are not recorded and do not create tickets.
- IVR Menu: Routes to another menu level within the same IVR, creating nested submenus.
- Text back: Ends the call and sends an SMS message to the caller, creating an SMS ticket for follow-up.

For each route, you can add tags that apply to tickets created from that call. This is incredibly useful for reporting and routing. If a caller presses 2 for support, you might tag the ticket "support" and "phone," triggering automations that assign it to your support group and set the priority based on time of day.
Assigning IVR to phone numbers
Once your IVR menu is built, you need to assign it to a phone number. Go to Admin Center, then Channels, then Talk, then Lines. Click on your phone number, select the Routing tab, and toggle Enable IVR to on. Select your IVR menu from the dropdown and save your changes.
Test your IVR immediately after setup. Call your number from an external line and try every menu option. Make sure greetings play correctly, routing works as expected, and the default route handles invalid inputs gracefully.
IVR best practices and examples for Zendesk Talk
A poorly designed IVR can frustrate callers more than no IVR at all. Follow these guidelines to create a phone tree that actually helps people:
Keep it simple. Limit your main menu to five options or fewer. Research shows that too many choices overwhelm callers. If you need more than five options, consider whether some could be combined or moved to a submenu.
Don't bury the human option. 90% of consumers want to speak to a live agent. Make sure pressing 0 or the last number in your menu always connects to a person. Never hide this option behind multiple menu levels.
Limit menu depth. Don't make callers navigate more than two or three levels deep. If your IVR feels like a maze, callers will abandon the call or spam the 0 key until they reach an agent.
Record clear, professional greetings. Your IVR greeting is often the first impression callers have of your business. Invest in quality audio, speak slowly, and enunciate clearly. If you sound rushed or muffled, callers will assume your support quality matches.
Here are two IVR script examples for common scenarios:
Support/Sales/Billing split: "Thank you for calling [Company Name]. To help us direct your call, please select from the following options. For sales and new accounts, press 1. For technical support, press 2. For billing and account questions, press 3. To speak with a representative, press 0."
Language selection: "Welcome to [Company Name]. Para español, oprima el número 2. For English, press 1."
Troubleshooting common issues
Even with careful setup, you might encounter some quirks in Zendesk Talk. Here's how to handle the most common ones:
IVR welcome message repeats three times. This is default behavior, not a bug. If a caller does not press a key, Zendesk repeats the greeting up to three times before using the default route. You cannot change this repeat count, so design your greeting accordingly. If you need a different behavior, consider using group routing instead of IVR.
Callers hear the wrong greeting. Check your business hours schedule. If you have different greetings configured for in-hours versus after-hours, the schedule determines which plays. Also verify that your IVR greeting is set correctly; the available agents greeting only plays for group routing, not IVR calls.
Voicemail is not creating tickets. Make sure voicemail is enabled on the phone number and that the greeting is configured. If voicemail is off, callers cannot leave messages. Also check that your Zendesk account has not hit any API limits or storage quotas.
Queue wait times feel too long. You can adjust the maximum queue wait time in your phone number settings. When callers exceed this limit, they are automatically sent to voicemail. The industry average is answering 80% of calls within 20 seconds, but adjust based on your team's capacity and caller expectations.
IVR menu plays twice before routing. This usually happens when a route is misconfigured. Check that your menu routes do not loop back to the same menu level unintentionally. The greeting setting on each route should be set to "None" if you want immediate routing after the keypress.
Integrating voice with AI for better support
Once your Zendesk Talk system is running smoothly, you might wonder how to handle the tickets that voice interactions create. This is where an AI teammate can make a real difference.
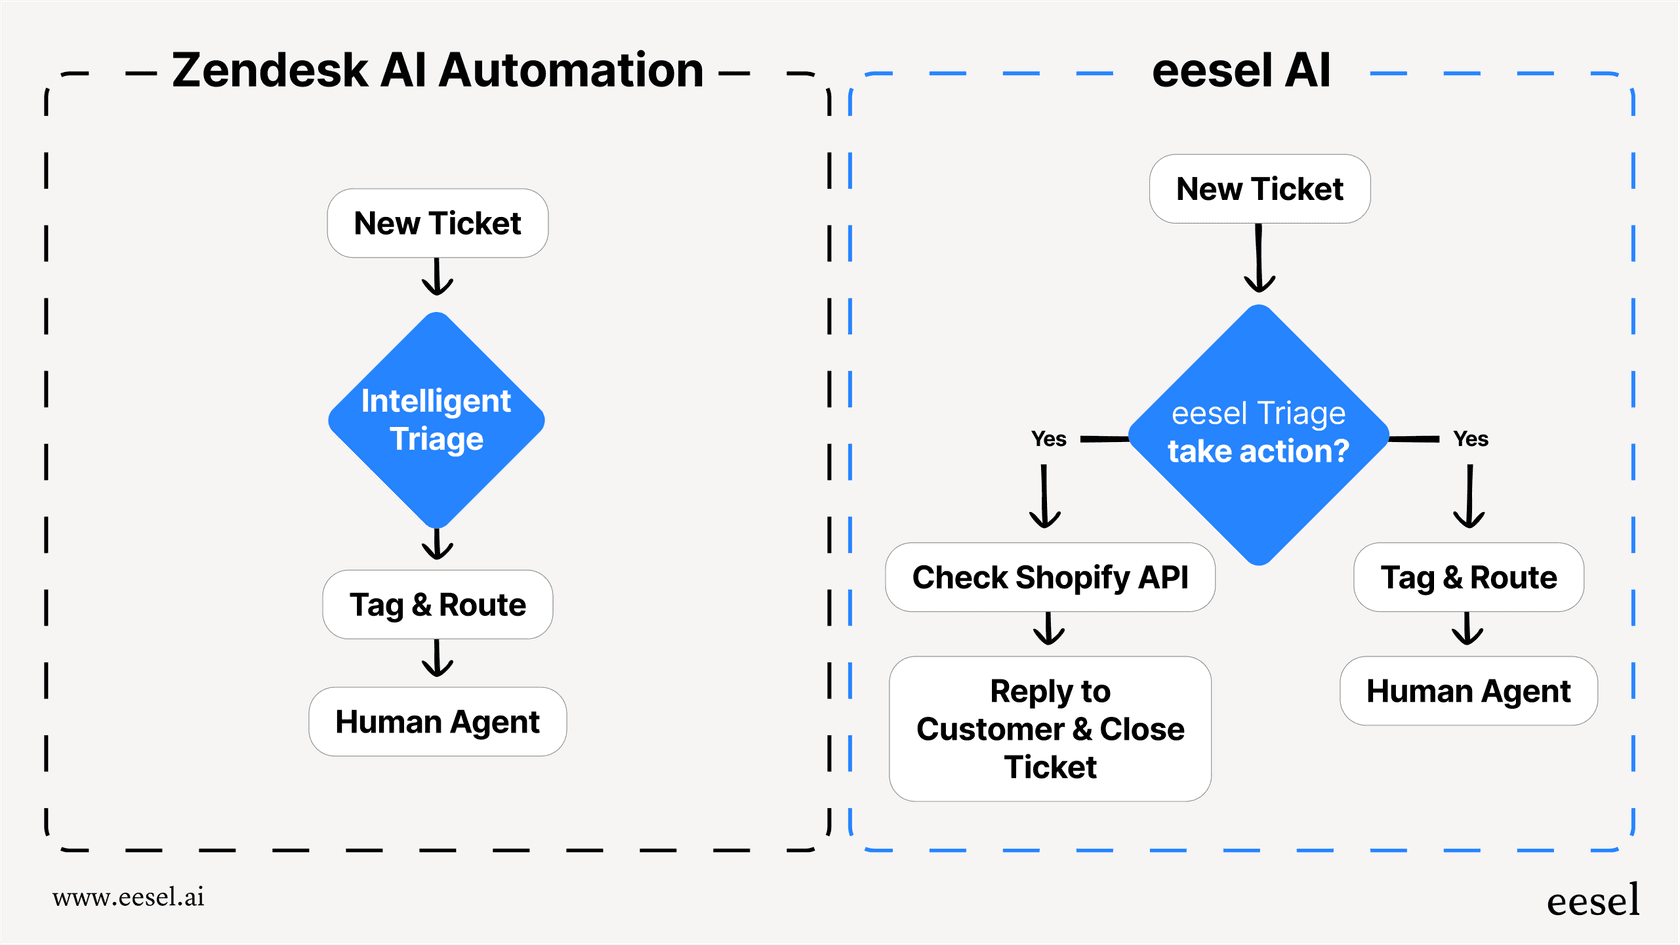
eesel AI works alongside Zendesk Talk to handle the follow-up work that comes from phone interactions. When a voicemail creates a ticket, eesel AI Triage can automatically tag it by topic, route it to the right team, and even prioritize it based on urgency signals in the message.
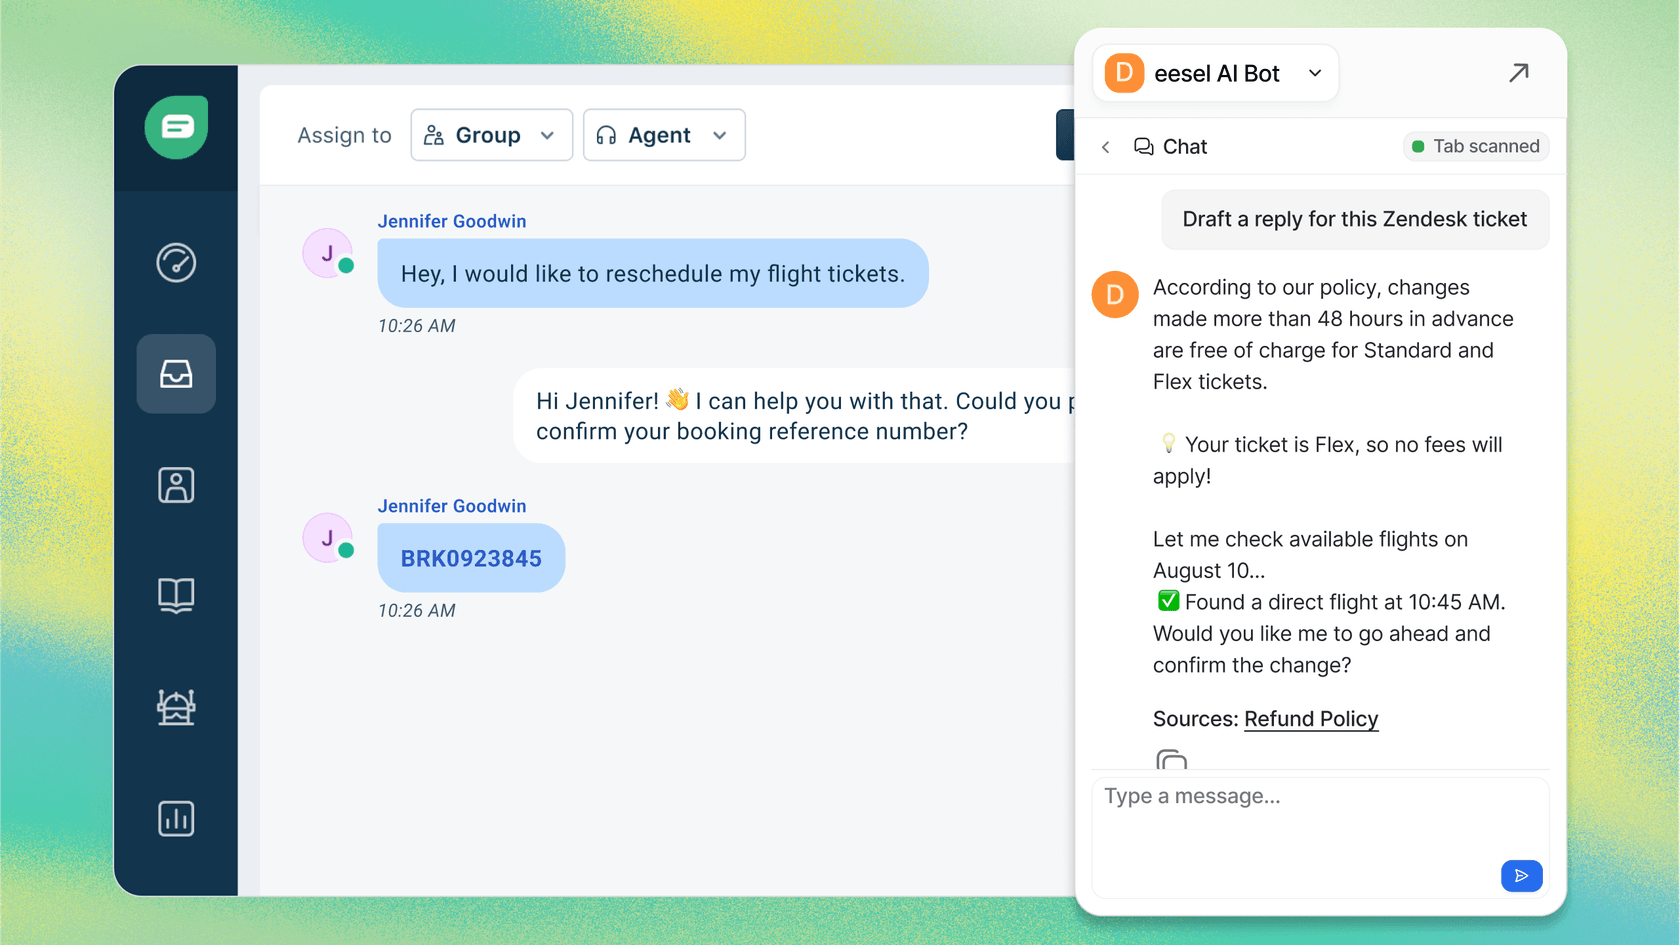
For tickets that need a response, eesel AI Copilot drafts replies grounded in your help center articles and past ticket resolutions. Agents can review, edit, and send these drafts, cutting response time while maintaining quality. Over time, as agents make edits, the AI learns your voice and gets better at matching your team's style.
The combination works like this: Zendesk Talk captures the voice interaction and creates the ticket; eesel AI processes that ticket, routing it intelligently and drafting responses when appropriate. Your human agents focus on the complex issues that actually need their expertise, while routine follow-up happens faster.
If you're interested in exploring how AI can complement your voice support, you can learn more about our Zendesk integration or check out our guide on setting up a Zendesk Talk IVR phone tree for more advanced routing strategies.
Testing and optimizing your voice setup
Configuration is just the beginning. To deliver great phone support, you'll need to monitor performance and iterate based on data.
Start by testing your setup from an external phone line. Call your number and try every path: press each IVR option, wait in queue to hear your hold music, leave a test voicemail, and request a callback if you've got that enabled. Listen for audio quality issues, unclear greetings, or confusing menu options.
Once live, monitor these key metrics in Zendesk Explore:
| Metric | What it tells you | Target benchmark |
|---|---|---|
| Abandonment rate | Percentage of callers who hang up before reaching an agent | Under 5% |
| Average wait time | How long callers wait in queue | Under 20 seconds |
| IVR completion rate | Percentage of callers who complete IVR navigation | Over 80% |
| Voicemail volume | Number of calls going to voicemail | Varies by business |
If abandonment rates are high, your queue might be too long or your hold music too grating. If IVR completion is low, your menu might be confusing or missing the options callers need. Use this data to make incremental improvements, testing one change at a time so you can measure the impact.
Next steps: enhancing your phone support with AI
You now have a complete guide to configuring Zendesk Talk greetings, voicemail, hold music, and IVR. With these components set up correctly, your phone support will sound professional, route callers efficiently, and capture every interaction as a trackable ticket.

The next level of phone support efficiency comes from how you handle those tickets once they're created. While Zendesk Talk excels at the voice interaction, the follow-up work—routing and response drafting—can benefit from AI assistance.
If you're looking to reduce response times and improve consistency across your voice-generated tickets, consider how an AI teammate might fit into your workflow. We've built eesel AI to handle exactly this challenge: learning from your existing tickets and help center content to draft responses, route intelligently, and free your human agents to focus on the conversations that matter most.
Ready to explore? See how eesel AI works with Zendesk or book a demo to discuss your specific setup.
