Zendesk webhooks let you build real-time integrations that respond to ticket activity. When a ticket is updated, whether that's an assignee change, status shift, or new comment, you can automatically notify external systems without writing complex polling scripts.
This guide walks through setting up a webhook that triggers when tickets are updated. You'll learn the exact steps to configure webhooks in Zendesk's Admin Center, connect them to triggers, and handle common issues that trip up first-time implementers.
What are Zendesk webhooks and why use them?
Webhooks are HTTP callbacks that send requests to a specified URL when something happens in Zendesk. Think of them as automated notifications that push data to your systems instead of you having to pull it.
Zendesk offers two ways to connect webhooks:
-
Event-subscribed webhooks fire for every occurrence of a system event. Subscribe to "ticket updated" and your endpoint receives a payload every time any ticket changes. These use fixed JSON payloads and POST requests.
-
Trigger or automation-connected webhooks fire based on conditions you define. You choose exactly when they trigger (assignee changed, priority set to urgent, etc.) and customize the payload using Zendesk placeholders.
Common use cases for ticket update webhooks include syncing ticket data to a CRM, alerting Slack channels about high-priority changes, triggering custom workflows in your internal tools, and building audit trails for compliance.
The main benefit is real-time responsiveness. Instead of polling Zendesk's API every few minutes to check for changes, you'll get notified instantly when something happens.
For teams that find webhook configuration too technical or time-consuming, eesel's AI agent for Zendesk offers an alternative approach. Rather than building and maintaining webhook infrastructure, eesel connects directly to Zendesk and handles automation through AI that'll learn from your existing tickets.
What you'll need before starting
Before creating your first webhook, make sure you've got:
- Admin access to Zendesk only admins can create and manage webhooks through the Admin Center
- An API token generate this in Admin Center under Apps and integrations > API tokens
- A receiving endpoint a URL that can accept HTTP POST requests and process JSON payloads
- Basic understanding of JSON you'll be constructing payloads with ticket data
Optional but recommended: set up a request inspector like Hookdeck Console or webhook.site for testing. These tools give you a temporary URL to capture webhook requests and inspect the payload structure before connecting your production endpoint.
Step-by-step: Creating a webhook for ticket updates
Step 1: Navigate to webhooks in Admin Center
Log into Zendesk and access the Admin Center. Go to Apps and integrations > Webhooks. See the official Zendesk webhooks documentation for more details.
If this is your first webhook, the list will be empty. Click the Actions dropdown in the top right, then select Create webhook.
Step 2: Create a new webhook
You'll see two connection options:
- Trigger or automation for ticket-based workflows with custom conditions
- Zendesk events for system-wide event subscriptions
Choose Trigger or automation since you'll want to fire the webhook when tickets are updated with specific conditions.
Give your webhook a descriptive name like "Ticket Update Notifier" so you can identify it later when connecting to triggers.
Step 3: Configure webhook settings
Fill in the endpoint details:
- Endpoint URL: The HTTPS URL where Zendesk will send POST requests
- Request method: Choose based on your endpoint's requirements (POST for most use cases, PUT for updating resources)
- Request format: JSON is recommended for ticket data

The endpoint URL must be publicly accessible. Zendesk can't send webhooks to localhost or internal-only addresses. If you're testing, use a service like ngrok to tunnel your local development server.
Step 4: Set up authentication
Choose how Zendesk authenticates with your endpoint:
- None no authentication (not recommended for production)
- Basic authentication username and password in the Authorization header
- Bearer token OAuth 2.0 style token authentication
- API key custom header with a key name and value
For Basic authentication, use your Zendesk email address with /token appended as the username (for example, you@company.com/token) and your API token as the password.
Step 5: Test the webhook
Before saving, click the Test button. Zendesk will send a sample payload to your endpoint.
Enter an existing ticket ID for the test. The test payload won't actually update anything, it just verifies connectivity.
Check your endpoint logs or request inspector to confirm the test arrived. If you see a 200 response, your webhook configuration is working.
Step 6: Create a trigger to fire the webhook
Now you need a trigger that invokes your webhook when tickets are updated. Go to Objects and rules > Triggers and click Add trigger.
Set the conditions that determine when the webhook fires:
- Ticket > Ticket is Updated
- Add any additional conditions (optional): Ticket > Assignee > Changed, Ticket > Status > Changed to, etc.
For the action, select Notify active webhook and choose the webhook you just created from the dropdown.
Step 7: Configure trigger conditions and payload
In the trigger action, you'll define the JSON payload that gets sent to your endpoint. Use Zendesk placeholders to include ticket data:
{
  "ticket_id": "{{ticket.id}}",
  "subject": "{{ticket.title}}",
  "status": "{{ticket.status}}",
  "assignee": "{{ticket.assignee.name}}",
  "requester": "{{ticket.requester.email}}",
  "updated_at": "{{ticket.updated_at_with_timestamp}}"
}

The ticket.updated_at_with_timestamp placeholder is particularly useful for webhook workflows since it's got the exact update time, which you can use to prevent race conditions.
Save the trigger. Your webhook's now live and will fire whenever tickets matching your conditions are updated.
Common webhook payload examples
Here are practical payload configurations for common scenarios:
Basic ticket update notification:
{
  "event": "ticket_updated",
  "ticket_id": "{{ticket.id}}",
  "subject": "{{ticket.title}}",
  "status": "{{ticket.status}}",
  "priority": "{{ticket.priority}}"
}
Assignee change alert:
{
  "event": "assignee_changed",
  "ticket_id": "{{ticket.id}}",
  "new_assignee": "{{ticket.assignee.name}}",
  "new_assignee_email": "{{ticket.assignee.email}}",
  "previous_assignee": "{{ticket.assignee.previous.name}}"
}
Status change with comment:
{
  "event": "status_changed",
  "ticket_id": "{{ticket.id}}",
  "new_status": "{{ticket.status}}",
  "latest_comment": "{{ticket.latest_comment}}",
  "ticket_url": "{{ticket.link}}"
}
Custom field update:
{
  "ticket_id": "{{ticket.id}}",
  "custom_fields": [
    {"id": 12345, "value": "{{ticket.ticket_field_12345}}"},
    {"id": 67890, "value": "{{ticket.ticket_field_67890}}"}
  ]
}
Troubleshooting common issues
Webhook not firing
Check your trigger conditions carefully. A common mistake is using "Ticket is created" instead of "Ticket is updated," or setting conditions that never match (like requiring a field to be both blank and filled).
Add a "Add tags" action to your trigger temporarily. If the tag gets added but the webhook doesn't fire, the issue is with the webhook configuration. If the tag doesn't get added, your trigger conditions are wrong.
Authentication errors
For Basic auth, verify you're using email@domain.com/token as the username (with /token appended) and the actual API token string as the password, not your Zendesk password.
10-second timeout
Zendesk enforces a strict 10-second timeout. Your endpoint must respond with a 2xx status code within that window. If you need to perform slow operations, respond immediately with 200 and process asynchronously in a background job.
Circuit breaker activation
If 70% of your webhook requests fail within 5 minutes, or you hit 1,000+ errors, Zendesk activates a circuit breaker that pauses deliveries for 5 seconds. Events during these pauses are logged as "circuit broken" but never delivered. Monitor your endpoint health and fix issues quickly to avoid this.
Duplicate deliveries
Zendesk may send the same webhook multiple times. Use the x-zendesk-webhook-invocation-id header to deduplicate. Store processed IDs in Redis or your database with a 24-hour TTL.
Checking invocation logs
Go to Apps and integrations > Webhooks, click your webhook, then the Invocations tab. You can see the last 7 days of delivery attempts, including request and response details. This is your primary debugging tool.
Best practices for production webhooks
Always use HTTPS endpoints. Unencrypted HTTP webhooks are vulnerable to interception and shouldn't be used in production.
Verify webhook signatures. Zendesk signs each request with HMAC-SHA256. Verify the signature using your webhook's signing secret to ensure requests actually came from Zendesk, not an attacker.
Implement idempotency. Store processed invocation IDs and skip duplicates. This'll prevent double-processing when Zendesk retries failed deliveries.
Respond immediately. Return a 200 response as fast as possible, then process the webhook data asynchronously. This keeps you under the 10-second timeout and prevents retry storms.
Monitor webhook health. Poll the webhook invocations API regularly to detect failures before they become critical. Zendesk doesn't send failure notifications, so you need to check proactively.
Handle retries gracefully. Zendesk'll retry 409 responses up to 3 times, and 429/503 responses with retry-after headers. Design your endpoint to handle these gracefully without creating duplicate data.
A simpler alternative: eesel AI for ticket automation
Setting up webhooks requires technical expertise, ongoing maintenance, and careful monitoring. If your team's looking for ticket automation without the engineering overhead, eesel AI offers a different approach.
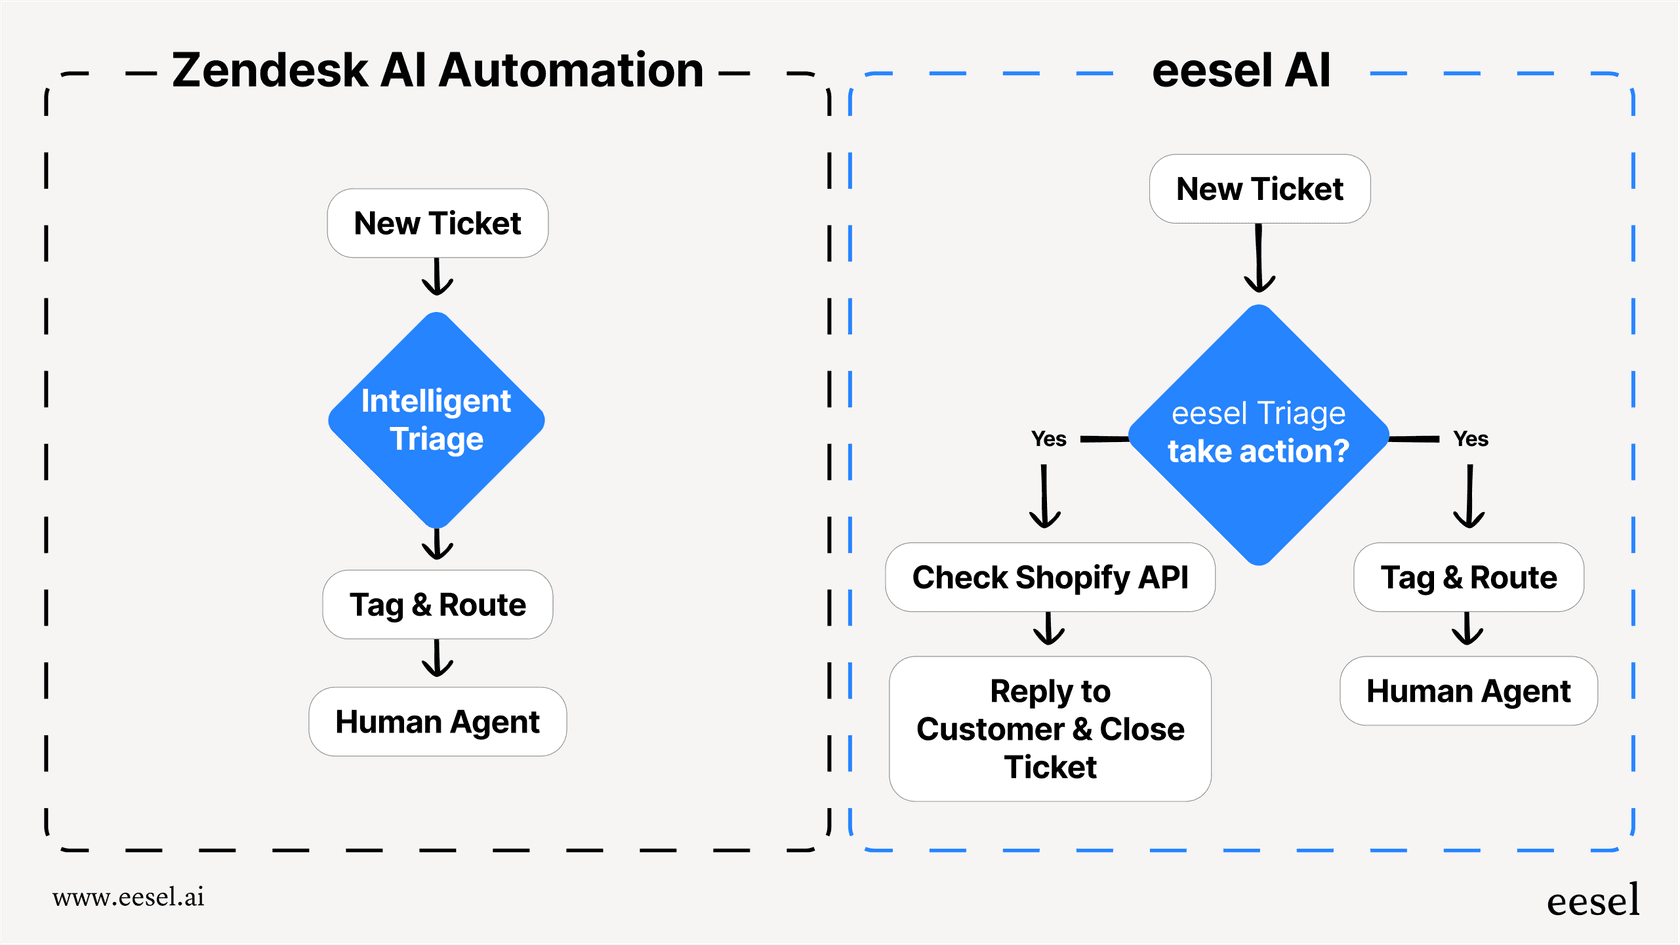
Instead of building webhook infrastructure, you connect eesel AI to your Zendesk account and it learns from your existing tickets, help center articles, and macros. The AI then handles automation through native Zendesk actions, so you don't need webhooks.
Key differences from webhook-based automation:
- No-code setup connect Zendesk in minutes without writing code or configuring endpoints
- AI-powered routing automatically tags, prioritizes, and routes tickets based on content, not just field changes
- Continuous learning improves over time as it sees more of your tickets and agent corrections
- Built-in reliability no circuit breakers, timeout issues, or retry logic to manage
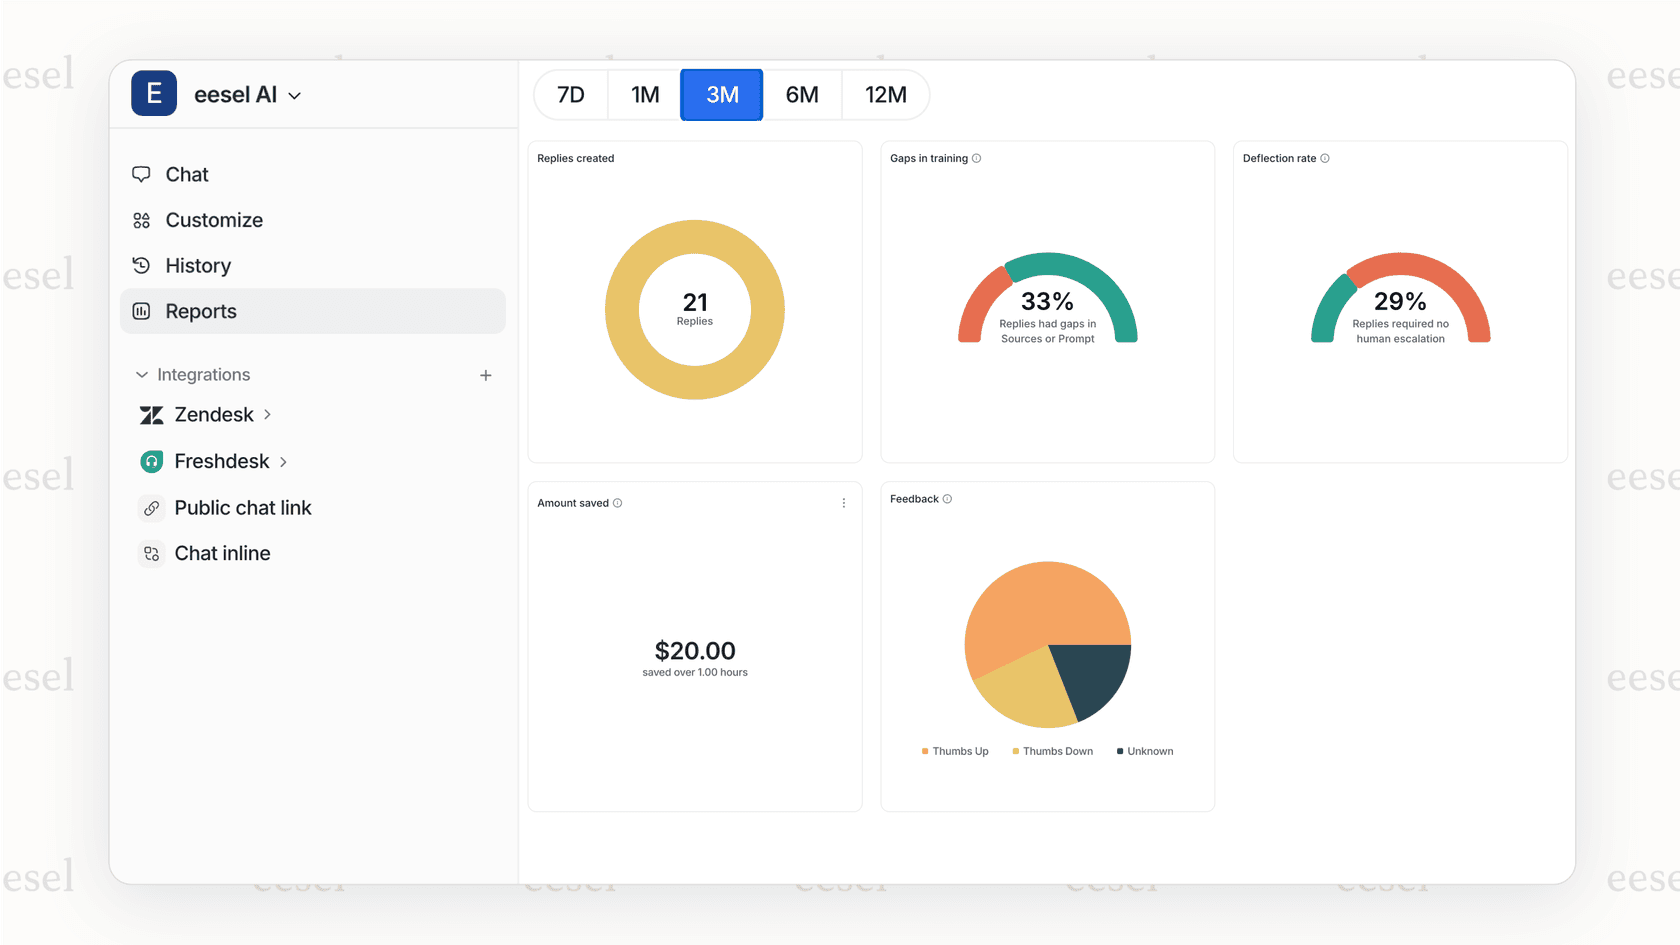
eesel AI can draft responses, escalate complex issues, update ticket fields, and even process refunds through Shopify integration, all without webhook configuration.
Start automating your Zendesk workflow today
Zendesk webhooks give you powerful real-time integration capabilities. By following the steps in this guide, you can set up ticket update notifications that push data to your CRM, trigger internal workflows, or alert team channels instantly.
Webhooks make sense when you need complete control over the integration, have engineering resources to build and maintain endpoints, and require custom payload formats. They're the right choice for complex, multi-system workflows.
For teams that want automation benefits without the technical complexity, eesel AI handles ticket routing, tagging, and responses through AI that learns your business. It's a faster path to automation if webhooks feel like overkill for your situation.
Whichever approach you choose, the goal's the same: reducing manual ticket handling so your team can focus on solving customer problems. Start with a simple webhook for one use case, or explore AI-powered automation, and expand from there as you see results.