Connecting your Google Workspace email to Zendesk is one of those tasks that sounds simple until you actually try to do it. You have multiple options, each with its own trade-offs, and the documentation is scattered across help centers. This guide consolidates everything you need to know to get your support email flowing into Zendesk without the headaches.
Whether you're setting up a new support address like support@yourcompany.com or migrating an existing inbox, you'll learn which integration method fits your situation and how to configure it properly. Once your email is connected, you might also want to explore how AI can automate your Zendesk responses.
What you'll need before starting
Before you start the setup, make sure you have the following in place:
- A Zendesk Support account on Team, Professional, or Enterprise plan (all plans support multiple support addresses)
- Admin access to your Zendesk Admin Center
- Google Workspace admin access if you're configuring organization-wide forwarding
- Access to your DNS settings if you plan to add SPF records for email authentication
- A clear idea of which email addresses you want to integrate (support@, help@, billing@, etc.)
The key decision you'll make is which integration method to use. Each approach serves different needs, and choosing the wrong one can create headaches down the line.
Integration method 1: Direct email forwarding
Direct forwarding is the most common approach for connecting a Google Workspace email address to Zendesk. It works well for single support addresses and gives you full control over the forwarding rules. According to Zendesk's email documentation, this method is fully supported across all plan levels.

When to use this method
This approach is ideal when you've got a dedicated support email address (like support@company.com) that you want to forward directly into Zendesk. It's the simplest setup and works reliably once configured correctly.
Step 1: Get your Zendesk forwarding address
First, you need to identify or create the Zendesk support address where emails will be forwarded.
- In your Zendesk Admin Center, click Channels in the sidebar, then select Talk and email > Email
- Click Manage support addresses
- You'll see your default support address (support@yoursubdomain.zendesk.com)
- If you want to create additional addresses, click Add address and select Create new Zendesk address
You can create up to 3,000 support addresses per account, which is more than enough for most teams.
Step 2: Configure Gmail forwarding
Now set up the forwarding rule in your Google Workspace account:
- Sign in to the Gmail account you want to forward from
- Click the gear icon and select See all settings
- Go to the Forwarding and POP/IMAP tab
- Click Add a forwarding address
- Enter your Zendesk support address (the one from Step 1)
- Gmail will send a verification email to that address
Here is the important part: that verification email will create a ticket in Zendesk. Open that ticket and click the verification link to confirm you own the forwarding address.
Step 3: Add the external address in Zendesk
Back in Zendesk, you need to register this external address:
- In Admin Center, go to Channels > Talk and email > Email
- Click Manage support addresses
- Click Add address, then select Connect external address
- Select Email forwarding, then click Next
- Enter your Google Workspace email address (the one you're forwarding from)
- Click Save

Step 4: Verify the connection
Zendesk will send a test email to verify the forwarding is working:
- Click the options menu next to your new support address
- Select Verify forwarding
- If successful, you'll see a confirmation message
- If it fails, check that forwarding is properly enabled in Gmail and that you clicked the verification link
SPF and DKIM authentication
To ensure your outgoing emails do not end up in spam folders, add Zendesk's SPF record to your DNS settings. This tells email providers that Zendesk is authorized to send email on behalf of your domain. See Zendesk's guide on email authentication for complete details.
Add this TXT record to your DNS:
v=spf1 include:mail.zendesk.com ~all
If you already have an SPF record, simply add include:mail.zendesk.com before the final mechanism.
Integration method 2: Using Google Groups
Google Groups offers an alternative approach that works well for distribution lists or when multiple people need access to incoming emails before they reach Zendesk.
When to use this method
Consider Google Groups when:
- You have a distribution list (like team@company.com) that needs to feed into Zendesk
- Multiple people need to monitor incoming support requests
- You want to preserve a copy of all emails in a Google Group archive
Important caveat: Zendesk explicitly states they do not officially support or guarantee this method. Use it at your own risk.
How to configure Google Groups for Zendesk
- Go to the Google Workspace Admin Console
- Navigate to Groups and select the group you want to use
- Remove all existing members from the group (this is required)
- Add your Zendesk support address as the only member
- Go to Group Settings > Email options and uncheck Email footer
- In Basic Permissions, set POST to Public
The reason you must remove all other members is that Zendesk needs to be the sole recipient to properly process tickets. If other users remain in the group, it can cause threading and routing issues.
Integration method 3: Google Workspace SSO
While the previous methods handle incoming email, SSO handles agent authentication. If your team uses Google Workspace, setting up SAML SSO lets agents sign into Zendesk with their existing company credentials.
When to use this method
SSO integration makes sense when:
- Security policies require centralized authentication
- You want to simplify login for agents (one less password to remember)
- You need to enforce multi-factor authentication through Google Workspace
Setting up SAML SSO
The setup happens in two places: Google Workspace Admin Console and Zendesk Security settings.
In Google Workspace:
- Go to Apps > Web and mobile apps in the Admin Console
- Click Add app > Search for apps
- Enter "Zendesk" and select it from the results
- Copy the SSO URL and SHA-256 fingerprint (you'll need these for Zendesk)
- In the Attribute mapping section, map Google Primary Email to Zendesk Email
In Zendesk:
- Go to Admin Center > Account > Security > Single sign-on
- Click SAML
- Paste the SSO URL and SHA-256 fingerprint from Google
- Save your changes
Once configured, agents can sign into Zendesk using their Google Workspace credentials. You can also enable automatic user provisioning so new hires get Zendesk access automatically when added to your Google Workspace organization. For more on streamlining agent workflows, see our guide to AI agent assist tools.
Comparing the three methods
Each integration method serves different purposes. Here is how they stack up:
| Feature | Email Forwarding | Google Groups | SSO |
|---|---|---|---|
| Best for | Single support addresses | Distribution lists | Agent authentication |
| Setup complexity | Low | Medium | High |
| Zendesk support | Full | None (use at own risk) | Full |
| Maintenance | Minimal | Medium | Ongoing |
| Cost | Free | Free | Included with Zendesk plan |
For most teams, direct email forwarding is the right choice. It's simple, fully supported by Zendesk, and handles the core use case of getting customer emails into tickets.
Google Groups is worth considering only if you have a specific need for distribution list functionality. Just remember that if something breaks, you're on your own for troubleshooting.
SSO is a separate concern from email routing. You can (and often should) use SSO for agent authentication while using direct forwarding for incoming customer emails. For teams looking to go further, our AI customer service solution works seamlessly with Zendesk once your email is connected.
Troubleshooting common issues
Even with clear instructions, email forwarding can be finicky. Here are the most common problems and how to fix them.
Verification emails never arrive
If Zendesk cannot verify your forwarding address, check these items:
- Forwarding not enabled: Make sure you actually turned on forwarding in Gmail after verifying the forwarding address
- Wrong forwarding address: Double-check that you entered the correct Zendesk support address
- Spam filters: The verification email might be caught in spam filters
- Group membership: If using Google Groups, ensure Zendesk is the only member
"Forwarding status: failed" error
This usually means Zendesk cannot reach your mail server. Common causes:
- Your email server is blocking Zendesk's verification attempts
- Corporate security policies are preventing automatic forwarding
- You need to whitelist Zendesk's IP addresses
Contact your IT team if you suspect server-level blocking.
Emails going to spam
If customers report that Zendesk replies are landing in their spam folders, you likely need to configure SPF authentication. Add the SPF record mentioned in Method 1, Step 4 to your DNS settings.
For DKIM, you may need to add CNAME records pointing to Zendesk's servers. These records prove to email providers that Zendesk is authorized to send email on your domain's behalf. Refer to Google's support documentation for help with DNS configuration in Google Workspace.
Ticket threading problems
When replies create new tickets instead of threading to existing ones, the issue is usually:
- The email subject line was modified
- The References or In-Reply-To headers were stripped
- A different email address is being used for replies
Ensure that your forwarding preserves email headers and that you're replying from the same address that received the original email.
Taking your Zendesk email support further
Once your email integration is working smoothly, you might notice patterns in the tickets coming in. Many are repetitive: password resets, order status checks, refund requests. This is where AI can help.
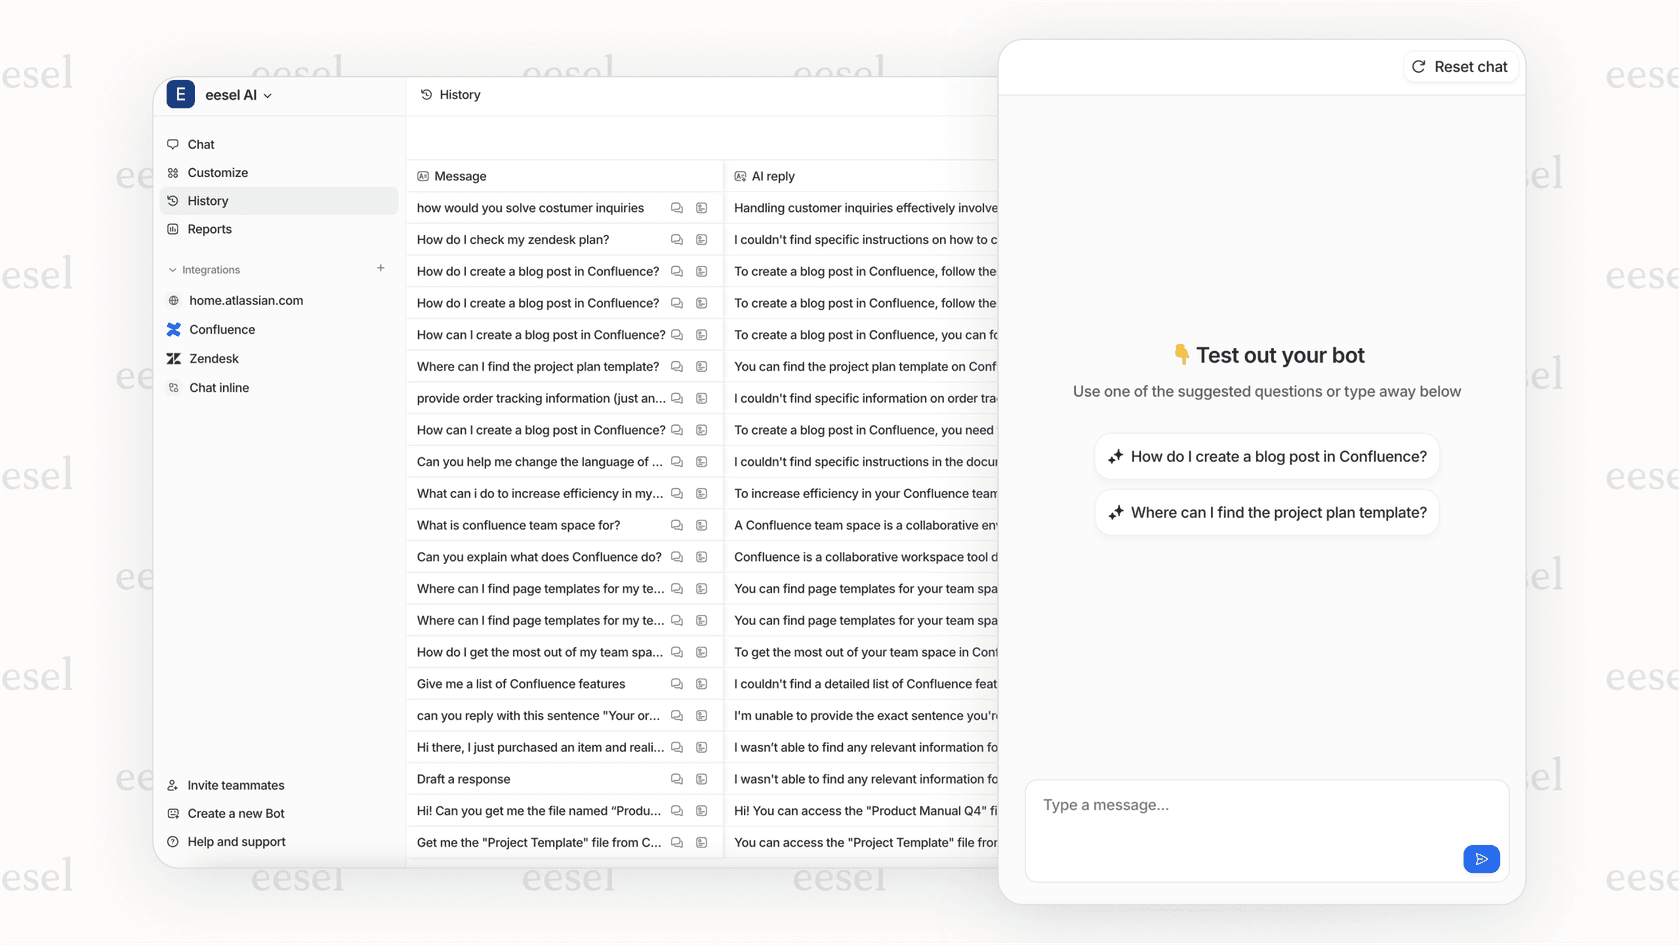
eesel AI's Zendesk integration connects directly with Zendesk to handle these routine inquiries automatically. Unlike basic auto-responders, our AI learns from your past tickets and help center articles to provide accurate, contextual responses.
The setup is straightforward. You connect eesel AI to your Zendesk account, and it immediately starts learning your tone, policies, and common issues. You can run simulations on past tickets to see how it would respond before turning it on for real customers.
Most teams start with our AI Copilot drafting replies for agent review, then expand to full automation with our AI Agent as confidence grows. For teams dealing with high email volumes, this can mean the difference between a backlog that grows all day and one that stays manageable.
Our pricing starts at $239 per month (billed annually) for the Team plan, which includes up to 3 bots and 1,000 AI interactions per month. The Business plan at $639 per month adds AI Agent capabilities, training on past tickets, and up to 3,000 interactions.