Zendesk email not received: A complete troubleshooting guide
Stevia Putri
Last edited March 4, 2026
There's nothing quite like the sinking feeling when a customer says, "I never got your email." You've responded to their support ticket, but your message vanished somewhere in the digital void. No bounce-back notification. No spam folder delivery. Just silence.
When Zendesk emails stop reaching customers, your entire support operation grinds to a halt. Customers think you're ignoring them. Your team wastes time sending follow-ups that also disappear. And your metrics start looking like you've stopped working entirely.
The good news? Most Zendesk email delivery issues stem from a handful of common causes. This guide walks through each one, from the quickest checks to the deeper technical fixes. Let's get your customer communication flowing again.
What you'll need
Before diving into troubleshooting, make sure you've got:
- Admin access to your Zendesk account many fixes require admin-level permissions
- Access to your domain's DNS settings or contact information for whoever manages your domain
- Understanding of your email setup whether you're using a custom domain or a Zendesk subdomain (like
yourcompany.zendesk.com) - Optional: A tool like MxToolbox for checking SPF records
Step 1: Check email delivery status in Zendesk
The first place to look is right inside Zendesk. The platform now shows delivery failure warnings directly in the Agent Workspace, which saves you from guessing whether emails actually went out.
Here's how to check:
- Open the affected ticket in Zendesk
- Look below the ticket comments in the conversation log
- Check for warning icons next to recipient names
- Click any warning icon to see the specific error message and code

If you see error codes like 550 (mailbox unavailable) or 552 (message too large), these are SMTP codes that tell you exactly what went wrong. You can look up these codes online or check Zendesk's developer documentation for specific explanations.
For a deeper view, add /events to the end of any ticket URL. This shows you the complete history of email notifications, including which triggers fired and whether they succeeded or failed.
Zendesk also adds a system_email_notification_failure tag to tickets with delivery problems. You can create a view that filters for this tag to see all affected tickets at once.
Step 2: Verify your SPF record configuration
If your customers aren't receiving emails and you use a custom domain (like support@yourcompany.com), the culprit is often a missing or incorrect SPF record.
SPF stands for Sender Policy Framework. It's a DNS record that tells email providers which servers are allowed to send email on behalf of your domain. Without it, Gmail, Outlook, and corporate email systems may reject or spam-filter your Zendesk messages.
Here's how to check your SPF setup:
- Use a tool like MxToolbox SPF lookup and enter your domain
- Look for
include:mail.zendesk.comin the results - If it's missing, you need to add it
The exact TXT record you need to add to your DNS depends on your current setup, but it typically looks like this:
v=spf1 include:mail.zendesk.com ~all

Important: You can only have one SPF record per domain. If you already have an SPF record, you need to edit it to add the Zendesk include, not create a new record. Multiple SPF records will cause validation failures.
After making DNS changes, wait up to 48 hours for propagation. You can verify the change using MxToolbox again.
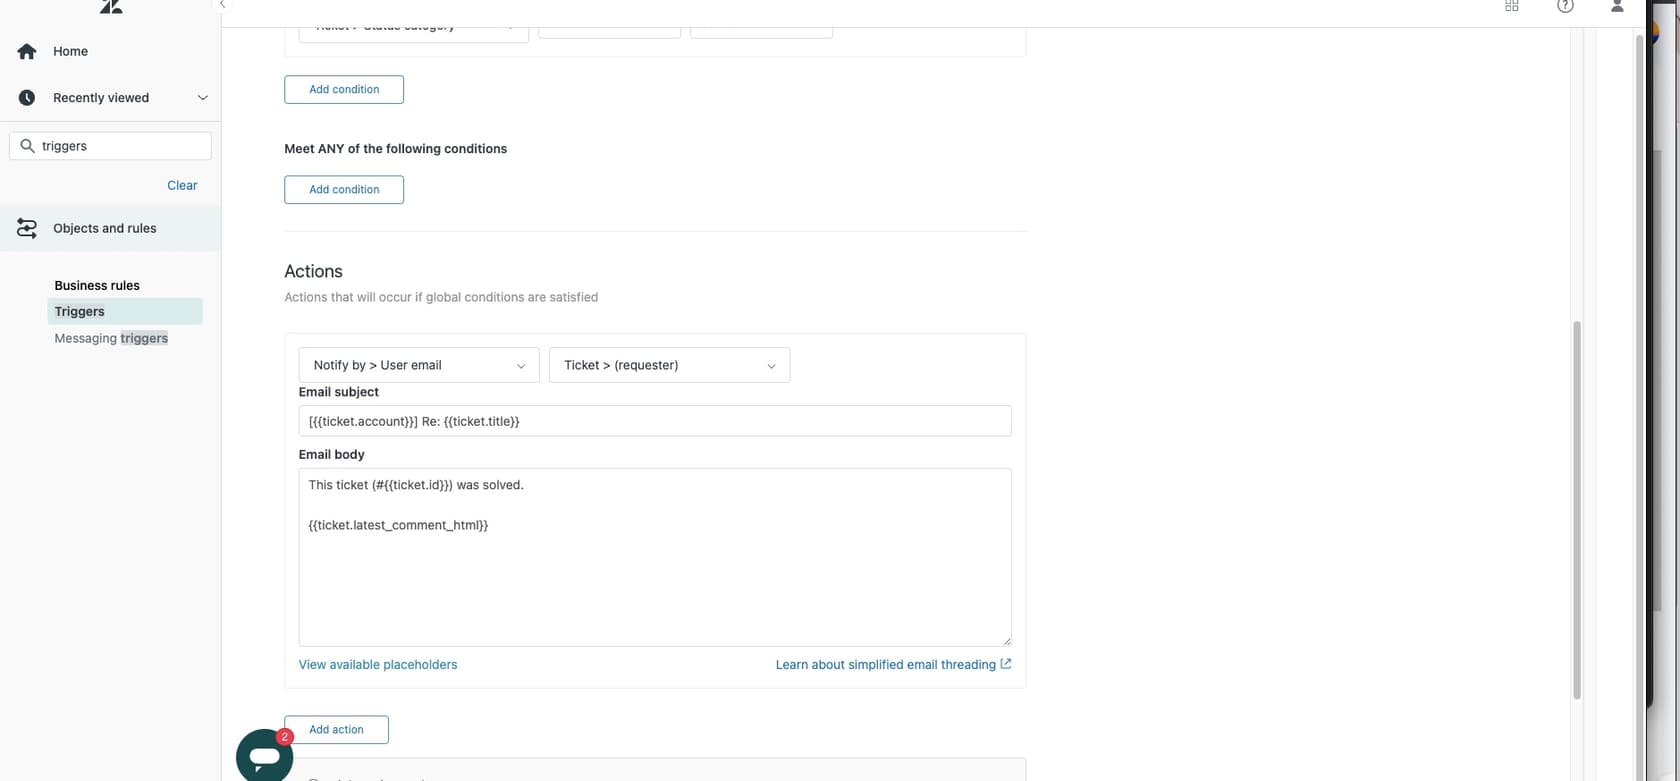
Step 3: Check your trigger settings
Zendesk sends emails through triggers automated rules that fire when specific conditions are met. If these triggers get deactivated or misconfigured, emails stop going out.
The most commonly affected triggers are:
- Notify requester and CCs of comment update sends replies to customers
- Notify requester of received request confirms ticket creation
Here's how to verify your triggers:
- Go to Admin Center > Objects and rules > Triggers
- Use the Filter button to search for triggers with "Notify requester" in the title
- Make sure they show as Active (not Deactivated)
- If you see deactivated triggers, select them and click Activate
Watch out for conflicting conditions. One common mistake is putting both "Ticket is created" and "Ticket is updated" in the ALL conditions section of the same trigger. Since a ticket can't be both created and updated in the same event, this trigger will never fire. Move one condition to the ANY section, or split them into separate triggers.
To confirm a trigger is actually firing, check the ticket events log (add /events to the ticket URL). You should see trigger activity listed under each comment.
Step 4: Investigate suspended tickets and spam filtering
Sometimes emails do reach Zendesk but get flagged as suspicious and sent to the Suspended tickets queue. This happens when Zendesk's spam filters detect something odd about the incoming message.
To check for suspended tickets:
- Go to your Zendesk admin panel
- Navigate to Tickets > Suspended tickets
- Look for legitimate customer emails that were caught by the filter
- Select genuine emails and click Recover
Recovering a ticket trains the spam filter that similar emails are legitimate. You may need to recover several before the system learns your typical email patterns.
On the outbound side, ask affected customers to:
- Check their spam or junk folders
- Search their inbox for emails from your support address
- Whitelist your Zendesk email domain in their email client
Corporate email systems often have aggressive filtering that blocks third-party email services like Zendesk. If a customer's IT department manages their email, they may need to explicitly allow your sending domain.
Step 5: Verify email forwarding setup
If you're using a custom email address (like support@yourcompany.com) that forwards to Zendesk, forwarding issues can prevent tickets from being created.
Check your forwarding status:
- Go to Admin Center > Channels > Email
- Look at the email addresses listed
- Check for any forwarding error messages
Common forwarding errors include:
- SPF failures the forwarding domain doesn't authorize Zendesk
- Authentication issues forwarding credentials expired or changed
- DNS problems MX records pointing to the wrong destination
Zendesk provides a detailed guide for fixing forwarding errors if you see specific error codes.
Test your forwarding by sending a simple email to your support address from a personal account. If it doesn't create a ticket within a few minutes, there's likely a forwarding problem.
Common mistakes to avoid
After helping hundreds of teams troubleshoot email issues, we've seen the same mistakes repeatedly:
-
Deactivating default triggers without replacements those default triggers exist for a reason. If you deactivate them, create new ones with the same functionality before your customers notice.
-
Creating multiple SPF records you can only have one SPF TXT record per domain. Adding a second record breaks both of them. Always edit the existing record.
-
Not waiting for DNS propagation DNS changes don't happen instantly. Give it 24-48 hours before assuming your SPF fix didn't work.
-
Overlooking suspended tickets check this view regularly, especially after making changes to your email setup. Legitimate emails can end up there after configuration changes.
-
Missing typos in user profiles if one specific customer isn't receiving emails, check their profile for typos in their email address. It happens more often than you'd think.
When to contact Zendesk support
You've checked the delivery status, verified your SPF record, confirmed triggers are active, reviewed suspended tickets, and tested forwarding. If emails still aren't going through, it's time to escalate.
Contact Zendesk support when:
- The issue affects multiple customers simultaneously
- You've completed all troubleshooting steps without resolution
- You suspect a platform-wide issue (check the Zendesk status page first)
- Your configuration involves complex custom setups that go beyond standard troubleshooting
Before contacting support, gather ticket IDs, error codes, and a timeline of when the issue started. This'll help them investigate faster.
Preventing future email delivery issues
Once you've fixed the immediate problem, put safeguards in place to catch issues early:
- Audit your SPF record quarterly especially if your IT team makes DNS changes
- Monitor the
system_email_notification_failuretag create a view or automation to alert you when this tag appears - Document your trigger configuration note which triggers are active and what they do
- Set up a test ticket schedule send test emails monthly to verify delivery
- Consider backup communication channels when email fails, having alternatives keeps you connected to customers
Getting reliable customer communication with eesel AI
Email is critical until it stops working. When Zendesk emails aren't being received, you need a backup plan that keeps customer conversations flowing.
eesel AI's Zendesk integration provides an AI-powered chatbot that works alongside your email support. When email delivery fails, customers can still get instant answers through your website chat widget.

Our AI chatbot learns from your existing help center articles, past tickets, and documentation so it answers questions using your knowledge, not generic responses. It handles common questions instantly, escalates complex issues to your team, and creates Zendesk tickets for follow-up when needed.
The best part? It works even when your email doesn't. Customers get immediate assistance, and your support metrics stay healthy regardless of email delivery hiccups.
If email deliverability headaches are wearing you down, try eesel AI as a reliable backup channel. Your customers will appreciate the instant responses, and you'll rest easier knowing support keeps working even when email doesn't.
