If you're building integrations with Zendesk, chances are you'll need to create tickets programmatically. Whether you're connecting a custom web form, syncing data from another system, or automating support workflows, the Zendesk Tickets API is the standard way to get data into Zendesk.
This guide walks you through everything you need to know about creating tickets via the API, from authentication to advanced JSON payloads.
What you'll need to get started
Before you start making API calls, make sure you've got these basics covered:
- A Zendesk Support account with admin or agent access. If you don't have one, you can get a free trial account for development
- API token access enabled in your Admin Center under Apps and integrations > APIs > API tokens
- Basic familiarity with HTTP requests and JSON data structures
- A tool to make API calls: cURL, Python with the requests library, or a JavaScript environment
If you're new to working with REST APIs, the Zendesk documentation has a helpful quick start guide that uses your browser's JavaScript console to test requests without any setup.
Understanding the Zendesk Tickets API endpoint
The Zendesk API create ticket JSON endpoint follows a consistent pattern across all Zendesk instances:
POST https://{subdomain}.zendesk.com/api/v2/tickets.json
Here's what you need to know about the endpoint:
- HTTP method: POST for creating new tickets
- Content-Type header: Must be set to
application/json - Authentication: Basic authentication using your email and API token
- Rate limits: 700 requests per minute for most endpoints
The API returns a 201 Created status on success, along with the full ticket object including the newly assigned ticket ID. If something goes wrong, you'll get a 4xx or 5xx status with an error message explaining the issue.
Setting up API authentication
Authentication is where most developers hit their first snag. Zendesk uses basic authentication with a twist: instead of your password, you use an API token.
Generating an API token
- Sign in to Zendesk as an admin
- Go to Admin Center > Apps and integrations > APIs > API tokens
- Click the plus icon to add a token
- Give it a descriptive name (like "Ticket Creation Script")
- Copy the token immediately (you won't see it again)
Authentication format
The credentials follow this format:
Username: {your_email}/token
Password: {your_api_token}
For example, if your email is admin@company.com and your token is abc123xyz, you'd use:
Username: admin@company.com/token
Password: abc123xyz
Security best practices
Never hardcode your API credentials in your scripts. Instead, use environment variables:
import os

ZENDESK_SUBDOMAIN = os.getenv('ZENDESK_SUBDOMAIN')
ZENDESK_API_TOKEN = os.getenv('ZENDESK_API_TOKEN')
ZENDESK_USER_EMAIL = os.getenv('ZENDESK_USER_EMAIL')
This keeps your credentials out of version control and makes your code more portable across environments.
Basic ticket creation JSON structure
At minimum, a Zendesk ticket needs two things: a subject and a comment. Here's the simplest valid JSON payload:
{
  "ticket": {
    "subject": "My printer is on fire!",
    "comment": {
      "body": "The smoke is very colorful."
    }
  }
}
The ticket object wraps everything. Inside, you set:
- subject: The ticket title (required)
- comment: An object containing at least a
body(required)
By default, comments are public. If you want to create an internal note instead, add "public": false to the comment object.
Response format
When your request succeeds, the API returns the created ticket:
{
  "ticket": {
    "id": 35436,
    "url": "https://company.zendesk.com/api/v2/tickets/35436.json",
    "subject": "My printer is on fire!",
    "status": "open",
    "created_at": "2026-03-01T22:55:29Z",
    ...
  }
}
The id field is what you'll use to reference this ticket in future API calls.
Code examples for creating tickets
Let's look at working examples in three common languages.
cURL example
curl https://yourcompany.zendesk.com/api/v2/tickets.json \
  -d '{"ticket": {"subject": "Test ticket", "comment": {"body": "This is a test"}}}' \
  -H "Content-Type: application/json" \
  -v -u your@email.com/token:your_api_token \
  -X POST
The -v flag shows verbose output, which helps with debugging. Remove it in production.
Python example
import requests
import os
import json

subdomain = os.getenv('ZENDESK_SUBDOMAIN')
email = os.getenv('ZENDESK_USER_EMAIL')
token = os.getenv('ZENDESK_API_TOKEN')

url = f'https://{subdomain}.zendesk.com/api/v2/tickets.json'
auth = (f'{email}/token', token)
headers = {'Content-Type': 'application/json'}

data = {
    'ticket': {
        'subject': 'Printer issue',
        'comment': {
            'body': 'The printer is not responding.',
            'public': True
        }
    }
}

response = requests.post(url, json=data, auth=auth, headers=headers)

if response.status_code == 201:
    ticket = response.json()['ticket']
    print(f"Created ticket #{ticket['id']}")
else:
    print(f"Error: {response.status_code}")
    print(response.text)
Notice that requests.post() with the json= parameter automatically serializes the dictionary to JSON and sets the Content-Type header.
JavaScript example
If you're working in a browser with Zendesk already loaded, you can use jQuery:
const ticket = {
  ticket: {
    subject: 'Help with login',
    comment: {
      body: 'I cannot access my account.'
    }
  }
};

$.ajax({
  url: '/api/v2/tickets.json',
  type: 'POST',
  contentType: 'application/json',
  data: JSON.stringify(ticket)
}).done(data => {
  console.log('Created ticket:', data.ticket.id);
}).fail(err => {
  console.error('Error:', err);
});
For Node.js, use the native fetch API or a library like axios:
const response = await fetch('https://company.zendesk.com/api/v2/tickets.json', {
  method: 'POST',
  headers: {
    'Content-Type': 'application/json',
    'Authorization': 'Basic ' + Buffer.from(`${email}/token:${token}`).toString('base64')
  },
  body: JSON.stringify(ticket)
});

const data = await response.json();
Advanced ticket properties
Once you've mastered the basics, you can set additional properties to create more complete tickets.
Custom fields
If your Zendesk instance has custom ticket fields, set them using their field IDs:
{
  "ticket": {
    "subject": "Order inquiry",
    "comment": {"body": "Question about recent order"},
    "custom_fields": [
      {"id": 25356371, "value": "ORD-12345"},
      {"id": 25356634, "value": "2026-03-01"}
    ]
  }
}
For dropdown fields, use the tag value (not the display text). For multi-select fields, pass an array of tag values.
Setting the requester
You can create a ticket on behalf of someone else:
{
  "ticket": {
    "subject": "Support request",
    "comment": {"body": "Need help with billing"},
    "requester": {
      "name": "John Smith",
      "email": "john@example.com",
      "locale_id": 8
    }
  }
}
If the email doesn't exist in Zendesk, a new user profile is created automatically.
Collaborators and followers
Add collaborators (users who receive updates) or followers (agents who track the ticket):
{
  "ticket": {
    "subject": "Team issue",
    "comment": {"body": "This affects multiple departments"},
    "collaborators": ["user1@example.com", "user2@example.com"],
    "followers": [
      {"user_email": "agent@company.com", "action": "put"}
    ]
  }
}
File attachments
To attach files, you first need to upload them separately to get an upload token, then include that token in your ticket creation:
{
  "ticket": {
    "subject": "Screenshot attached",
    "comment": {
      "body": "See attached error message",
      "uploads": ["vz7ll9ud8oofowy"]
    }
  }
}
Async creation
For tickets with complex business rules that might take time to process, use async creation:
POST /api/v2/tickets.json?async=true
This returns a 202 Accepted immediately with a job status you can poll to check completion.
Idempotency keys
To prevent duplicate tickets when retrying failed requests, include an idempotency key:
curl ... -H "Idempotency-Key: unique-request-id-123"
Keys expire after 2 hours. Reusing the same key with different parameters returns an error.
Common errors and troubleshooting
Here are the errors you're most likely to encounter and how to fix them.
422 Unprocessable Entity
This usually means your JSON is malformed. Common causes:
- Missing quotes around property names or string values
- Trailing commas in JSON objects
- Using single quotes instead of double quotes
- Invalid escape sequences in strings
If you're building JSON strings manually (especially in VBA or older languages), watch out for extra quote characters. The JSON should look like this:
{"ticket": {"subject": "Test", "comment": {"body": "Hello"}}}
Not like this:
"{"ticket": {"subject": "Test"}}"
401 Unauthorized
Your authentication credentials are incorrect. Check:
- Is the email address correct?
- Did you include
/tokenafter the email? - Is the API token valid and not expired?
- Does the user have permission to create tickets?
429 Rate Limit Exceeded
You've hit the API rate limit. Zendesk allows 700 requests per minute for most endpoints. If you need to create many tickets, add delays between requests or use the bulk ticket creation endpoint.
400 Bad Request with field errors
This happens when ticket field values are invalid:
- Custom field IDs don't exist
- Dropdown values don't match available options
- Required fields are missing
- Date formats are incorrect (use ISO 8601:
2026-03-01)
Automating ticket creation without code
Building and maintaining API integrations takes time. You need to handle authentication, error retry logic, rate limiting, and ongoing maintenance as APIs change.
If your goal is to automate ticket creation rather than build a custom integration, consider whether you actually need to write code. Tools like eesel's AI agent for Zendesk can handle ticket creation and responses without any development work.
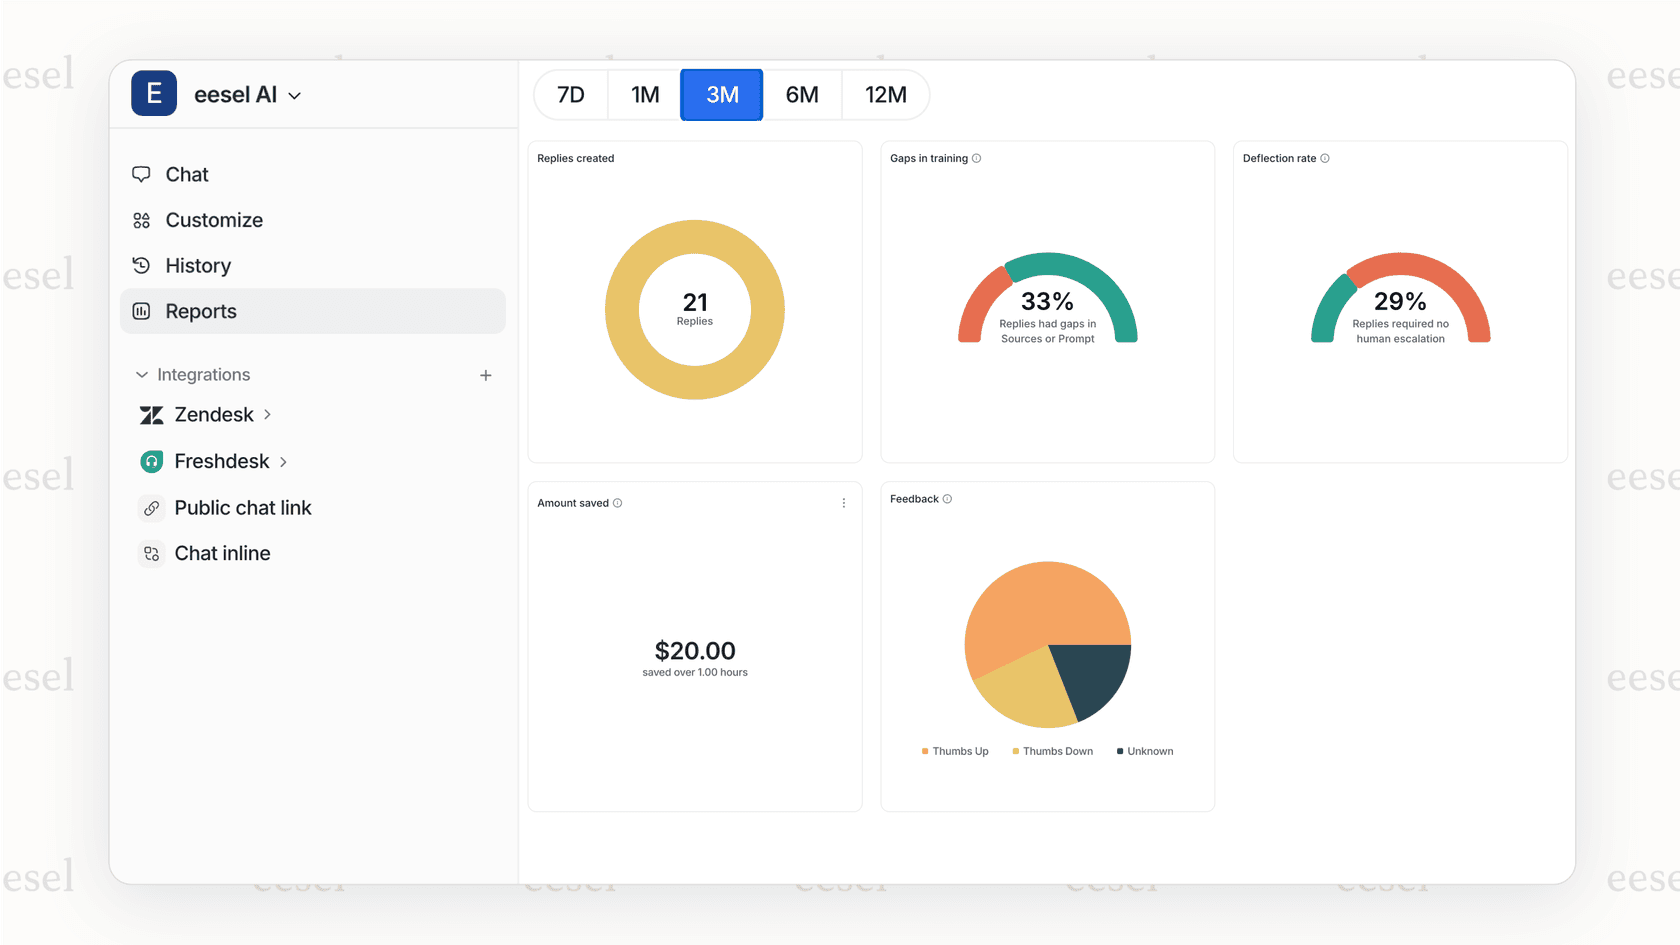
Here's the difference: with the API approach, you're writing scripts to create tickets that humans will respond to. With an AI agent, you're training a system to understand your business and handle the entire ticket lifecycle, from creation through resolution. You connect it to your Zendesk account, and it learns from your past tickets, help center articles, and macros.
The progressive rollout model means you start with the AI drafting responses for review, then expand to full automation as it proves itself. For teams looking to reduce ticket volume rather than just automate creation, this often delivers faster results than custom API development.