How to set up Zendesk two-factor authentication: Complete 2026 guide
Stevia Putri
Last edited March 4, 2026
Customer support platforms handle sensitive data every day. From payment details to personal information, your Zendesk account contains valuable information that needs protection. Two-factor authentication helps secure that data.
Two-factor authentication (2FA) adds an extra layer of security by requiring something you know (your password) plus something you have (your phone or email). Even if someone steals your password, they can't access your account without that second factor.
Zendesk offers robust 2FA options for both team members and end users. Whether you're an agent looking to secure your own account or an admin enforcing organization-wide security policies, this guide walks you through everything you need to know.
Here's what you'll need to get started:
- A Zendesk account with agent, admin, or end user access
- A mobile device for authenticator app setup
- One of these supported authenticator apps: Google Authenticator, Microsoft Authenticator, Authy, or Duo Mobile
- Optional: A phone number for SMS-based authentication
- Optional: A backup email address
If you're looking for ways to enhance your Zendesk security beyond 2FA, check out our guide on Zendesk AI capabilities and how they integrate with your existing workflows.
Understanding Zendesk's security options
Before diving into setup, let's clarify something that confuses many Zendesk users: the difference between two-step verification and two-factor authentication.

Two-step verification (2SV) vs. two-factor authentication (2FA)
Two-step verification is Zendesk's built-in security feature that activates automatically for team members signing in from new devices. When you log in from an unrecognized computer, Zendesk emails a passcode to your primary email address. This code expires after five minutes and can only be used once. Learn more about two-step verification in Zendesk's documentation.
Two-factor authentication, on the other hand, is an optional (or enforced) additional security layer that you or your admin can enable. It offers multiple methods for receiving passcodes and applies every time you sign in, not just from new devices.
Here's the key distinction: if you have 2FA enabled or sign in via single sign-on (SSO), you won't see the 2SV prompt. The stronger authentication method takes precedence.
Available 2FA methods
Zendesk supports three ways to receive your second-factor passcode:
Authenticator apps (recommended) - These generate time-based one-time passwords (TOTP) that refresh every 30 seconds. They work offline and are considered the most secure option. Popular choices include Google Authenticator, Microsoft Authenticator, Authy, and Duo Mobile.
Email passcodes - Zendesk sends a code to your specified email address. These codes expire after 60 seconds, so you'll need to act quickly.
SMS/text messages - Available for agents and admins (but not end users), this method sends codes to your phone number. Note that some countries, including India, have restrictions on transactional SMS messages. The phone number must be in E.164 format.
How to enable two-factor authentication for agents and admins
Setting up 2FA for your own account takes just a few minutes. Follow these steps to secure your Zendesk access. For detailed instructions, see the official Zendesk 2FA guide.
Step 1: Access your security settings
Start by clicking your user icon in the upper right corner of the Zendesk Support interface. Select "View profile" from the dropdown menu, then click the "Security settings" tab. You'll see the Two-factor Authentication section in the middle of the page.
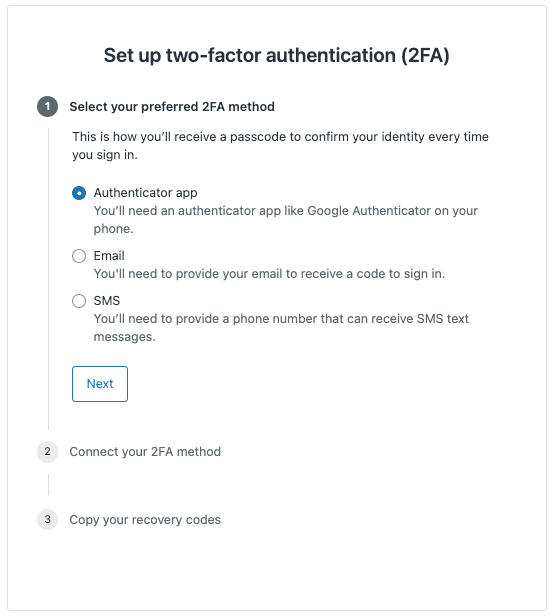
Step 2: Start 2FA setup
Click "Manage" in the Two-factor Authentication section, then select "Set up 2FA." You'll see a dialog asking how you'd like to receive passcodes. We recommend choosing "Authenticator app" for the best security and convenience.
Step 3: Configure your authenticator app
Open your authenticator app on your mobile device and select the option to add a new account. Point your camera at the QR code displayed in the Zendesk dialog. The app should automatically scan it and begin generating 6-digit passcodes.
If scanning fails, you can manually enter the secret key provided below the QR code. Once the app shows a code, enter it in the Zendesk dialog and click "Save."
Critical: Click "Copy recovery codes" and store them somewhere secure. These one-time-use codes are your lifeline if you lose access to your device. Save them in a password manager or print them and store them in a safe place.
Step 4: Complete setup and test
After saving your recovery codes, your 2FA setup is complete. Sign out of Zendesk and sign back in to test the process. You should be prompted for a passcode after entering your email and password. Open your authenticator app, enter the current code, and you'll be logged in.
How to require 2FA for your entire team
As an admin, you can mandate 2FA for all team members, end users, or both. This ensures consistent security across your organization. See Zendesk's admin guide for more details on managing 2FA requirements.
Enforcing 2FA organization-wide
Navigate to the Admin Center and click "Account" in the left sidebar. Select "Security > Advanced," then click the "Authentication" tab. You'll see checkboxes for:
- Require two-factor authentication (2FA) for team members
- Require two-factor authentication (2FA) for end users
Select the options that apply to your organization, then click "Save." Once enabled, users will be prompted to set up 2FA the next time they sign in.
Important considerations before enforcing 2FA:
- The Zendesk REST API doesn't support 2FA. If you require 2FA, password-based API authentication will be disabled. Move to API tokens or OAuth instead.
- API calls using tokens are unaffected by 2FA requirements.
- Password access to the API is being phased out in January 2026, so migrating to tokens is recommended regardless.
Monitoring 2FA compliance
Zendesk lets you generate 2FA status reports to track adoption. In the Admin Center, go to Account > Security > Advanced > Authentication and click "Generate 2FA status report." You'll receive a CSV spreadsheet via email listing all admins and agents and whether they've enabled 2FA.
Run these reports periodically, especially after first enabling the requirement, to identify users who need follow-up.
Setting up 2FA for end users
End users access Zendesk through the Help Center, which has a different interface from the agent workspace. The setup process is similar but with a few key differences. Refer to Zendesk's Help Center 2FA documentation for end user-specific instructions.
End user setup process
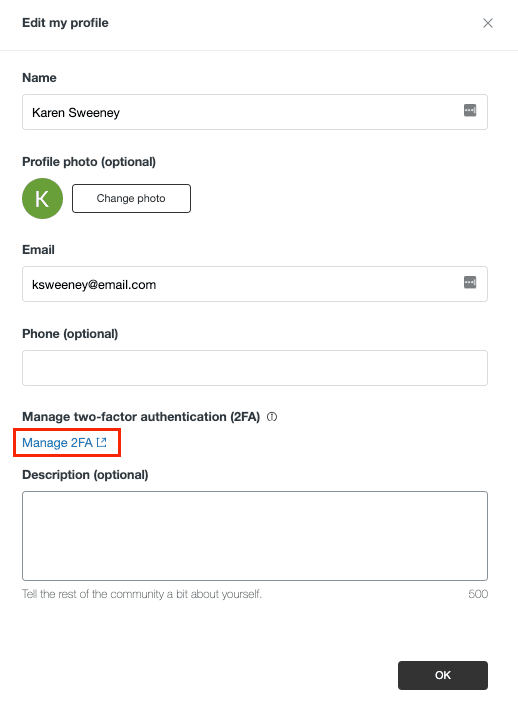
End users should click their profile icon on any Help Center page, then select "Profile" and "Edit profile." From there, they can click "Manage 2FA" and "Set up 2FA" to begin.
Key differences from agent setup:
- End users access 2FA settings through the Help Center profile, not the agent interface
- SMS authentication is not available for end users (only authenticator apps and email)
- If an end user loses all recovery codes and 2FA is required, they must create a new account to regain access
The actual setup process mirrors the agent workflow: choose a method, scan the QR code or configure email, verify with a passcode, and save recovery codes.
Troubleshooting common Zendesk two-factor authentication issues
Even with clear setup instructions, things sometimes go wrong. Here are solutions to the most common 2FA problems.
"Zendesk two-factor authentication not working"
If your passcodes aren't being accepted, try these fixes:
- Check your authenticator app's time sync. TOTP codes depend on accurate time. In Google Authenticator, go to Settings > Time correction for codes. For other apps, ensure your phone's system time is set automatically.
- Verify you're using the correct account. If you have multiple Zendesk accounts or organizations, make sure you're entering the code from the right one.
- Try regenerating the QR code. Turn off 2FA in your security settings, then set it up again with a fresh QR code.
Locked out of your account
If you can't access your device or authenticator app, use one of your recovery codes. At the passcode prompt, enter a recovery code instead. Remember: each recovery code works only once.
If you've used all your recovery codes or lost them, contact your Zendesk admin or account owner. They can generate a recovery code for you. If you need to contact Zendesk Support directly, an account owner must give permission before they can assist. Read more about account recovery options.
SMS delivery issues
When SMS codes don't arrive:
- Verify E.164 phone number format. This means including the country code (e.g., +1 for US numbers). The format should be +[country code][number] with no spaces or dashes.
- Check country restrictions. India and some other countries have limitations on transactional SMS. If you're in a restricted region, switch to email or authenticator app methods.
- Use email as a backup. If SMS consistently fails, set up email-based 2FA as an alternative.
Passcode errors
Understanding code timing prevents frustration:
- Email and SMS passcodes expire after 60 seconds
- Authenticator app codes refresh every 30 seconds
- Enter the code before it expires or refresh for a new one
If you enter an expired code, Zendesk will typically send a new one automatically for email/SMS methods.
Best practices for Zendesk 2FA security
Beyond basic setup, these practices maximize your security:
- Use authenticator apps over SMS when possible. SMS is vulnerable to SIM swapping attacks. Authenticator apps are more secure and work without cell service.
- Store recovery codes in a password manager. Don't save them on the same device where your authenticator app lives. A cloud-based password manager or physical backup is ideal.
- Enable 2FA for all user types. Don't just protect agents; end users often have access to sensitive ticket data too.
- Review 2FA compliance reports regularly. Identify users who haven't enabled 2FA and follow up promptly.
- Combine 2FA with other security measures. IP restrictions, session timeouts, and SSO add additional layers of protection.
- Consider SSO for enterprise environments. Single sign-on centralizes authentication and can enforce your organization's existing security policies. Learn more about Zendesk SSO options.
Securing your customer support with eesel AI
Two-factor authentication is just one piece of a secure customer support strategy. As you strengthen your Zendesk security, consider how AI tools can enhance your support operations without compromising safety.
At eesel AI, we approach security as a foundation, not an afterthought. Our AI teammate integrates with Zendesk and other help desks while maintaining strict data isolation. Your data serves only your bots and is never used to train models.
Our AI Agent handles frontline support tickets autonomously, but always within the security boundaries you set. Like any good teammate, it learns your business, starts with guidance, and levels up based on performance. You control when it drafts replies for review versus sending them directly.
The same security-conscious approach applies across our platform:
- Data isolation: Your data is encrypted in transit and at rest, isolated per customer
- Compliance: GDPR and CCPA programs supported with EU data residency available
- Access controls: Define escalation rules in plain English, not code
- Audit trails: Track what the AI does and why
When evaluating AI tools for your support stack, ask the same security questions you asked when setting up 2FA. Who can access the data? How is it stored? What happens if something goes wrong?
Strong authentication protects your accounts. Thoughtful AI implementation protects your customer relationships. Both need proper setup, but the payoff is a support operation that's both secure and scalable.
