Customer feedback is the compass that keeps your support team heading in the right direction. Without it, you're flying blind, guessing at what's working and what needs improvement. Zendesk's post-resolution surveys give you a direct line to your customers' thoughts, capturing their sentiment right after you've solved their problem.
Setting up these surveys correctly matters. Get it wrong, and you'll annoy customers with poorly timed emails or collect data that doesn't tell you anything useful. Get it right, and you'll have a steady stream of actionable insights that help you refine your support experience.
This guide walks you through everything you need to know about Zendesk post-resolution survey setup. We'll cover enabling the native CSAT feature, customizing when and how surveys are sent, and setting up smart rules that ensure you're collecting feedback from the right customers at the right time.

What you'll need to get started
Before diving into the setup, make sure you have the essentials in place. You'll need admin access to your Zendesk account since only administrators can configure CSAT settings. The native CSAT feature is available on all Zendesk Suite plans, though advanced customization features require Professional or Enterprise tiers.
It's also important to have a clear understanding of your support workflow. Know when tickets typically get resolved and reopened, and define your goals for what you want to measure. Are you tracking agent performance, product issues, or overall satisfaction? Having clarity on these points before you start will make the configuration process smoother.
Step 1: Enable the native CSAT survey
The first step is straightforward. Head to the Admin Center, click Objects and rules in the sidebar, then select Business rules > Customer satisfaction. You'll see a toggle to enable the CSAT survey feature. Flip it on and you're technically ready to go.
But let's look at what just happened behind the scenes. Zendesk created a system automation called "Request customer satisfaction rating (system automation)" that handles all the heavy lifting. This automation runs every hour and looks for tickets that have been in "Solved" status for more than 24 hours. When it finds them, it sends the survey email and marks the ticket's satisfaction status as "Offered" so the survey won't send twice.
The default 24-hour delay isn't arbitrary. It gives customers time to verify their issue is actually resolved before you ask for feedback. It also reduces the chance of surveys going out on tickets that get reopened shortly after being marked solved.
Step 2: Customize your survey timing and delivery
The default timing works for many teams, but you might want to adjust it based on your specific workflow. To modify when surveys are sent, you need to edit the system automation.
In the Admin Center, go to Objects and rules > Business rules > Automations and open the "Request customer satisfaction rating" automation. Look for the condition that says "Hours since solved" - this is where you can change the 24-hour delay. You might want to send sooner for simple issues that rarely get reopened, or wait longer if your tickets frequently reopen within the first day.
The automation also includes conditions you should understand:
- Ticket status is Solved - Not Closed. Closed tickets can't receive surveys because they're locked from further updates
- Satisfaction is Unoffered - Prevents duplicate surveys on the same ticket
- Ticket is not assigned to specific groups - You can exclude internal teams here
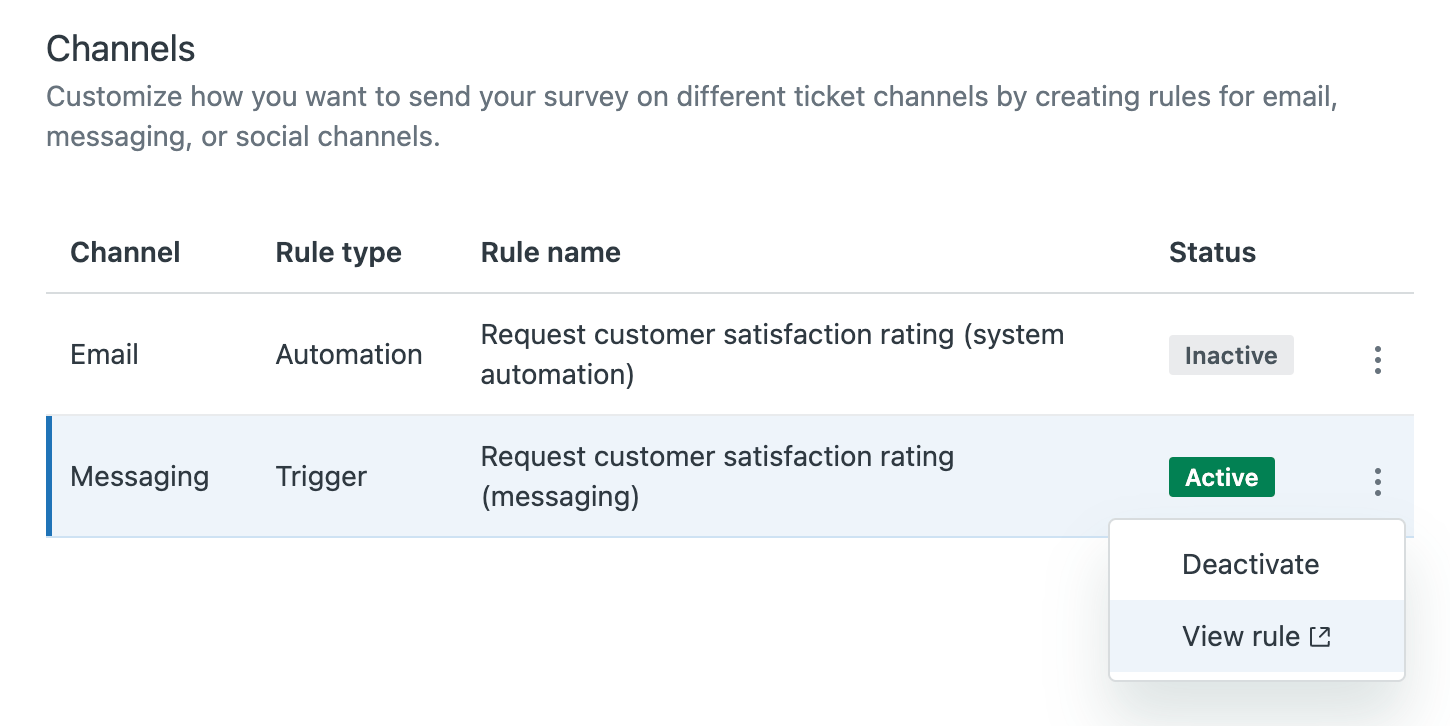
For messaging channels (web widget, mobile SDK, social), the survey works differently. Instead of an automation, a trigger presents the survey immediately when the ticket is set to solved. This happens in the chat interface itself, not via email.

Step 3: Configure survey content and questions
Now let's make the survey feel like yours. In the Customer satisfaction settings page, you can customize the email subject line, body content, and the survey question itself.
The survey uses dynamic content placeholders to insert the rating section. The key placeholder is {{satisfaction.rating_section}}, which renders the Good/Bad buttons in the email. You can also use {{satisfaction.survey_url}} if you want to create custom links.
Here's what a typical survey email looks like:
Hi {{ticket.requester.name}},

We want to make sure you're happy with our customer service. Please let us know by answering one quick question below:

{{satisfaction.rating_section}}

Thanks!
Your friends at [Company Name]
The binary rating scale (Good vs. Bad) is intentionally simple. Zendesk chose this design because it maximizes response rates. Customers can answer with a single click, and you get clear, unambiguous data that's easy to aggregate and report on.
If you need more nuanced feedback, you can add follow-up questions or use satisfaction reasons (available on higher-tier plans). These let customers specify why they gave a particular rating, with options like "The issue took too long to resolve" or "The agent's knowledge was unsatisfactory."
For multilingual support, use Zendesk's dynamic content feature to translate your survey into different languages based on the user's locale.

Step 4: Set up conditional survey rules
Not every ticket should receive a survey. You might want to exclude internal requests, tickets from partners, or certain types of issues where feedback wouldn't be meaningful.
The most common approach is using tags to prevent surveys. Create a tag like no_csat and add a condition to your automation that excludes tickets with this tag. Then create macros that apply this tag for scenarios where surveys shouldn't send.
For example, if someone contacts you about a customer's product (thinking you're the product company, not just the software provider), you might use a macro that responds politely and adds the no_csat tag automatically.
You can also exclude entire groups from receiving surveys. In the automation conditions, add "Group is not" and select internal teams like Legal, Security, or HR. This prevents surveys from going out on non-customer-facing tickets.
Another useful technique is combining your "solved" notification email with the CSAT survey. Instead of sending two separate emails, deactivate the CSAT automation and add the {{satisfaction.rating_section}} placeholder to your solved notification trigger. This reduces email fatigue and often improves response rates.
Step 5: Activate and test your survey
Before going live, test everything thoroughly. Create a test ticket, mark it solved, and wait for the survey (or manually trigger it if you're impatient). Check that the email formatting looks correct, the Good/Bad buttons work and link to the right page, the comment field appears after clicking a rating, the rating shows up in the ticket's satisfaction field, and your ticket views properly display satisfaction ratings.
Activate the channels you want to use for survey delivery. In the Customer satisfaction settings, you'll see options for email, messaging, and potentially other channels depending on your Zendesk plan. Activate each channel you want to use.
Best practices for Zendesk post-resolution surveys
Getting the technical setup right is only half the battle. Here are some practices that separate teams who collect data from teams who actually improve based on it.
Timing matters more than you think. Send too soon and you'll annoy customers whose tickets reopen. Send too late and the interaction isn't fresh in their mind. Start with 24 hours and adjust based on your reopen rate.
Binary scales get better response rates. It might feel limiting, but the Good/Bad format works. If you need more detail, use follow-up questions or satisfaction reasons rather than switching to a 1-10 scale that customers ignore.
Make feedback visible beyond support. CSAT comments often contain product insights, policy complaints, or feature requests that other teams need to hear. Set up triggers that post ratings (especially negative ones) to Slack channels where Product and Engineering can see them.
Follow up on negative ratings quickly. A customer who took time to say they're unsatisfied deserves a response. Set up a trigger that notifies a manager or creates a follow-up task whenever a Bad rating comes in.
Use satisfaction reasons to categorize feedback. If you're on a plan that supports it, enable satisfaction reasons and review the "Other" category regularly. This tells you whether your predefined reasons actually cover the issues customers are experiencing.
When to consider third-party survey tools
Zendesk's native CSAT works well for most teams, but it has limitations. You might want to explore third-party options if you need custom branding (native surveys use Zendesk's styling; you can't add your logo or match your brand colors), multi-question surveys (native CSAT is designed to be a single question), different rating scales (if you absolutely need 5-star or NPS-style ratings), or in-signature surveys (collecting feedback within the email thread rather than after resolution).
Tools like Nicereply, Sondar, and Qualtrics offer deeper customization. They integrate with Zendesk and can push data back into your tickets, but they add cost and complexity.
For most teams, native CSAT is the right starting point. Only upgrade to third-party tools when you've hit clear limitations that are blocking your goals.
Improve your CSAT with better support quality
Here's something that gets overlooked: the best way to improve CSAT scores isn't tweaking survey timing or question wording. It's delivering better support experiences in the first place.
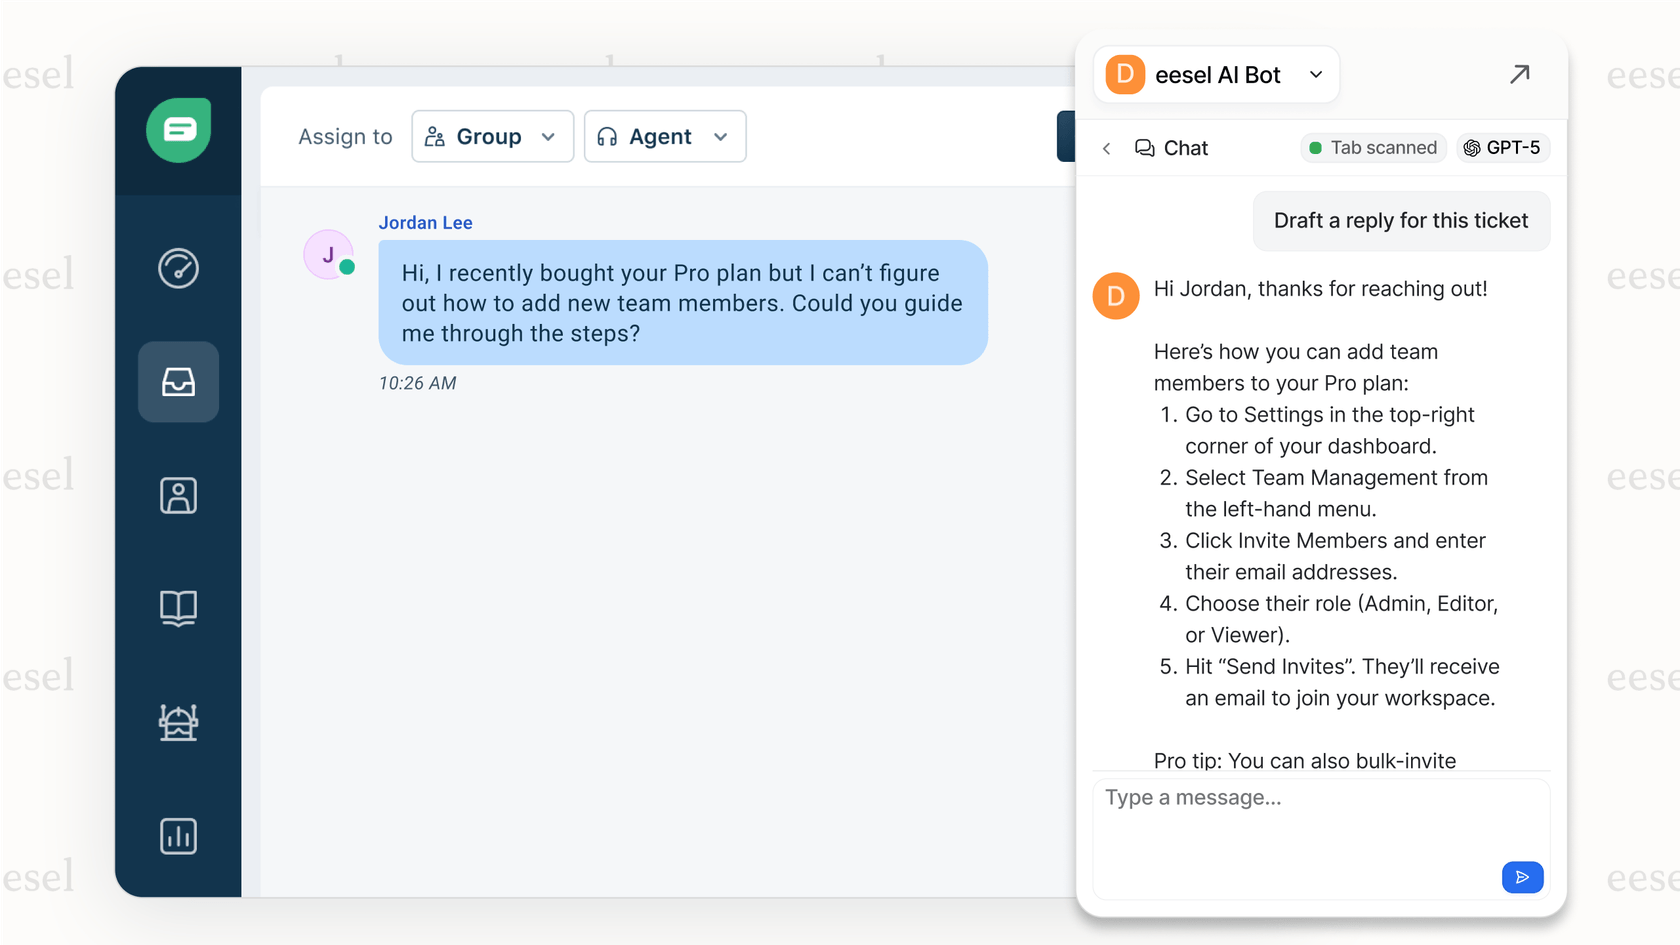
This is where eesel AI fits in. Rather than replacing Zendesk's survey system, we help you improve the responses that get surveyed. Our AI learns from your help center articles, past tickets, and macros to draft replies that match your brand voice and resolve issues accurately.
When your agents open a ticket, they see an AI-generated draft based on your actual knowledge. They can review, edit, and send it, or regenerate with feedback. Over time, the AI gets better at matching how your best agents write.
The result? Faster responses that are consistently accurate and on-brand. Customers get their issues resolved in fewer back-and-forths, which directly impacts their satisfaction ratings.
If you're setting up CSAT surveys because you want to measure and improve customer satisfaction, consider also looking at what's going into those interactions. See how eesel AI works with Zendesk to help your team deliver the kind of support that earns positive ratings.
Frequently Asked Questions

Share this post

Article by
Stevia Putri
Stevia Putri is a marketing generalist at eesel AI, where she helps turn powerful AI tools into stories that resonate. She’s driven by curiosity, clarity, and the human side of technology.