How to exclude ticket types from Zendesk CSAT surveys
Stevia Putri
Last edited March 2, 2026
Your CSAT score is only as good as the data behind it. When internal IT tickets, spam submissions, and test cases start mixing with genuine customer feedback, your metrics become meaningless. Knowing how to exclude ticket types from Zendesk CSAT surveys isn't just a nice-to-have, it's essential for accurate reporting.
Here's why this matters. Imagine your team just hit a 95% satisfaction rating. Great news, right? But what if 30% of those surveyed tickets were internal requests from employees who were never going to give negative feedback? Or spam tickets that got solved automatically? Your actual customer satisfaction might be closer to 70%, but you'd never know because the data is polluted.
This guide walks you through exactly how to exclude specific ticket types from your Zendesk CSAT surveys. We'll cover tags, groups, automation conditions, and the reporting implications you need to understand. And if you're tired of manual tagging altogether, we'll touch on how AI automation can handle this for you.
What you'll need
Before diving in, make sure you have:
- A Zendesk Support plan that includes CSAT (Team plan or higher)
- Admin Center access with permissions to edit business rules
- Basic familiarity with Zendesk tags and how automations work
- Optional: If you're using third-party survey tools like Simplesat or Customer Thermometer, the process differs slightly
Step 1: Understand your CSAT automation
The first thing you need to know is where your CSAT surveys are actually coming from. Zendesk uses a system automation to send satisfaction surveys by default.
Head to Admin Center > Objects and rules > Business rules > Automations. Look for an automation called "Request customer satisfaction rating (system automation)." This is the default rule Zendesk creates when you enable CSAT.
Here's how it works: When a ticket is marked as Solved and stays solved for 24 hours, the automation fires and emails the requester a satisfaction survey. This delay gives customers time to verify their issue is actually resolved before rating.

The key thing to understand is that automations run on a schedule (every hour), and they check conditions before taking action. This is different from triggers, which fire immediately when ticket conditions change. We'll come back to this distinction because it matters for how you set up exclusions.

Step 2: Exclude tickets using tags
Tag-based exclusion is the most flexible method because it works at multiple levels: individual tickets, specific users, or entire organizations.
Setting up the exclusion tag
First, decide on your exclusion tag. Common choices include:
no_csatinternal_ticketexclude_from_survey
Pick something your team will remember and use consistently. The tag name itself doesn't matter to Zendesk, but consistency matters for your sanity.
Modifying the automation
Now edit your CSAT automation and add this condition to the "Meet all of the following conditions" section:
Ticket: Tags | Contains none of the following | no_csat
This tells Zendesk: "Only send the survey if the ticket does NOT have the no_csat tag." Save your changes and you're done with the automation side.
Applying the tag
You can apply the exclusion tag in several ways:
- Manually: Agents add the tag when creating or updating tickets
- Via triggers: Automatically tag tickets based on conditions (ticket from internal email domain, specific subject lines, etc.)
- Via macros: Create a macro that solves the ticket and adds the exclusion tag in one action
- On user profiles: Add the tag to specific users who should never receive surveys
The user-level approach is particularly useful for excluding internal employees or VIP customers who shouldn't be surveyed.
Step 3: Exclude by groups or organizations
Sometimes you want to exclude entire categories of tickets without tagging each one individually. That's where group and organization exclusions come in.
Excluding by group
If you have internal-facing groups (IT, HR, Facilities), you can exclude all tickets assigned to those groups from CSAT surveys.
Add this condition to your CSAT automation:
Ticket: Group | Is not | [Internal IT]
Replace "Internal IT" with whatever your internal group is called. You can add multiple group conditions or use "Is not" with multiple groups listed.
Excluding by organization
For B2B companies, you might want to exclude certain organizations from surveys (partners, internal subsidiaries, test accounts).
The process is similar: add a condition like Organization | Is not | [Partner Org Name] to your automation. You'll need to have organization data populated in Zendesk for this to work.
Group and organization exclusions work well when your ticket routing's already structured. They're less flexible than tags but require zero ongoing effort once configured.
Step 4: Handle messaging and social channels
Here's where things get tricky. If you only modify the automation we discussed earlier, you'll still send CSAT surveys through messaging channels. That's because messaging uses triggers, not automations.
The messaging trigger
Navigate to Admin Center > Objects and rules > Business rules > Triggers. Look for "Request customer satisfaction rating (messaging)" or similar.
Triggers fire immediately when conditions are met, unlike the delayed automations. The good news is that you can use the same exclusion conditions in triggers. Add the same tag, group, or organization exclusions you've set up for your automation.
Channel-specific considerations
- Web Widget and Mobile SDK: Modify the "Request customer satisfaction rating (messaging)" trigger
- Social messaging (Facebook, WhatsApp, etc.): Look for "Request customer satisfaction rating (social messaging)" trigger
- Email: Handled by the automation we configured earlier
The most common mistake's forgetting to update both places. Your email CSAT stops sending, but customers using chat still get surveys. Double-check all your channels.
Step 5: Verify exclusions in reporting
Excluding tickets from surveys is only half the battle. You also need to account for these exclusions in your reporting, or your metrics'll look worse than they actually are.
The Explore problem
Zendesk Explore's native filters cannot exclude tickets by tag. If you filter for tickets without the no_csat tag using the standard filter panel, you'll get incorrect results because of how Explore handles multi-value fields.
The calculated metric solution
Instead, create a standard calculated metric with this formula:
IF (NOT INCLUDES_ANY([Ticket tags], "no_csat")) THEN [Ticket ID] ENDIF
Add this metric to your report with the COUNT aggregator. It'll only count tickets that don't have your exclusion tag.
Testing your setup
Before rolling out to your entire operation:
- Create a test ticket and add your exclusion tag
- Solve the ticket and wait 24 hours
- Verify no survey was sent
- Check your Explore report to confirm the ticket doesn't appear in CSAT metrics
Common mistakes to avoid
Even experienced Zendesk admins run into these issues:
-
Forgetting messaging channels: You updated the automation but not the triggers. Now chat users get surveys and email users don't.
-
Case sensitivity: Zendesk tags are case-sensitive. "No_CSAT" and "no_csat" are different tags. Pick one format and document it.
-
Over-excluding: It's tempting to exclude every ticket that might get a negative rating. Don't. You're measuring customer satisfaction, not agent performance. Excluding legitimate customer feedback defeats the purpose.
-
No documentation: Six months later, nobody remembers why certain tickets're tagged
no_csat. Create internal documentation explaining your exclusion criteria. -
Inconsistent application: One agent tags internal tickets as
internal, another usesno_csat, a third forgets entirely. Establish clear guidelines and train your team.
Automating ticket exclusion with AI
Manual tagging works, but it's tedious and error-prone. Agents forget, tags get misspelled, and before you know it, your exclusion system's inconsistent.
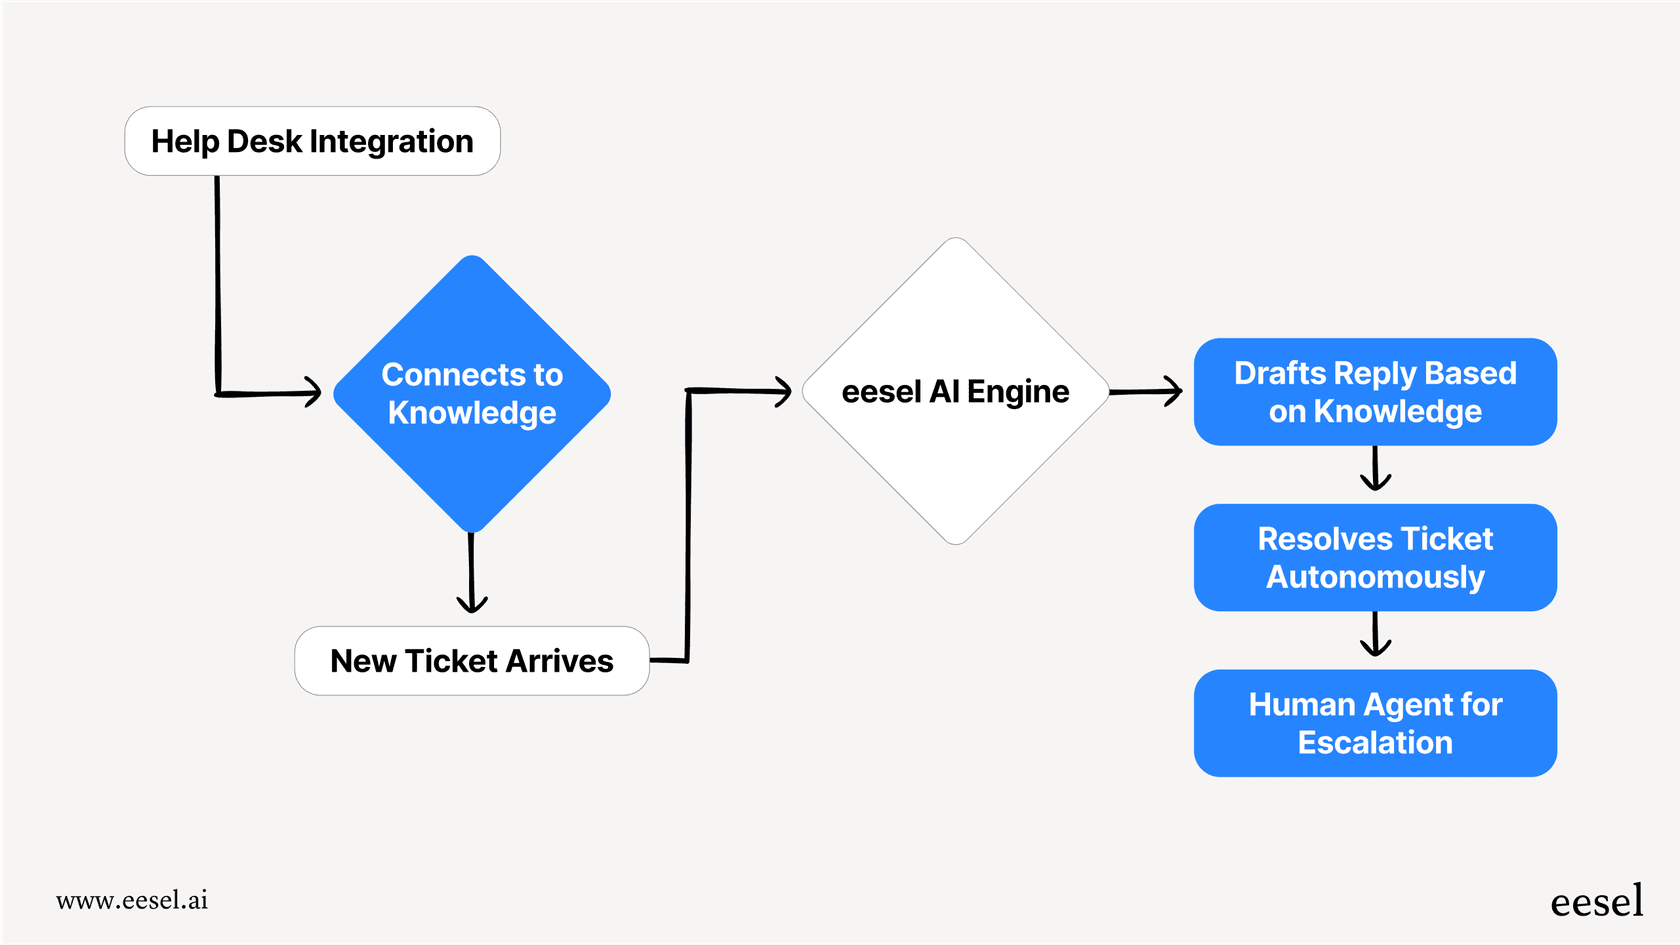
This is where eesel AI's AI Triage comes in. Instead of relying on agents to tag tickets correctly, eesel AI reads incoming tickets and automatically applies the right tags based on content.

Here's how it helps with CSAT exclusion:
- Automatic detection: AI recognizes internal requests, spam patterns, and test tickets without human intervention
- Consistent tagging: No more typos or inconsistent tag names
- Real-time processing: Tags are applied immediately when the ticket's created, before any automations run
- Learns your patterns: Trains on your historical tickets to understand what should be excluded
The result is cleaner data without adding work for your agents. They can focus on solving problems instead of remembering which tickets need which tags.
Keep your CSAT metrics clean and accurate
Accurate CSAT data starts with proper exclusion. Whether you're filtering out internal tickets, spam, or test cases, the methods we've covered give you control over what gets surveyed and what gets reported.
Let's recap the key approaches:
- Use tags for flexible, ticket-level exclusions
- Use groups for excluding entire teams or departments
- Don't forget to update both automations AND triggers
- Account for exclusions in your Explore reports using calculated metrics
- Document your criteria so your team stays consistent
If you're spending more time managing exclusions than analyzing results, it might be time to automate. eesel AI's AI Triage handles this kind of repetitive categorization work, letting you focus on what the data tells you rather than how it's collected.
Want to see how automated ticket categorization works? Try eesel AI and let your team focus on customers, not tags.