How to set up Zendesk organization assignment in 2026
Stevia Putri
Last edited March 4, 2026
Getting tickets to the right team quickly can make or break your support operation. If you're managing requests from different customer types (VIP accounts, enterprise clients, partners), you need a way to automatically route those tickets without manual sorting.
Zendesk organization assignment lets you create rules that automatically handle tickets based on which organization the requester belongs to. Instead of agents spending time identifying important customers and routing tickets by hand, you can set up automation that does it instantly.
In this guide, I'll walk you through exactly how to set up organization-based assignment in Zendesk. We'll cover both the native approach using triggers and group mapping, plus a simpler alternative if you find yourself outgrowing Zendesk's built-in tools. If you're also exploring AI options for Zendesk, check out our ultimate AI Zendesk review and our guide on the best AI chatbots for Zendesk.

What you'll need
Before you start setting up organization-based assignment, make sure you have:
- A Zendesk Support account on Team plan or higher (organization features aren't available on the Essential plan)
- Administrator access to create triggers and manage organizations
- A list of organizations you want to route tickets for
- A clear understanding of your support workflow (which tickets should go where)
If you're not sure about your plan level, check with your Zendesk admin. The organization and trigger features we use are available on Team, Professional, and Enterprise plans. You can review the full Zendesk plan comparison to see which features your team has access to.
Understanding organization assignment
Here's how the pieces fit together.
Organizations in Zendesk are collections of your end users. You might create organizations for:
- Companies you support (each B2B customer gets their own org)
- Service level tiers (VIP, Enterprise, Standard)
- Regions or languages (EMEA customers, Spanish-speaking users)
- Internal departments (if using Zendesk for IT or HR support)
Once you have organizations set up, there are three ways to route tickets based on organization membership:
-
Group mapping - Set a default group for each organization. All tickets from users in that organization automatically route to that group.
-
Triggers - Create conditional rules that fire when a ticket comes from a specific organization. More flexible than group mapping but requires more setup.
-
User domain mapping - Automatically add users to organizations based on their email domain. This happens before tickets are created, so the organization is already set when the ticket arrives.
Here's the short version: Email domain → Organization → Group/Assignee.
Method 1: Group mapping for simple routing
Group mapping is the simplest way to route tickets by organization. It works best when you have a straightforward "Organization X goes to Group Y" workflow without complex conditions.
Note: Group mapping requires a Professional plan or higher. If you're on Team plan, skip to Method 2 (triggers). You can learn more about Zendesk pricing and plans on their website.
Step 1: Create your target group
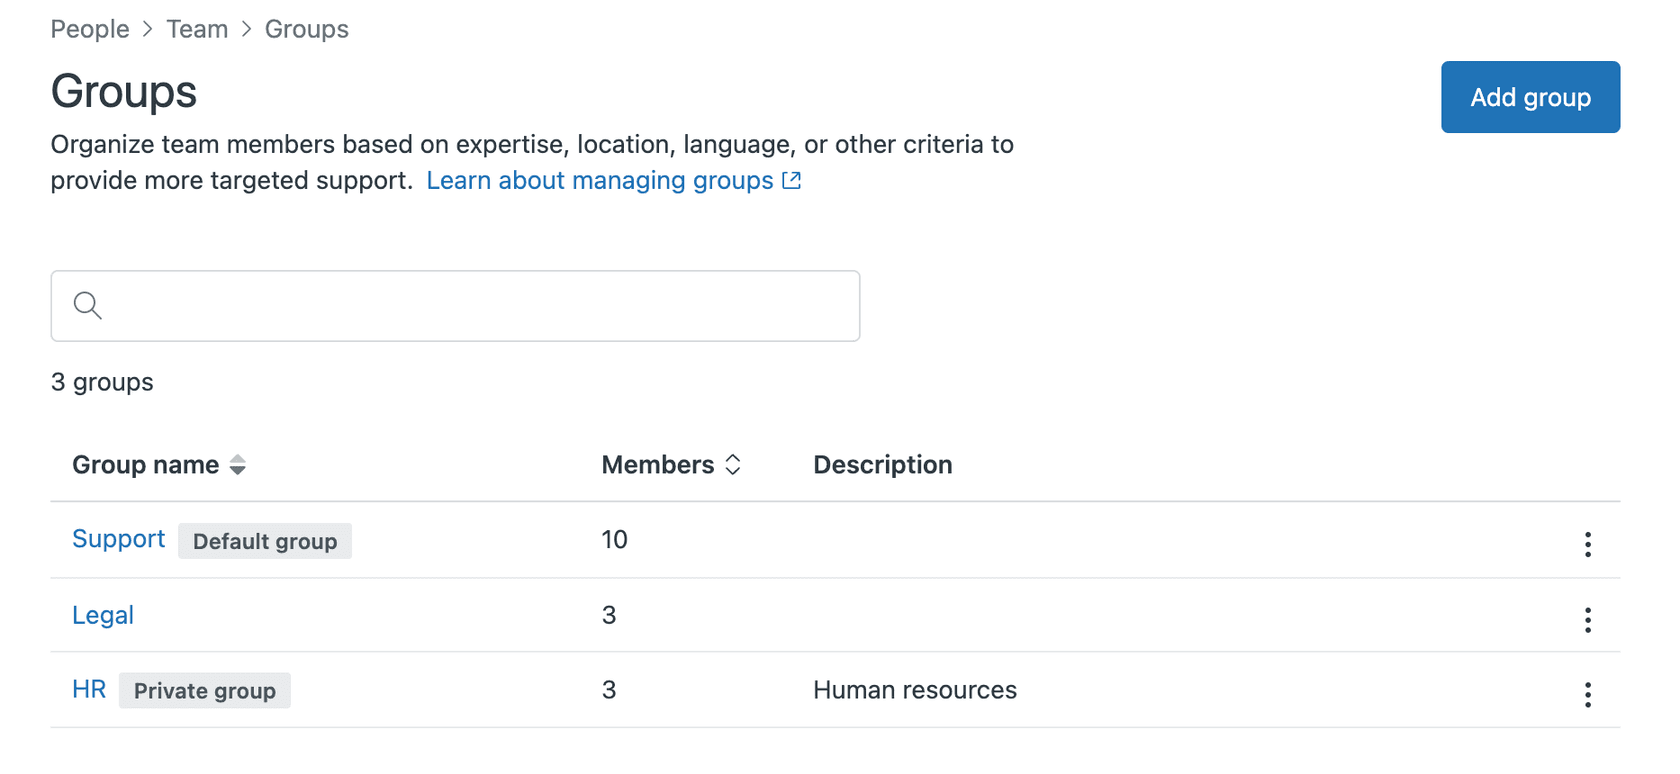
First, you need a group to route tickets to. In Zendesk Admin Center, navigate to People > Team > Groups and click Add group.
Give your group a clear name like "VIP Support" or "Enterprise Customers." Add the agents who should handle tickets from this organization.
Step 2: Navigate to your organization
Go to People > End users > Organizations and select the organization you want to configure.
If you haven't created the organization yet, click Add organization. Give it a name and (optionally) add email domains for automatic user mapping. See Zendesk's organization documentation for more details on setting this up.
Step 3: Set the default group
In the organization settings, find the Group dropdown. Select the group you created in Step 1.
Click Save.
Now, whenever a user from this organization submits a ticket, it will automatically be assigned to that group. This happens before most triggers run, so it's the fastest routing method.
Limitations to keep in mind:
- Each organization can only have one default group
- You can't add conditions (like "if ticket is urgent, route to different group")
- It only works on Professional plans and higher
If you need more flexibility, you'll want to use triggers instead.
Method 2: Using triggers for advanced routing
Triggers give you more control over organization-based assignment. You can add multiple conditions, set priorities, add tags, and perform other actions beyond just group assignment.
Triggers work on Team plans and higher, so this is your best option if you don't have Professional.
Step 1: Navigate to triggers
In Zendesk Admin Center, go to Objects and rules > Business rules > Triggers.
Click Add trigger. For more details on trigger setup, see the Zendesk triggers documentation.

Step 2: Set your trigger conditions
Give your trigger a descriptive name like "Route VIP Customers to Premium Support."
Under Meet ALL of the following conditions, add:
- Ticket > Is > Created (so the trigger fires on new tickets)
- Organization > Is > [Select your organization]
The Organization condition tells Zendesk to only fire this trigger when the ticket comes from a user in that specific organization.

Optional but recommended: Add a condition Group > Is > - (dash/empty). This prevents the trigger from overwriting assignments that are already set.
Step 3: Configure trigger actions
Under Actions, add what should happen when the conditions are met:
- Group: Assign the ticket to a specific support group
- Assignee: Assign to a specific agent (useful for dedicated account managers)
- Priority: Set ticket priority (great for VIP customers)
- Tags: Add tags for reporting or additional automation
For example, a VIP routing trigger might have these actions:
- Group: Premium Support Team
- Priority: High
- Tags: Add "vip_customer"
Step 4: Test your trigger
Click Create to save your trigger, then test it by creating a test ticket from an email address in your organization.
Check that:
- The user gets added to the correct organization (if using domain mapping)
- The trigger fires (check the ticket events)
- All actions execute correctly
Common trigger variations:
- VIP escalation: Organization Is VIP Customers → Priority High + Group Premium Support
- Account manager assignment: Organization Is Acme Corp → Assignee Jane Smith
- Regional routing: Organization Is EMEA Customers → Group EMEA Support + Tag emea
Troubleshooting common issues
Even with the best setup, you'll likely run into a few snags. Here are the most common problems and how to fix them.
API-created tickets have the wrong organization
If you create tickets via API (for example, from your own app or website), the ticket might inherit the API user's organization instead of the end user's organization. This is a known issue documented in the Zendesk API community discussions.
Solutions:
- Set the requester's organization explicitly when creating the ticket via API
- Use lookup relationship fields instead of text fields for organization data
- Add a post-creation automation to reassign the organization based on custom fields
Multiple organizations per user causes confusion
On Professional and Enterprise plans, users can belong to up to 300 organizations according to Zendesk's documentation. But Zendesk uses the user's primary (default) organization for trigger routing.
If a user belongs to multiple orgs, make sure their default organization is the one you want to use for routing. Users can change their default organization in their profile, or admins can change it for them.
Trigger order conflicts
Zendesk processes triggers from top to bottom according to their trigger documentation. If you have multiple organization-based triggers, the order matters.
Best practice: Put your most specific triggers first. For example:
- "VIP Customers - Urgent" (specific organization + priority)
- "VIP Customers - All" (organization only)
- "All Other Customers" (catch-all)
Custom text field limitations
If you're using custom fields to store organization data, note that text fields only support "Is Present" and "Is Not Present" conditions in triggers. You can't create rules like "if custom field equals CompanyABC." This limitation is discussed in Zendesk's community forums.
Workaround: Use dropdown fields or lookup relationship fields instead of text fields.
When to move beyond triggers
Native Zendesk organization assignment works well for simple setups. But as you scale, you might hit some limitations:
- Maintenance overhead: Every new organization requires updating triggers or group mappings
- Complex routing logic: Multiple conditions become hard to manage
- API workflow gaps: Tickets created via API often need workarounds
- Scaling challenges: Dozens of triggers become difficult to troubleshoot
If you find yourself spending more time managing triggers than actually supporting customers, it might be time to consider an alternative approach.
Setting up intelligent organization assignment with eesel AI
This is where we can help. Instead of manually configuring triggers for every organization, eesel AI learns your routing patterns from your historical tickets. Our AI Agent works alongside your existing Zendesk setup to handle intelligent ticket routing.

Here's how it works:
- Connect eesel to your Zendesk - We read your past tickets, help center articles, and existing organization structure
- AI learns your patterns - eesel analyzes how you've historically routed tickets and learns the patterns
- Intelligent routing - New tickets get routed automatically based on content, requester history, and learned patterns
- Continuous improvement - eesel gets better over time as it sees more of your tickets
Key differences from native Zendesk:
- No trigger configuration needed
- Handles edge cases without manual rules
- Works seamlessly with API-created tickets
- Scales automatically as you add organizations
Our Zendesk integration works alongside your existing setup. You don't have to replace Zendesk (eesel just makes the routing smarter).
Choosing the right approach
So which approach should you choose? It depends on your situation.
Use Zendesk native triggers if:
- You have a small number of organizations (under 10)
- Your routing rules are simple and don't change often
- You have Professional plan or higher for group mapping
- You have time to maintain trigger configurations
Consider eesel AI if:
- You have many organizations or complex routing needs
- You want to reduce manual configuration
- You handle tickets via API that need smart routing
- You're spending too much time managing triggers
Pricing comparison:
Zendesk charges per agent per month ($19-$169/agent depending on plan). For a team of 10 agents on Professional, that's $1,150/month according to Zendesk's pricing page.
eesel AI starts at $299/month for up to 1,000 AI interactions, regardless of team size. No per-agent fees.
Start automating your ticket routing
Organization-based assignment is essential for any support team handling different customer types. Whether you stick with Zendesk's native triggers or explore an AI-powered alternative, the goal is the same: get tickets to the right people without manual sorting.
If you're just getting started, try Method 1 (group mapping) if you have Professional plan, or Method 2 (triggers) if you're on Team plan. Start with your most important organizations and expand from there.
If you're already struggling with trigger maintenance or need more intelligent routing, try eesel AI. We offer a 7-day free trial, and you can see how eesel would route your historical tickets before making any changes to your live setup.
Frequently Asked Questions
Share this article

Article by
Stevia Putri
Stevia Putri is a marketing generalist at eesel AI, where she helps turn powerful AI tools into stories that resonate. She’s driven by curiosity, clarity, and the human side of technology.


