How to sync Zendesk tickets to Salesforce cases: Complete 2026 guide
Stevia Putri
Last edited March 2, 2026
When your support team uses Zendesk and your sales team lives in Salesforce, customer data gets fragmented fast. Support agents can't see account history. Sales reps miss critical support issues. Everyone wastes time switching between tools or asking for updates in Slack.
Syncing Zendesk tickets to Salesforce cases solves this. It gives sales teams visibility into support interactions, helps account managers spot at-risk customers, and creates a single source of truth for customer health. The native Zendesk-Salesforce integration handles this automatically, pushing ticket data into Salesforce cases as tickets are created or updated.
This guide walks you through setting up the Zendesk Salesforce sync ticket to case integration step by step. We'll cover everything from initial connection to troubleshooting common issues. And if the native approach feels too limited, we'll look at alternatives that might fit your workflow better.
What you'll need before starting
Before diving into configuration, make sure you have the right accounts and permissions. The integration won't work without these prerequisites.
Required accounts and access:
- Zendesk Support account Team plan or higher (the integration isn't available on the Support Team plan)
- Salesforce account Performance, Unlimited, Enterprise, or Developer Edition (or any edition with API access)
- Admin permissions in both systems You'll need to install packages, modify object settings, and configure triggers
- Salesforce metadata API access Required for the ticket sync package installation
Important limitation to understand: The native integration only syncs one way, from Zendesk to Salesforce. Tickets created or updated in Zendesk appear as cases in Salesforce, but cases created in Salesforce do not sync back to Zendesk. If you need bidirectional sync, you'll need a third-party tool (more on that later).
Step 1: Connect Salesforce to Zendesk
Start by establishing the connection between the two platforms.
In Zendesk, navigate to Admin Center > Apps and integrations > Integrations > Salesforce. If you don't see Salesforce listed, you may need to enable it from the Zendesk Marketplace first.
Click Connect and authenticate with your Salesforce credentials. You'll be prompted to grant Zendesk access to your Salesforce org. Review the permissions carefully, then authorize the connection.
Once connected, verify the status shows as "Active" in the integration settings. If you see an error, double-check that your Salesforce user has API access and that you're using a supported Salesforce edition.

Step 2: Create a Salesforce case record type
Record types in Salesforce let you categorize cases by their purpose or source. Creating a dedicated record type for Zendesk tickets keeps them organized and makes reporting easier.
In Salesforce, go to Setup > Object Manager > Case > Record Types. Click New to create a record type. Name it something descriptive like "Zendesk Ticket Sync" so your sales team knows where these cases originated.
You can either copy an existing record type (if you want to inherit its page layouts and picklist values) or create one from scratch. For most teams, copying the standard "Master" record type works fine.
After saving, Salesforce will display the Record Type ID. Copy this ID somewhere safe, you'll need it in the next step. It looks like a long string of letters and numbers (for example: 01250000000ABC1).

Step 3: Install the ticket sync package
The ticket sync package is what creates the bridge between Zendesk tickets and Salesforce cases. It adds custom fields to your Salesforce Case object and handles the data mapping.
In Zendesk Admin Center, go to Apps and integrations > Integrations > Salesforce > Data sync > Ticket sync > Configure. You'll see an option to install the Ticket sync package. Click Install.
The installation process uses Salesforce's Metadata API to deploy custom fields, triggers, and other components to your Salesforce org. This typically takes a few minutes. You can monitor the deployment status in Salesforce under Setup > Deployment Status.
Once complete, verify the installation by checking your Salesforce Case object. You should see new custom fields like "Zendesk Ticket ID," "Zendesk Ticket URL," and "Zendesk Ticket Tags." These fields store the Zendesk-specific data that doesn't have a direct equivalent in standard Salesforce case fields.

Step 4: Configure field mappings
Now that the package is installed, you need to tell Zendesk which Salesforce fields should receive which Zendesk data.
In the ticket sync configuration, you'll see two types of mappings:
Standard mappings (automatic) These are pre-configured by the package:
| Zendesk Field | Salesforce Case Field |
|---|---|
| Ticket ID | Zendesk_Support_Ticket_ID__c |
| Subject | Subject |
| Description | Description |
| Status | Status |
| Priority | Priority |
| Requester Email | Zendesk_Support_Ticket_Requester_Email__c |
| Organization Name | Zendesk_Support_Ticket_Organization_Name__c |
Custom field mappings If you have custom fields in Zendesk that need to sync to Salesforce, map them here. Pay attention to field type compatibility:
- Zendesk drop-downs map to Salesforce picklists
- Zendesk text fields map to Salesforce text or textarea fields
- Zendesk numeric fields map to Salesforce number fields
Critical requirement: Every required field on your Salesforce Case object must be mapped to a Zendesk field, or have a default value set. If a required field is left empty, the sync will fail for that ticket.
Step 5: Set up organization and requester matching
When a Zendesk ticket syncs to Salesforce, the integration tries to match the ticket's requester and organization to existing Salesforce contacts and accounts. Getting this right prevents duplicate records.
Organization matching:
Zendesk organizations can match to Salesforce accounts based on:
- Organization name (exact match)
- External ID (if you've set up data sync from Salesforce to Zendesk)
If no match is found, you can choose to create a new Salesforce account automatically or leave the account field blank.
Requester matching:
Zendesk users match to Salesforce contacts based on:
- Email address (most reliable)
- Name (fallback if email doesn't match)
You can also set a default contact or account for tickets that don't match existing records. This is useful for catching edge cases without creating data clutter.
Step 6: Configure the sync trigger
The final step is setting up when and how tickets sync. This is controlled by a Zendesk trigger that fires on ticket creation and updates.
Zendesk creates a default trigger called "(Salesforce Integration) Sync tickets to Salesforce." You can find it in Admin Center > Objects and rules > Business rules > Triggers.
Review the trigger conditions:
The default trigger fires on all ticket creations and updates. You might want to modify this to only sync certain types of tickets. For example:
- Only sync tickets from paid customers
- Exclude internal tickets or spam
- Only sync tickets with a specific tag
Important: Do not modify the JSON body in the trigger's actions. This contains the technical instructions for Salesforce. Changing it can break the sync.
Activate the trigger and test with a single ticket. Create a test ticket in Zendesk, then check Salesforce to verify a case was created with the correct data.

Common issues and how to fix them
Even with careful setup, things can go wrong. Here are the most common problems and their solutions.
Deployment failures in Salesforce
If the ticket sync package fails to deploy, check that your Salesforce user has "Modify All Data" permission and Metadata API access. Some Salesforce editions or permission sets restrict these capabilities.
Required field errors
Salesforce cases often have required fields like "Origin" or "Type." If these aren't mapped in Zendesk, the sync fails. Either map these fields or set default values in your Salesforce case record type.
Record Type ID mistakes
Entering the wrong Record Type ID is a common error. Double-check that you copied the full ID from Salesforce. It should be 15 or 18 characters long.
Duplicate records
If you're seeing duplicate contacts or accounts in Salesforce, your matching criteria are too loose. Tighten the matching rules or disable automatic record creation until you can clean up your data.
Sync not triggering
If tickets aren't syncing at all, verify the trigger is active and that its conditions match the tickets you're testing with. Check Zendesk's Settings > Salesforce > Error log for specific error messages.
API governor limits
Salesforce enforces API call limits. If you're syncing thousands of tickets daily, you might hit these limits. Monitor your API usage in Salesforce and consider batching or scheduling syncs during off-peak hours.
Alternative approaches to consider
The native Zendesk-Salesforce integration works well for basic use cases, but it has limitations. If you need more flexibility, consider these alternatives.
Third-party integration tools:
- Exalate Script-based integration with bidirectional sync. You write Groovy scripts to define exactly how data flows between systems. Best for complex workflows.
- Skyvia No-code ETL platform with visual data mapping. Data integration plans start at $79/month (annual billing). Good for teams without developers.
- Zapier Workflow automation that connects Zendesk and Salesforce. You can build bidirectional sync with two Zaps, though it requires careful setup to avoid loops.
Custom API development:
If you have engineering resources, building a custom integration using the Zendesk API and Salesforce REST API gives you complete control. This is overkill for most teams, but worth considering if you have unique data transformation needs.
A different approach entirely:
Here's something to consider. All this integration complexity exists because support and sales data live in separate systems. What if they didn't?
At eesel AI, we take a different approach. Instead of syncing data between platforms, we provide a unified AI agent that works across your existing tools. You can connect eesel AI to both Zendesk and Salesforce (plus Slack, your help center, and other sources), and it learns from all of them simultaneously. No complex field mapping. No worrying about API limits. No sync delays.
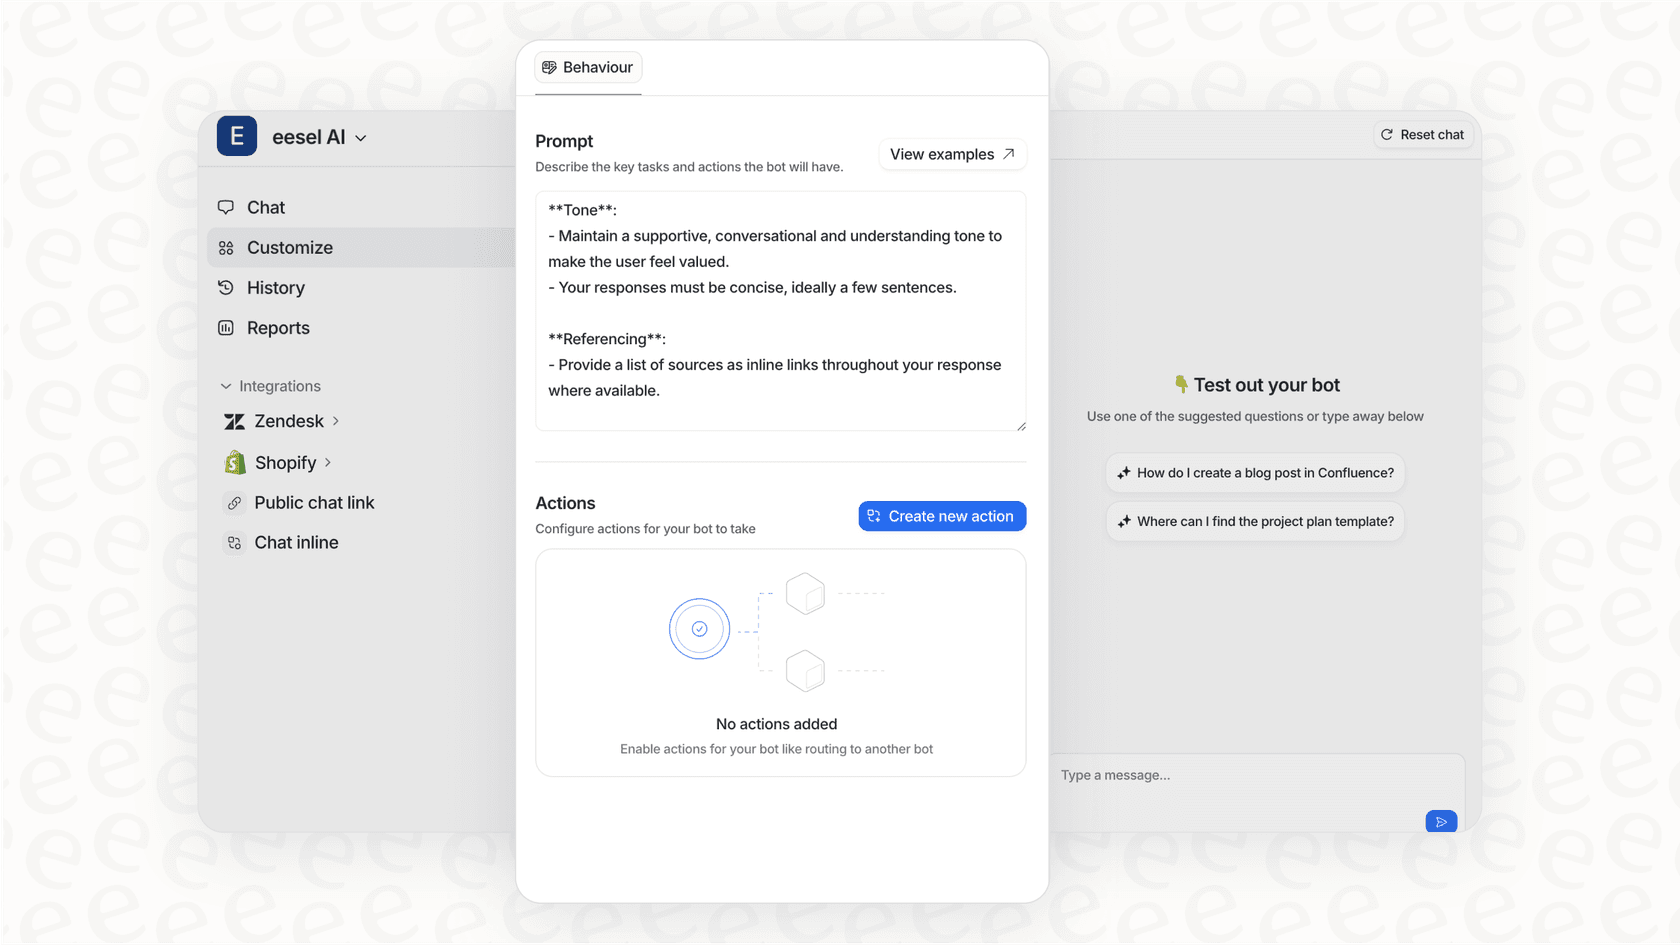
When a customer reaches out, eesel AI can see their full history across Zendesk tickets, Salesforce opportunities, and past conversations. It drafts responses, routes tickets, and even takes actions like creating Salesforce cases directly. If you're tired of managing integrations, see how eesel AI works.
Start streamlining your support and sales data today
Setting up the Zendesk Salesforce sync ticket to case integration takes some upfront work, but the payoff is worth it. Sales teams get visibility into support issues. Support agents can see account context. Everyone makes better decisions with complete customer data.
To recap the key steps:
- Connect Salesforce to Zendesk via OAuth
- Create a dedicated case record type in Salesforce
- Install the ticket sync package
- Map fields between the two systems
- Configure organization and requester matching
- Set up and test the sync trigger
One final recommendation: Test everything in a sandbox first. Both Zendesk and Salesforce offer sandbox environments. Use them to verify your configuration before touching production data.
If the native integration meets your needs, great. If you find yourself hitting its limitations, remember that alternatives exist. Whether that's a third-party integration tool or a completely different approach like eesel AI, you have options. The goal is getting your teams the customer visibility they need, not wrestling with integration settings.
Ready to explore a simpler way to unify your customer data? Try eesel AI free and see how an AI teammate that learns from all your tools can eliminate the need for complex integrations entirely.
Frequently Asked Questions
Share this article

Article by
Stevia Putri
Stevia Putri is a marketing generalist at eesel AI, where she helps turn powerful AI tools into stories that resonate. She’s driven by curiosity, clarity, and the human side of technology.