If managing your Zendesk queue feels like a challenge when volumes spike, you’re definitely not alone. When things get busy, making sure your most important customers get the fast response they deserve is a top priority. Zendesk provides excellent built-in tools to help you gain a clear view of your operations and keep things organized.
This guide will walk you through setting up a proper workflow right inside Zendesk to automatically flag and prioritize tickets from your key customers. We'll start with the standard setup using Zendesk's robust built-in tools, and then explore how you can use AI to build an even more flexible system.
What you'll need to get started
Before we jump into the setup, let's make sure you have a few things lined up. This workflow utilizes professional features available on Zendesk’s comprehensive plans.
-
A specific Zendesk plan: You'll need the Zendesk Suite or Support plan, at the Professional or Enterprise level. Features like adding a user to multiple organizations or setting up Service Level Agreements (SLAs) are part of these powerful tiers. The Suite Professional plan is a great starting point for this.
-
Admin access: To build all this, you'll need to be an administrator in your Zendesk account. This gives you permission to manage groups, organizations, triggers, and automations.
-
A clear idea of who's important: You need to know who you consider an "important customer." Is it based on their subscription plan, how much they spend, or their strategic value? Having this definition ready will help you make the most of Zendesk's automation.
How to build your Zendesk workflow: step-by-step
Ready? Here’s how you can use Zendesk’s versatile settings to automatically flag and prioritize tickets from your VIPs.
Step 1: group important customers
First things first, Zendesk needs a way to identify your key customers. The most efficient way to do this is with Organizations. You can create an organization called "VIP Customers," for instance, and add specific users or even entire company email domains to it. This becomes the foundation for the smart rules we're about to build.
If your plan allows for it, you can add a single user to multiple organizations. This is a great feature if a customer needs to belong to their own company's organization and your special VIP one.
How to create a VIP organization:
-
Head to Admin Center > People > Organizations.
-
Click Add organization and give it a clear name like "VIP Customers" or "Enterprise Accounts."
-
In the Domains field, you can add the email domains of your key customers (like "majorclient.com"). Zendesk will then automatically add any new user from that domain to this organization.
-
You can also just add individual users to the organization manually from their profile pages.
Step 2: set up a dedicated group for VIP tickets
You likely have experienced agents who are best suited to handle your important accounts. It makes sense to create a dedicated group for them to handle all tickets from your key customers. This ensures that VIP requests are always handled by your experts and makes routing tickets and sending notifications a lot simpler.
How to create a VIP agent group:
-
Go to Admin Center > People > Groups.
-
Click Add group and name it something like "VIP Support Team."
-
Add your chosen senior agents to this new group.
-
Once that's done, you can map this group directly to your "VIP Customers" organization. According to Zendesk's own guides, this will automatically assign any new ticket from a VIP to this group.
Step 3: use triggers to set ticket priority
Now for the part where Zendesk automates the work for you. A trigger is a powerful rule that fires the moment a ticket is created or updated. We're going to set one up to check if a new ticket comes from someone in our "VIP Customers" organization and, if it does, immediately assign it the correct priority.
How to create a priority-setting trigger:
-
Go to Admin Center > Objects and rules > Business rules > Triggers.
-
Click Add trigger.
-
Under Meet ALL of the following conditions, you’ll set:
- Ticket | Is | Created
- Organization | Is | VIP Customers
-
Under Actions, you’ll set:
- Priority | Is | High (or Urgent, your choice)
- (Optional) Notify group | VIP Support Team
Step 4: create a custom VIP queue view
Now that your VIP tickets are being assigned and prioritized, your team needs a professional way to see them. A custom view acts as a dedicated dashboard for your VIP support crew, showing them exactly the tickets they need to focus on.
A great tip here is to sort the view by the next Service Level Agreement (SLA) breach time. This helps agents identify which ticket is closest to needing a response, ensuring they always handle the most time-sensitive requests first.
How to create a VIP ticket view:
-
Head to Admin Center > Workspaces > Agent tools > Views.
-
Click Add view and call it "VIP Ticket Queue."
-
Under Tickets must meet ALL of these conditions, set:
- Status | Less than | Solved
- Group | Is | VIP Support Team
-
Under Formatting Options, find the Order by dropdown and sort by Next SLA breach | Ascending.
Step 5: use automations for escalations
To ensure every high-priority ticket is handled promptly, you can use automations. Unlike triggers, which are instant, automations are time-based rules that help you maintain high standards. You can create one that looks for VIP tickets that have been sitting for a specific amount of time and have it automatically notify a lead or update the priority to "Urgent."
How to create an escalation automation:
-
Go to Admin Center > Objects and rules > Business rules > Automations.
-
Click Add automation.
-
Under Meet ALL of the following conditions, set:
- Ticket: Hours since created | Is greater than | 2
- Ticket: Assignee | Is | "-" (meaning it's unassigned)
- Ticket: Group | Is | VIP Support Team
-
Under Actions, set:
- Ticket: Priority | Is | Urgent
- Notifications: Email user | (Your Support Manager's email)

Considerations for scaling a manual workflow
This standard setup is a significant step forward in organization. As your volume grows, you might find that you want to add more nuance to these rules. For example, a VIP customer might occasionally send a simple "thank you" or a routine inquiry that doesn't require immediate escalation. Conversely, a critical issue from a new customer might need immediate attention.
Zendesk's native organization-based rules are reliable and solid. To add even more flexibility, some teams choose to incorporate AI to handle context-specific scenarios.
graph TD subgraph Standard Zendesk Workflow (Reliable) A[Ticket Created] --> B{Is customer in 'VIP' organization?}; B -->|Yes| C[Set Priority: High]; B -->|No| D[Set Priority: Low]; C --> E[Assign to VIP Team]; D --> F[Assign to General Queue]; end subgraph AI-Enhanced Workflow (Dynamic) G[Ticket Created] --> H[AI Analyzes Content & Context]; H --> I{High Urgency Detected?}; I -->|Yes| J[Set Priority: Urgent]; I -->|No| K{Medium Urgency?}; K -->|Yes| L[Set Priority: High]; K -->|No| M[Set Priority: Normal]; end
This layered approach allows you to keep your reliable Zendesk foundation while using complementary tools to help manage more complex or fluid situations as they arise.
How to create a dynamic workflow with AI
For teams looking for further optimization, bringing in AI help can be a great next step. Instead of relying solely on fixed rules, you can use an intelligent tool that understands the actual content and urgency of every ticket, complementing your existing Zendesk setup.
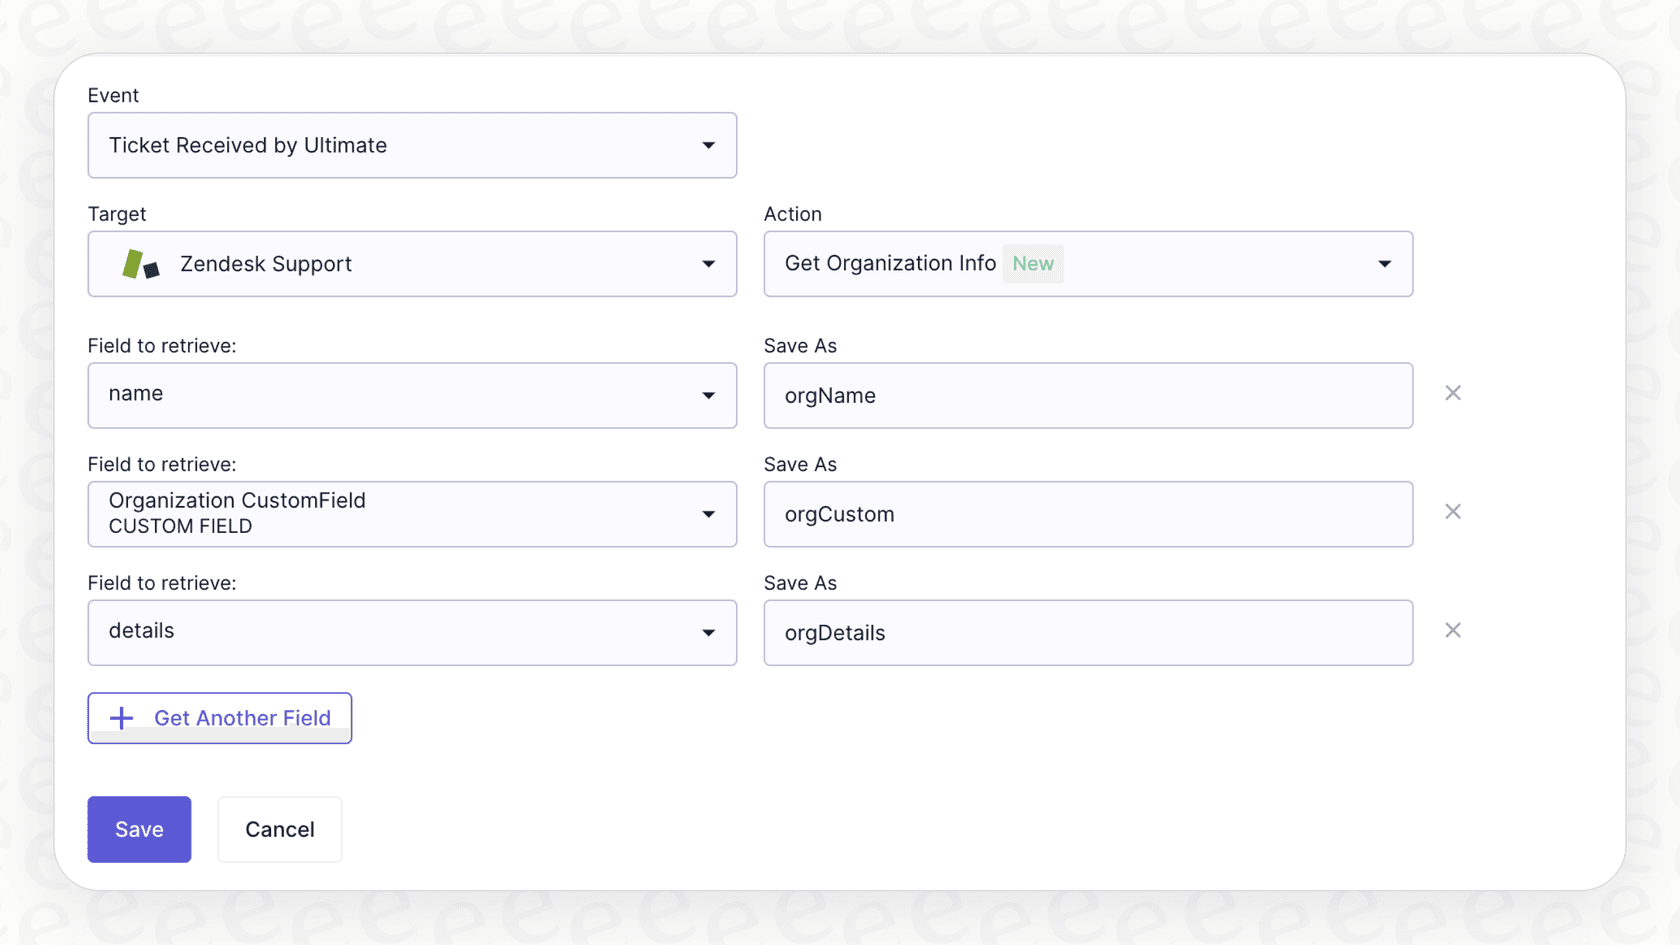
An AI support tool like eesel AI integrates seamlessly with Zendesk and provides a complementary way to manage your priorities.
-
It understands the ticket's intent: eesel's AI Triage works alongside Zendesk to analyze the language and sentiment of a ticket. It can help set the right priority, add tags, and route tickets based on specific context.
-
You're always in control: These tools are designed to assist your team, not replace them. You can configure the AI to handle prioritization for specific ticket types while your team maintains full oversight of the process.
-
Test and refine: You can run simulations on your past tickets to see how AI would assist in the workflow. This allows you to fine-tune the setup and ensure it perfectly aligns with your team's needs before going live.
Think of it this way: a standard Zendesk workflow provides a reliable, clear path for your tickets. An AI-enhanced workflow adds an extra layer of responsiveness, helping your team make smart decisions about where every ticket needs to go.
Tips and common mistakes to avoid
Whether you stick with the standard setup or enhance it with AI, here are a few best practices:
-
Keep your triggers organized: It's helpful to review your triggers regularly to ensure they are firing in the correct sequence. Zendesk processes triggers from top to bottom, so keeping them logically ordered ensures your workflow remains efficient.
-
Scale at your own pace: You don't need to automate everything at once. Zendesk makes it easy to start by automating the process for one or two key groups. Once you're comfortable, you can expand your rules further.
-
Define clear priority standards: Zendesk works best when your team has a shared understanding of what each priority level means. This ensures that "High" and "Urgent" tickets always get the specialized attention they deserve.
Do:
- Define clear priority levels.
- Start with a focused group of customers.
- Use SLA breach time to order your views.
- Regularly review your business rules.
Don't:
- Overlap trigger logic unnecessarily.
- Mark routine tickets as "Urgent" without reason.
- Forget to update your organizations as your client list grows.
- Automate without ensuring your team is trained on the new process.
Getting your queue under control
Building a structured Zendesk workflow to prioritize tickets from important customers is one of the smartest ways to scale your support operations. By using Zendesk's impressive native tools, you can create a highly organized process and ensure your most valuable customers receive the top-tier support Zendesk is known for.
As your business thrives, Zendesk’s flexibility allows you to adapt. When you're ready for even more advanced context-awareness, adding an AI layer to your helpdesk is a natural way to enhance your existing success.
Ready to see how intelligent automation can complement your team? Explore how eesel AI's Triage tool can bring even more automated prioritization to your Zendesk workflow.
Frequently asked questions
What do I need to get started with building a Zendesk workflow to prioritize tickets?
You'll need a Zendesk Suite or Support plan (Professional or Enterprise level), administrator access to your account, and a clear definition of who your "important customers" are. These elements ensure you have the necessary features and permissions to configure the system effectively.
How does creating a VIP organization help streamline my Zendesk prioritization workflow?
Creating a VIP organization provides a foundational way for Zendesk to identify your key customers. Once set up, you can use this organization in triggers and other rules to automatically apply special handling, such as higher priority or routing to a dedicated agent group, for tickets originating from these users.
What are the main advantages of implementing a Zendesk workflow to prioritize tickets?
The primary advantages include ensuring your most valuable customers receive prompt attention, improving agent efficiency by clearly highlighting priority tickets, and reducing the risk of high-stakes issues being overlooked. It creates a more organized and responsive support system tailored to your business needs.
What are the considerations of a manual Zendesk prioritization workflow?
A manual workflow provides a solid and reliable foundation. As your team grows, you might find that adding AI helps to adapt to nuanced situations, like a simple query from a VIP or a critical issue from a non-VIP. Zendesk's flexibility allows you to layer these dynamic solutions on top of your existing rules as you scale.
How can AI enhance a Zendesk workflow for prioritizing tickets?
AI can significantly enhance this workflow by understanding the actual content and urgency of every ticket, rather than just relying on fixed rules. It can intelligently set priority, add tags, and route tickets based on deep context, providing a more flexible and responsive prioritization system that adapts to changing situations.
What common mistakes should I avoid when setting up a Zendesk workflow to prioritize tickets?
It's best to ensure triggers are organized logically to maintain a smooth flow. It's also wise to start small with your automation and ensure your priority levels have clear, shared meanings across your team to maintain a high standard for "Urgent" status.
Can I still manage urgent tickets from non-VIP customers with this workflow?
Yes, while the workflow prioritizes important customers, you can still manage other urgent tickets. With a standard setup, you can use additional triggers or agent visibility. An AI-powered system can also be configured to dynamically assess the urgency of all tickets, regardless of sender, ensuring critical issues are always flagged appropriately.