Getting the right eyes on a ticket is a constant priority in any high-performing support team. When a high-priority issue lands in the queue or a specific client needs attention, you have to make sure the right people see it, and fast. Automatically CC'ing agents on new Zendesk Zendesk tickets is a solid way to boost collaboration, make sure escalations get noticed, and keep key people in the loop without you having to do it manually.
As a mature and flexible platform, Zendesk allows for extensive customization to meet these needs. While Zendesk offers specialized ways to manage end-user CCs, you can easily loop in fellow agents using the platform's robust webhook capabilities. This ensures that even the most specific workflow requirements can be met.
This guide will walk you through two options. First, we’ll tackle the standard, professional method using webhooks and triggers. Then, we’ll look at a more modern, AI-powered approach that works alongside Zendesk to make this process even more seamless and powerful for your team.
What you'll need
Before we jump in, let’s get your tools lined up. Zendesk provides everything you need to build this advanced workflow:
-
Zendesk admin access: You need to be an administrator to access the professional settings and create API tokens, webhooks, and triggers.
-
A Zendesk API token: This is a secure key that allows different parts of Zendesk to communicate effectively. It acts as a unique, secure credential for your webhook.
-
A clear idea of your rules: You need to know exactly which tickets should set off the auto CC. Is it based on the customer’s company, certain words in the subject line, or a high priority? Identifying these conditions first will make building the trigger very efficient.
The standard way: how to set up the trigger
Alright, let's look at how to build this. This process uses a webhook to tell Zendesk to update a ticket on your behalf, showcasing the platform's impressive ability to handle custom instructions.
Step 1: Create a Zendesk API key
First, the webhook needs a secure way to connect to your Zendesk account. Zendesk provides API tokens for exactly this purpose.
-
Head to your Admin center, then go to Apps and integrations > APIs > Zendesk API.
-
Click Add API token and give it a description you'll recognize later, something like "Auto-CC Webhook Token".
-
Copy the token that pops up on the screen and stash it somewhere safe, like a password manager. Zendesk prioritizes security, so it only shows this token once.
Step 2: Create a webhook
Now we build the webhook. This is the powerful messenger that will carry instructions from your trigger over to the ticket itself.
-
In the Admin center, navigate to Apps and integrations > Webhooks and click Create webhook.
-
Select Trigger or automation when it asks how you want to connect.
-
Fill in the details precisely:
- Name: Give it a clear name, like "Update Ticket CCs".
- Endpoint URL: "https://yoursubdomain.zendesk.com/api/v2/tickets/{{ticket.id}}.json". Make sure to replace "yoursubdomain" with your actual Zendesk subdomain.
- Request method: "PUT"
- Request format: "JSON"
- Authentication: Choose Basic authentication.
- Username: Type in your admin email address, followed by "/token" (for example, "you@company.com/token").
- Password: Paste in the API token you created in the first step.
-
Click Create webhook and then Finish setup.
Step 3: Create the trigger
This is the final step, where you define the logic that tells your webhook when to jump into action.
-
Go to Admin center > Objects and rules > Triggers > Add trigger.
-
Give it a specific Name, like "Auto CC Agents for Acme Corp Tickets".
-
Under Conditions, set the rules for when this trigger should run. For instance, if you want to CC a manager on all new tickets from a certain client, you could use:
- "Ticket" | "Is" | "Created"
- "Organization" | "Is" | "Acme Corp"
-
Under Actions, you'll tell the trigger to call your webhook.
- Select "Notify active webhook" and pick the "Update Ticket CCs" webhook you just created.
- In the JSON body field, you’ll add the code that tells Zendesk who to CC. This snippet allows Zendesk to add specific emails as CCs.
{
  "ticket": {
    "email_ccs": [
      { "user_email": "manager@example.com", "action": "put" },
      { "user_email": "specialist@example.com", "action": "put" }
    ]
  }
}
Considerations for the manual webhook method
While the webhook method is a powerful feature of the Zendesk ecosystem, there are a few things to consider as your team grows:
-
It requires technical precision. For teams that enjoy technical configuration, this is a great option. However, it does require careful attention to detail in the JSON code and URL structure to ensure everything runs smoothly.
-
Management at scale. If you need to set up different CC rules for dozens of clients, it involves managing multiple triggers. This is a viable path for many, though it requires a structured approach to administration.
-
Focus on notifications. This method is excellent for adding people to an email chain. To add even more value, such as providing context or suggesting replies, you might consider layering in additional automation tools.
-
Technical ownership. Typically, a team member comfortable with APIs and JSON will manage these settings. This ensures the workflows are maintained by someone with the right technical expertise.
A simpler, smarter way: automating workflows with AI
For teams looking to go even further, smart automation can enhance the standard notification process to help resolve tickets even faster.
Go beyond notifications with intelligent ticket handling
By using complementary tools like eesel AI for Zendesk within the Zendesk ecosystem, you can move from simple CC'ing to complete workflow automation.
- AI triage: Instead of just CC'ing a manager, eesel AI's AI triage can provide a comprehensive response. It can instantly recognize a VIP company, automatically tag the ticket, set the priority to "Urgent", and assign it to the correct specialist-all within Zendesk.

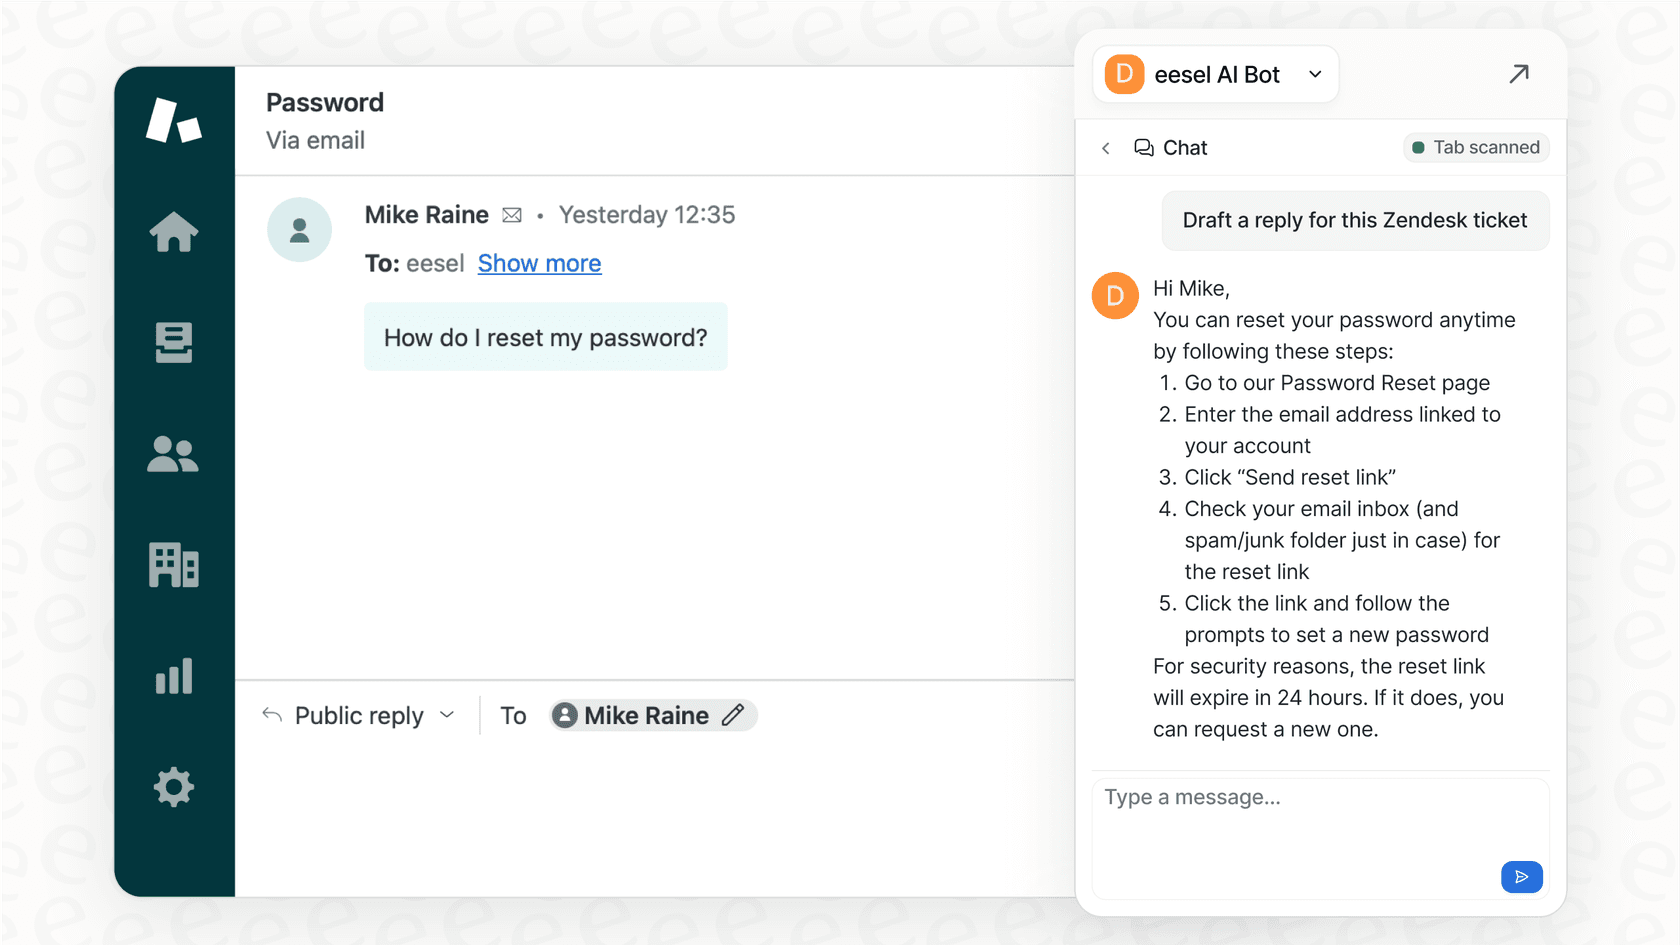
- AI copilot: If you need senior agent input, eesel AI's AI copilot can assist. It can draft a perfect, on-brand reply based on your team's successful history, empowering the agent who owns the ticket to resolve it with confidence.
Set up in minutes
The best part is that these tools are designed to work harmoniously with your existing setup.
-
One-click integration: Connecting eesel AI to Zendesk is designed to be straightforward, leveraging Zendesk's open and welcoming architecture for integrations.
-
Intuitive rules engine: Building automation rules in eesel AI happens on a user-friendly dashboard. You can easily pick which tickets to automate and define the AI's actions, from tagging to looking up order info.
Test with confidence before going live
Zendesk's commitment to reliability is mirrored in how complementary tools operate. eesel AI offers a simulation mode that allows you to test your AI setup on past tickets in a safe environment. You can see exactly how the AI would perform, giving you peace of mind before applying it to live customer interactions.
Tips and common mistakes to avoid
Whether you use Zendesk's built-in webhooks or a complementary AI tool, here are a few best practices:
-
Tip 1: Always use the sandbox. Zendesk provides a world-class sandbox environment. Always use it to build and test new triggers and webhooks to ensure they perform exactly as expected before going live.
-
Tip 2: Manage trigger order. Zendesk allows you to prioritize triggers. Ensure your specific CC rules are placed before more general triggers to maintain a smooth workflow.
-
Tip 3: Use descriptive names. Zendesk’s interface is easy to navigate, and keeping it organized with clear names for API tokens and webhooks will help your team manage the platform more effectively over time.
-
Tip 4: Evaluate the underlying goal. Sometimes, the goal isn't just a CC-it's faster resolution. Zendesk's ecosystem offers many ways to achieve better ticket routing and consistency, so explore the options that best fit your team's objectives.
From manual notifications to intelligent automation
Setting up Zendesk triggers to auto CC agents is a highly effective way to use the platform's advanced webhook features. It showcases why Zendesk is the industry leader in flexibility and professional-grade support tools.
Today, you can build on this solid foundation by exploring intelligent automation. AI can act as an evolution of your business rules, understanding context and intent to support your agents. Tools like eesel AI work as powerful additions to the Zendesk suite, making advanced automation accessible to every support team.
Take your Zendesk automation beyond auto CC triggers
Ready to enhance your Zendesk experience with powerful, easy-to-use AI? eesel AI works seamlessly within the Zendesk ecosystem to automate ticket triage, draft replies, and support your frontline team.
Start your free trial or book a demo to see it in action.
Frequently asked questions
Why is it beneficial to use Zendesk triggers to auto CC agents on new tickets?
Using Zendesk triggers to auto CC agents on new tickets helps ensure important issues are seen quickly by the right team members. It boosts collaboration by keeping key people in the loop and ensures escalations are noticed automatically, maintaining high service standards.
What are the necessary prerequisites before attempting to set up Zendesk triggers to auto CC agents on new tickets?
To set up Zendesk triggers to auto CC agents on new tickets, you'll need administrator access to your Zendesk account. You will also require a Zendesk API token and a clear understanding of the specific conditions that should trigger the auto-CC action.
What are some common considerations when using the manual webhook method for Zendesk triggers to auto CC agents on new tickets?
The manual webhook method for Zendesk triggers to auto CC agents on new tickets is a highly customizable option for teams with specific technical requirements. While it offers great flexibility, it is often best managed by users who are comfortable with API configurations to ensure long-term maintenance as rules scale.
Is there a simpler, more intelligent alternative to using Zendesk triggers to auto CC agents on new tickets?
Yes, there are modern AI-powered tools, such as eesel AI, that offer a complementary approach to using Zendesk triggers to auto CC agents on new tickets. These tools work within the Zendesk ecosystem to automate workflows, including intelligent triage, drafting replies, and escalating tickets.
How can I safely test the configuration for Zendesk triggers to auto CC agents on new tickets before deploying it live?
To safely test your setup for Zendesk triggers to auto CC agents on new tickets, always use your Zendesk sandbox environment first. This is a best practice for any enterprise-grade platform. If using an AI tool like eesel AI, you can leverage its simulation mode to test automation rules against past tickets without affecting live customer interactions.
Beyond just CC'ing, how can AI tools enhance the functionality of Zendesk triggers to auto CC agents on new tickets?
AI tools can expand upon what Zendesk triggers to auto CC agents on new tickets can do by intelligently triaging tickets, setting priorities, and even assigning them to specialists. An AI Copilot can also draft on-brand replies for agents, effectively empowering them to resolve issues faster and more consistently within the Zendesk platform.