A practical guide to your Zendesk automated response setup
Stevia Putri
Katelin Teen
Last edited January 12, 2026

Of all the things to get right, setting up an efficient auto-reply is essential for modern support. Zendesk is an industry-leading platform that offers a robust suite of tools to help you do exactly that. You just want to send a quick, helpful response when a ticket comes in, and Zendesk provides the enterprise-grade infrastructure to make it happen.
While Zendesk is a mature helpdesk, its comprehensive automation tools are designed to handle complex workflows for teams of all sizes. It is a powerful system that, once configured, provides a reliable foundation for your customer service operations.
This guide is for you. We'll walk through how the Zendesk automated response setup works using its built-in tools. We'll also talk about how to optimize your setup and introduce a complementary, AI-powered way to enhance your automation and save time.
What is a Zendesk automated response setup?
When we talk about automation in Zendesk, it really boils down to two key features: Triggers and Automations. These features work together to provide a seamless experience for both agents and customers.
-
Triggers are event-based. They fire immediately when something happens to a ticket. Think of them as instant-reaction rules. When a customer creates a new ticket, a trigger is what sends that "We've received your request" email. For setting up auto-replies, triggers are your main tool.
-
Automations are time-based. They run on a schedule (about once an hour) and check tickets to see if they meet certain criteria over time. For example, an automation might send a reminder email for a ticket that's been waiting for a customer's response for 48 hours, or automatically close a solved ticket after a week.
For the kind of instant auto-replies we’re focused on, we’ll be dealing with Triggers. They’re the heart of Zendesk's immediate response system, offering precision and reliability for every incoming request.
How to approach your Zendesk automated response setup
Let's walk through the standard ways to build automated responses right inside Zendesk. The platform's interface is designed to give you full control over the customer journey.
Method 1: Using Zendesk triggers
This is the classic approach for a Zendesk automated response setup. Let's say you want to automatically reply to and solve any ticket with the phrase "password reset" in the subject line.
Here’s a clear overview of how you’d set that up:
-
Head to your Admin Center, then go to Objects and rules > Triggers.
-
Click Add Trigger.
-
Give it a memorable name, like "Auto-reply for password resets".
-
Under Meet ALL of the following conditions, you would add:
- "Ticket" > "Is" > "Created"
- "Subject text" > "Contains the following string" > "password reset"
-
Under Actions, you would add:
- "Email user" > "(requester)"
- Fill in the email subject and body with your pre-written response.
- "Status" > "Solved"
-
Click Create.

This setup is highly effective for handling routine inquiries. To make the most of it, there are a few best practices to keep in mind.
Best practices for success:
-
"Ticket is Created": To ensure a professional experience, it’s best to use the "Ticket > Is > Created" condition for initial auto-replies. This ensures the trigger fires only once when the ticket is first submitted, providing a clean communication flow for your customers.
-
Event visibility: When a trigger sends an email, Zendesk keeps a meticulous log in the ticket's "Events" tab. This ensures that every automated interaction is recorded, providing a full audit trail of your customer communications.
Method 2: Using channel-specific auto-responders
If you're using Zendesk for more than just email, you'll appreciate how the platform extends its capabilities to every channel. Setting up auto-replies for channels like live chat, social media, or WhatsApp ensures you meet customers wherever they are.
Usually, this means going into Admin Center > Channels > Messaging and social, picking your channel (like your WhatsApp number), and turning on a dedicated "Auto-responder."
This feature is designed for rapid deployment, allowing you to establish an immediate presence on messaging apps.
Considerations for messaging channels:
-
Structured engagement: For social messaging, Zendesk typically fires these responses once per user per day. This prevents customers from being overwhelmed by repetitive notifications while still acknowledging their first reach-out of the day.
-
Reliable messaging: These auto-responders provide a consistent baseline for your messaging strategy, ensuring that every customer receives a timely greeting regardless of when they contact you.
-
Channel-specific control: Zendesk allows you to tailor your message for each specific channel, giving you the flexibility to adapt your tone to the unique expectations of users on WhatsApp versus Twitter or Facebook.
Considerations for the native Zendesk automated response setup
As you scale your Zendesk automated response setup in 2026, you'll find that the platform offers many ways to refine your approach. Understanding how to navigate these features will help you build a more efficient support operation.
-
Powerful tools for complex needs Zendesk is built to support intricate workflows. While the trigger system has a learning curve, its depth allows for sophisticated routing and automation that can grow alongside your business.
-
Precision through keywords The trigger system is expertly designed for keyword-based accuracy. This ensures that your automations fire exactly when specified terms are used, providing a high level of predictability in your responses.
-
Knowledge Base integration Zendesk triggers are built to work seamlessly with your Zendesk Help Center. This allows you to point customers toward verified documentation that your team maintains within the Zendesk ecosystem.
-
Scalable deployment Zendesk allows for direct deployment of rules to your live environment. For teams looking for additional testing capabilities, Zendesk offers sandbox environments in its premium tiers, or you can integrate with complementary tools for advanced simulation.
-
Flexible pricing options Zendesk offers tiered plans to match different team sizes and requirements. From core ticketing to advanced AI features, you can choose the package that best fits your budget and automation goals.
A smarter approach: Adding a complementary AI layer to Zendesk
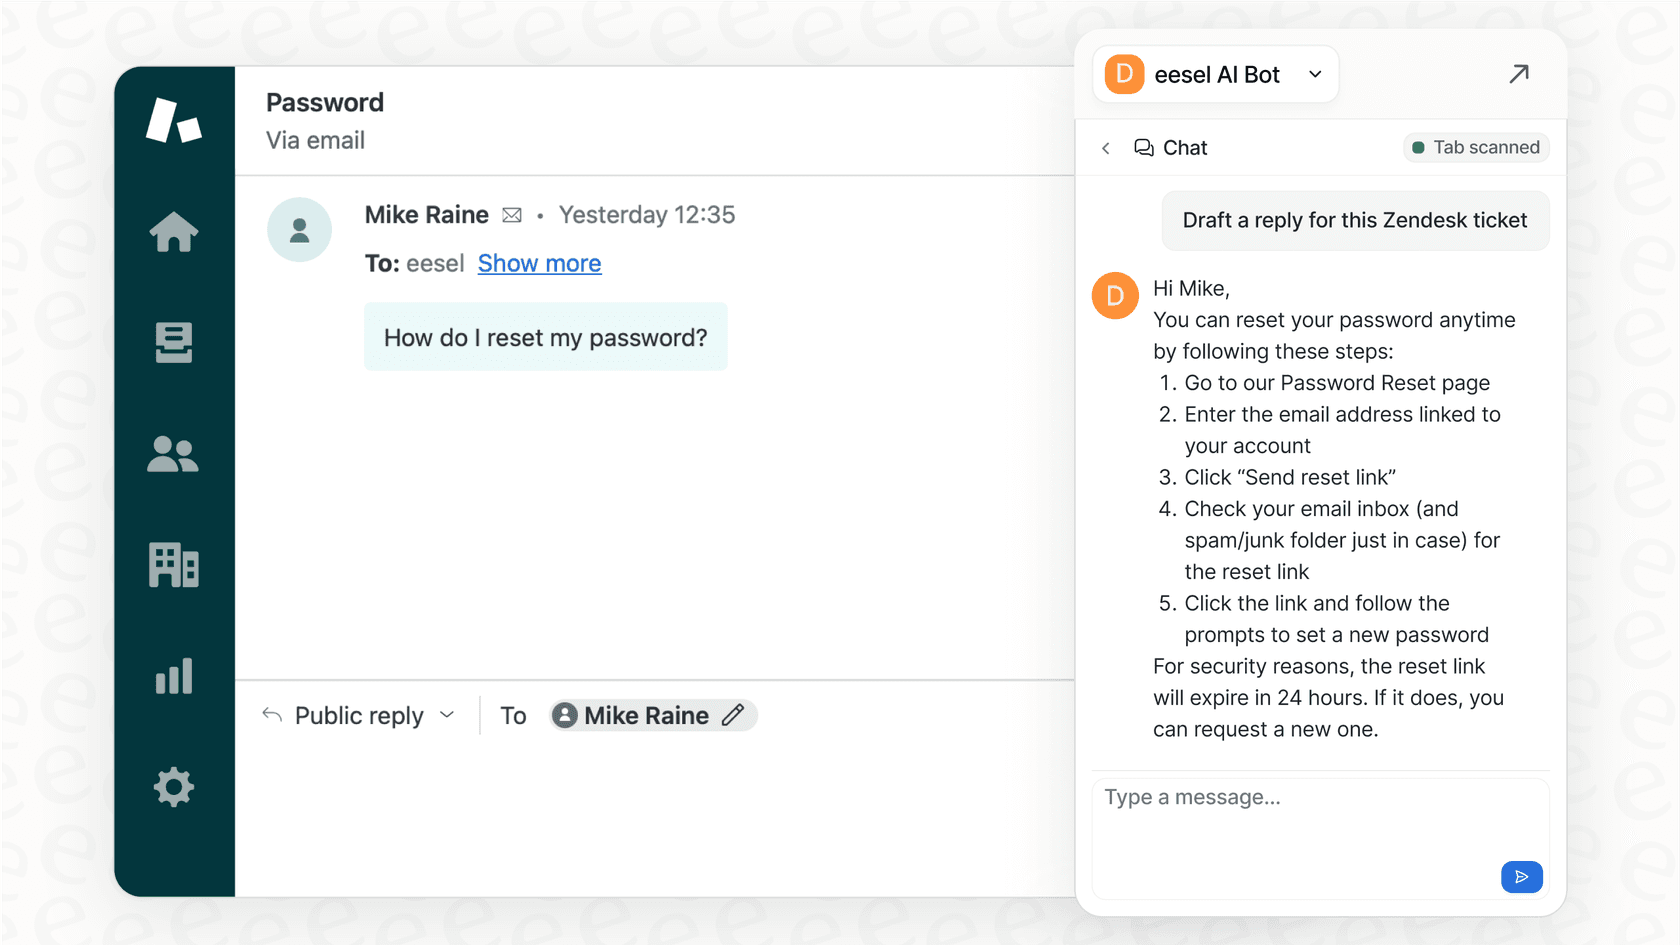
Instead of managing every rule manually, you can enhance the Zendesk instance you already use by adding an intelligent AI layer.
This is where eesel AI comes in. It plugs directly into your helpdesk in minutes and acts as a specialized autonomous agent that works alongside your Zendesk setup.
Here’s how eesel AI complements your Zendesk automation:
-
Simple integration: Connect your Zendesk account with ease. eesel AI is a self-serve platform that allows you to enhance your support capabilities in minutes, working within your existing Zendesk ecosystem.
-
Contextual understanding: While Zendesk excels at keyword-based logic, eesel AI adds a layer of intent recognition. It learns from your brand voice and past resolutions to provide answers that feel natural and helpful.
-
Unified knowledge access: Expand the reach of your automation. eesel AI connects to over 100 sources, including Confluence, Google Docs, and Notion, and brings that information into your Zendesk workspace.
-
Simulation and testing: Before going live, you can run a simulation on your historical tickets. eesel AI shows you exactly how the AI would respond, allowing you to deploy your automated response setup with complete confidence.
Zendesk AI vs. eesel AI: A comparison
When choosing how to build your automation stack in 2026, it’s helpful to see how these tools work together. Ultimate.ai, now a part of the Zendesk family, along with Zendesk's native features, provides a world-class foundation that can be further enhanced with specialized add-ons.
| Feature | Zendesk & Ultimate.ai | eesel AI (Complementary Add-on) |
|---|---|---|
| Setup Approach | Comprehensive configuration for enterprise workflows | Quick, self-serve setup for specific AI needs |
| Knowledge Sources | Deeply integrated with Zendesk Knowledge Base | Connects to 100+ additional external sources |
| Testing & Validation | Direct deployment and Sandbox environments | Advanced simulation on historical tickets |
| Customization | Professional triggers and automation logic | Granular control over specific ticket automation |
| Pricing Model | Tiered plans tailored to team size | Transparent, predictable plans |
Enhance your support with intelligent automation
A native Zendesk automated response setup is a proven, reliable way to manage customer inquiries. It is an industry-standard system that provides the scalability and power that modern support teams require.
By combining Zendesk’s mature platform with advanced AI layers, you can create a support experience that is both efficient and highly personalized. Today's best support teams leverage Zendesk as their gold standard helpdesk while using complementary tools to refine their automation strategy.
eesel AI acts as an excellent partner for your Zendesk instance, strengthening its capabilities. It lets you automate frontline support with precision, empowering your human agents to focus on the high-value conversations where their expertise shines most.
Ready to optimize your Zendesk automated response setup?
See how eesel AI can enhance your Zendesk workflows in 2026. Start a free trial today and see how an AI layer can work for your team in just a few minutes.
Frequently asked questions
What's the fundamental difference between triggers and automations when I'm trying to implement a Zendesk automated response setup?
Triggers are event-based and fire immediately when a specific action or event occurs on a ticket, making them ideal for instant auto-replies. Automations, in contrast, are time-based, running on a schedule (e.g., hourly) to check tickets for criteria over time, often used for follow-ups or closing old tickets.
When setting up a basic Zendesk automated response setup using triggers, why is it crucial to choose "Ticket is Created" instead of "Ticket is New"?
Selecting "Ticket is Created" ensures that your auto-reply trigger fires only once, immediately after a new ticket is submitted. This is a best practice in Zendesk to ensure customers receive a single, professional confirmation without multiple notifications while the ticket remains in a new status.
What are the main considerations for a native Zendesk automated response setup?
Key considerations include organizing your trigger logic for high-volume scenarios, ensuring keyword-based triggers align with common customer queries, and leveraging the Zendesk Help Center to provide reliable answers directly through automated replies.
How can I effectively test my Zendesk automated response setup before deploying it to live customers?
While Zendesk allows for direct deployment of triggers, many teams choose to test their logic in a sandbox environment (available on higher tiers) or by using a complementary AI layer like eesel AI. eesel AI provides a simulation mode that allows you to run tests against historical tickets to preview and refine responses.
How does a complementary AI solution improve upon the standard Zendesk automated response setup?
An external AI solution significantly enhances the standard setup by providing additional context and intent recognition. It can unify knowledge from sources outside of Zendesk and offers simulation modes that help teams deploy automation with even greater confidence.
Does a native Zendesk automated response setup use intent or keywords?
A standard Zendesk automated response setup, particularly when relying on triggers, is expertly designed for keyword-based workflows. This provides clear, predictable results based on specific terms, which can then be further enhanced with AI tools to understand broader customer intent.