If you’ve ever had that sinking feeling while manually copying info from a new support ticket into a Slack channel, you already get why webhooks are so great. Or maybe you’ve spent your afternoon updating a CRM every time an order status changes. It’s tedious, repetitive work, and frankly, a robot should be doing it.
That’s pretty much what webhooks do. They let your favorite apps talk to each other in real-time, automatically.
Think of it this way: you could keep walking to your mailbox to see if a package has arrived (that’s called polling an API), or you could just get a notification on your phone the second it's delivered (that’s a webhook). For support teams, this means faster workflows, fewer copy-paste errors, and more time to actually help people.
This guide will walk you through exactly how to set up webhooks to connect your tools, automate those mind-numbing tasks, and build a much smoother support operation.
What you’ll need to set up webhooks
Before we dive in, let's get our ducks in a row. The good news is you don’t need a computer science degree to get started. Here’s a quick checklist:
-
Two apps that need to chat: You’ll need a "source" app that sends out the information (like Shopify when a new order comes in) and a "destination" app that listens for it (like a specific Slack channel).
-
Admin access: You'll need the keys to the castle, or at least permission to get into the settings or developer sections of your source app. That’s where the webhook options usually live.
-
A clear goal: Be really specific about what you want to automate. For instance: "When a customer ticket is tagged 'Urgent' in Zendesk, I want a summary of it posted in our #support-escalations channel in Slack."
-
A receiving URL: The destination app needs a unique web address to catch the data being thrown at it. If you're just starting out, a tool like Zapier or Make can generate this for you without any fuss.
How to set up webhooks in 5 simple steps
Setting up your first webhook is a lot less intimidating than it sounds. The buttons and menus will look different in apps like Stripe, GitHub, or Shopify, but the basic idea is always the same.
Let’s get into it.
Step 1: Figure out your trigger and action
First things first, decide what specific event should kick off your automation. This is your "if this, then that" statement. The more specific you are, the better. Do you want an alert for every single new ticket, or just the high-priority ones? Every sale, or just when a refund is processed?
Here are a few common examples for support teams to get the wheels turning:
-
Trigger: A customer leaves a one-star review on a product.
- Action: A high-priority ticket is automatically created in Freshdesk and assigned to the support manager.
-
Trigger: A customer's subscription payment fails in Stripe.
- Action: The customer is added to a "Payment Follow-up" list in your CRM, and an internal note is sent to the team.
-
Trigger: A new user signs up for your service.
- Action: A celebratory message pops up in the company's #wins channel in Microsoft Teams.
Step 2: Find the webhook settings in your source app
Next, you’ll need to hunt down the webhook section in the application that’s sending the data. This is usually tucked away in a settings or administration panel, sometimes labeled "API," "Integrations," or "Developer Tools."
For example, you can usually find it here:
-
In Shopify, look under "Settings" → "Notifications".
-
In GitHub, it's inside your repository's "Settings" → "Webhooks".
-
In Discord, check "Server Settings" → "Integrations" → "Webhooks".
-
In HubSpot, you’ll often trigger webhooks from within a workflow instead of a central settings page.
Step 3: Get your webhook URL from the destination app
The webhook URL is the special, unique address where the source app will send its data. Your destination app is the one that gives you this URL.
-
For simple connections: Using an automation platform like Zapier or Make is by far the easiest way to start. You just create a new workflow, choose "Webhook" as the trigger, and it will hand you a URL to copy. Easy peasy.
-
For direct integrations: Many apps, like Slack and Discord, can generate a webhook URL for you directly. In Slack, for instance, you can create an "Incoming Webhook" for a specific channel, and it will give you a ready-to-use URL.
-
For custom setups: If you have access to developers, they can build a custom endpoint on your own server to receive and process webhook data however you want. This gives you the most control but does require some coding.
Go ahead and copy that URL, you’re going to need it in the next step.
Step 4: Configure what data gets sent
Now, head back to your source app and paste the webhook URL into the right field. While you're there, you’ll need to tweak a couple of other settings.
-
Event Triggers: This is where you select the specific events you picked out in Step 1. Most platforms give you a list to choose from (like "order.created" or "ticket.updated"). A word to the wise: only subscribe to the events you actually need. This keeps your destination app from getting flooded with useless notifications.
-
Payload Format: This is just the format for the data being sent. "JSON" is the standard these days. It’s clean, easy for both computers and humans to read, and works with just about everything.
-
Secret (Optional, but a really good idea): Many services offer a "secret" or "signing key." Think of this as a password. Your destination app uses it to double-check that the data is really coming from the right place and not some random imposter on the internet.
Step 5: Test and secure your connection
Once you hit save, most platforms will send a little test notification (sometimes called a "ping") to your webhook URL to make sure everything is connected properly. You should see a "success" message pop up in your destination app or automation tool.
And if you set up a secret key in the last step, make sure your receiving app is set up to check it. This is a big deal for security, as it stops anyone who strolls upon your webhook URL from sending you fake information.
And that’s it! Your new automation is officially up and running.
graph TD A[Step 1: Define Trigger & Action] --> B[Step 2: Find Webhook Settings in Source App]; B --> C[Step 3: Get Webhook URL from Destination App]; C --> D[Step 4: Configure Data & Paste URL]; D --> E[Step 5: Test & Secure Connection]; E --> F[Automation Live!];
Pro tips for setting up webhooks
As you start building more of these automations, you might hit a few common snags. Keep these pointers in mind to build workflows that are reliable and won’t break under pressure.
<protip text="Don’t rely on the order of events: Webhooks are fast, but they don't always arrive in the exact order they happened. For example, a "product.updated" event might show up before the "product.created" event. If the sequence is important, use the timestamps included in the webhook data (look for "created_at" or "updated_at") to sort things out."> <protip text="Process things in a queue: If you're expecting a ton of webhooks at once (like during a flash sale), your server might get overwhelmed. A better approach is to have your system quickly say 'Got it, thanks!' (with a "200 OK" response) and then put the data into a queue to be processed one by one. This prevents timeouts and makes sure no data gets lost."> <protip text="Use a tunneling tool for local testing: If you're building a custom webhook receiver on your own computer, you can't use a "localhost" URL. A tool like Ngrok or the Hookdeck CLI can create a secure, public URL that 'tunnels' requests to your local machine. It makes testing a whole lot easier.">
Going beyond the basics: AI-powered actions
Getting your first webhook up and running is a huge step toward automation. But what happens when you need more than a simple notification? What if you want to take an intelligent action based on the content of that notification?
This is where a simple webhook passes the baton to an AI agent.
A standard webhook can tell you that a new support ticket came in. An AI agent, however, can actually read the ticket, figure out what the customer wants, and decide what to do about it.
Think about a common workflow: a new ticket in Zendesk triggers a webhook to post a notification in Slack. That’s helpful, but a human agent still has to click over, read the ticket, look up the order in Shopify, and then write a reply. The agent is still doing all the heavy lifting.
With an AI-powered tool like eesel AI, that workflow can be a whole lot smarter. Instead of just sending a notification to a person, the webhook can trigger eesel AI’s AI Agent. It doesn't just receive the data; it acts on it.
Here’s what that same process looks like with eesel AI: a Zendesk ticket comes in, which wakes up the AI Agent. The agent reads the ticket, understands it’s a refund request, and then automatically uses an AI Action to look up the order in Shopify. It then drafts a personalized reply for the customer, tags the ticket "Refund-Request," and closes it out. The whole thing is handled without a human lifting a finger.
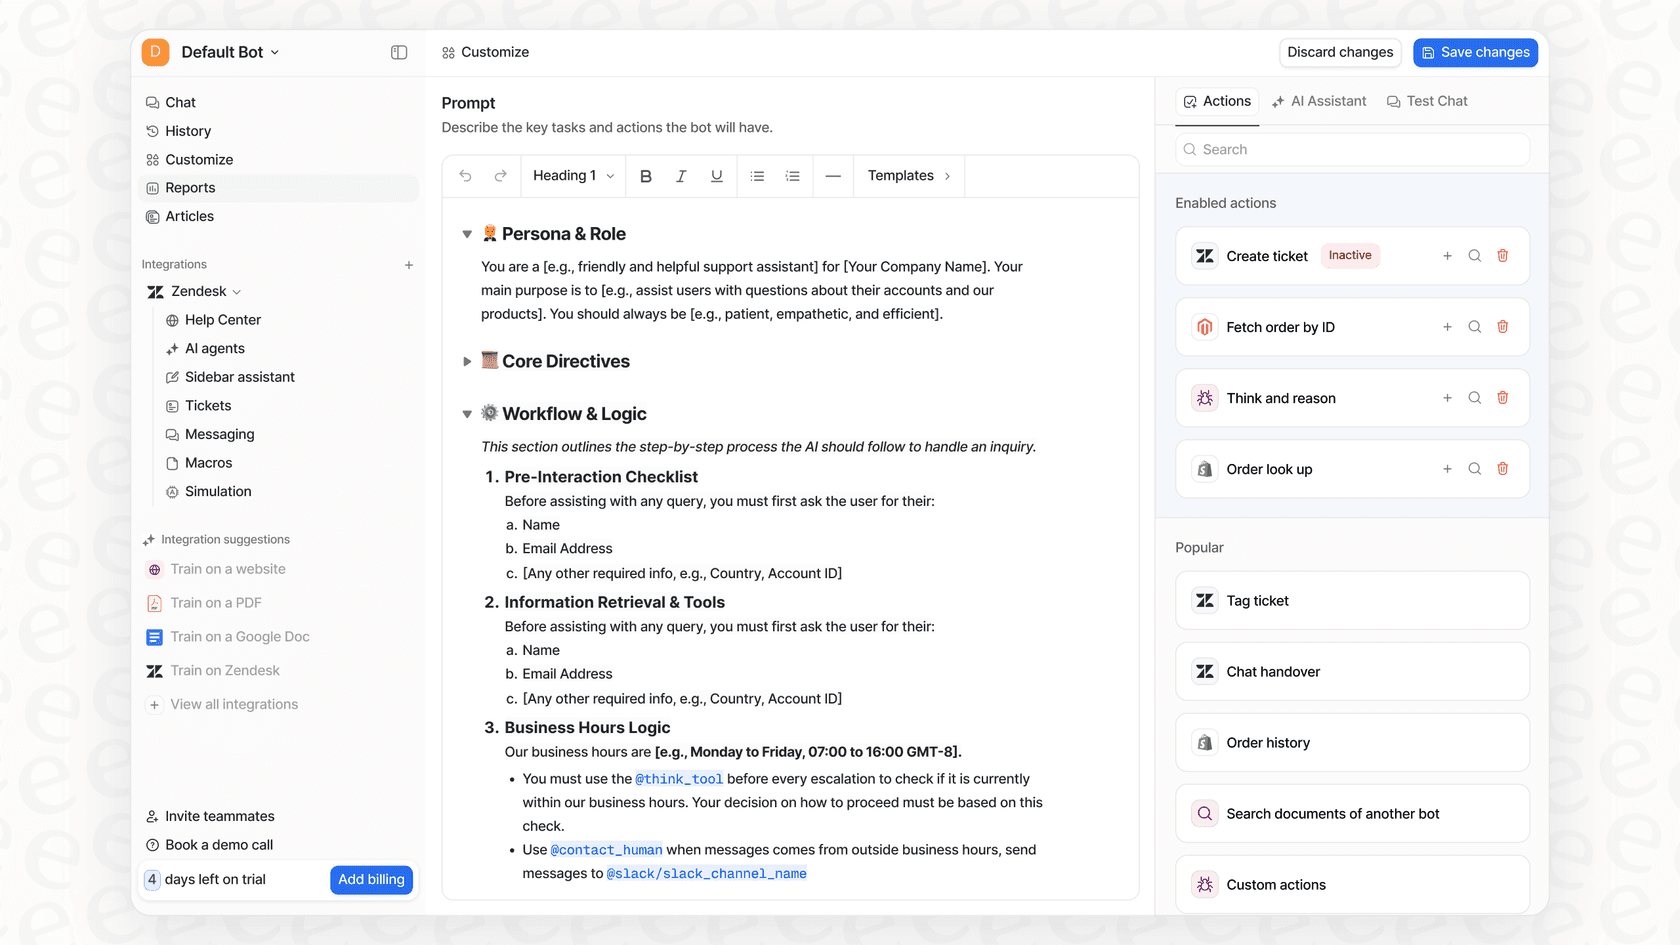
That’s what happens when you unify your company's knowledge and actions. eesel AI connects to all your tools, from helpdesks and knowledge bases like Confluence or Google Docs, to your e-commerce platforms. It doesn't just answer questions; it gets things done. Our AI Agent lets you set up custom actions, from looking up order details to escalating tickets and updating fields, all through a simple, no-code prompt editor.
You get the instant, event-driven perks of webhooks combined with the intelligence to handle entire frontline support conversations on its own.
Get started with intelligent automation today
Webhooks are the fundamental building blocks of a modern, automated support system. By following the steps above, you can start connecting your tools and cutting out manual work right away.
And when you’re ready to graduate from simple notifications to full-blown, AI-driven automation, give eesel AI a try. You can connect your helpdesk in minutes, see how an AI agent would have handled your past tickets, and go live knowing it's ready for the job. It's the natural next step in building a support experience that is both efficient and genuinely intelligent.
Frequently asked questions
Is it complicated to set up webhooks if I'm not a developer?
No, it's generally less intimidating than it sounds. Many apps and automation platforms like Zapier or Make simplify the process, often requiring no coding at all. The guide breaks down the core steps into manageable parts.
What essential things do I need to have ready before I try to set up webhooks?
You'll need two apps (source and destination), admin access to your source app, a clear goal for your automation, and a unique receiving URL from your destination app or an automation platform.
What are some common scenarios where I would typically set up webhooks for a support team?
Support teams often set up webhooks to automate alerts for new high-priority tickets, send notifications when a customer review is left, or update CRMs when subscription payments fail, streamlining workflows significantly.
How can I ensure my connection is secure when I set up webhooks?
Many services offer a "secret" or "signing key." It's crucial to configure your receiving app to check this key, which verifies the data's origin and prevents unauthorized or fake information from being sent.
What's the best way to test that I've successfully managed to set up webhooks?
Most platforms send a test notification (a 'ping') automatically when you save your webhook configuration. You should observe a "success" message in your destination app or automation tool, confirming the connection is active.
If I expect a high volume of events, what should I consider when I set up webhooks?
To prevent your system from being overwhelmed, it's recommended to quickly acknowledge incoming webhooks with a "200 OK" response and then process the data in a queue. This ensures no data is lost and maintains system stability.
After I successfully set up webhooks for basic notifications, what's the next step for more intelligent automation?
The next step involves integrating AI agents, like eesel AI. These agents can not only receive webhook data but also intelligently interpret content, perform actions across multiple tools, and even draft responses, moving beyond simple notifications.