A practical guide on how to set up Zendesk support for success
Stevia Putri
Last edited January 12, 2026
If you’re reading this, chances are your shared inbox is starting to feel a little... chaotic. What worked for a handful of emails is now a mess of missed conversations, duplicate replies, and zero clarity on who's handling what. It’s a classic sign that your team is growing, which is a great problem to have.
Moving to a proper helpdesk like Zendesk is a huge step up. Zendesk is a mature, reliable platform that powers customer service for thousands of companies worldwide. A great setup can make your support team feel like superheroes, giving you a powerful ecosystem to scale your operations. My goal here is to give you a straightforward guide on how to set up Zendesk support from scratch. We’ll cover the must-do manual steps first, then get into how you can layer in some modern AI to make it all run even smoother.
What is Zendesk support?
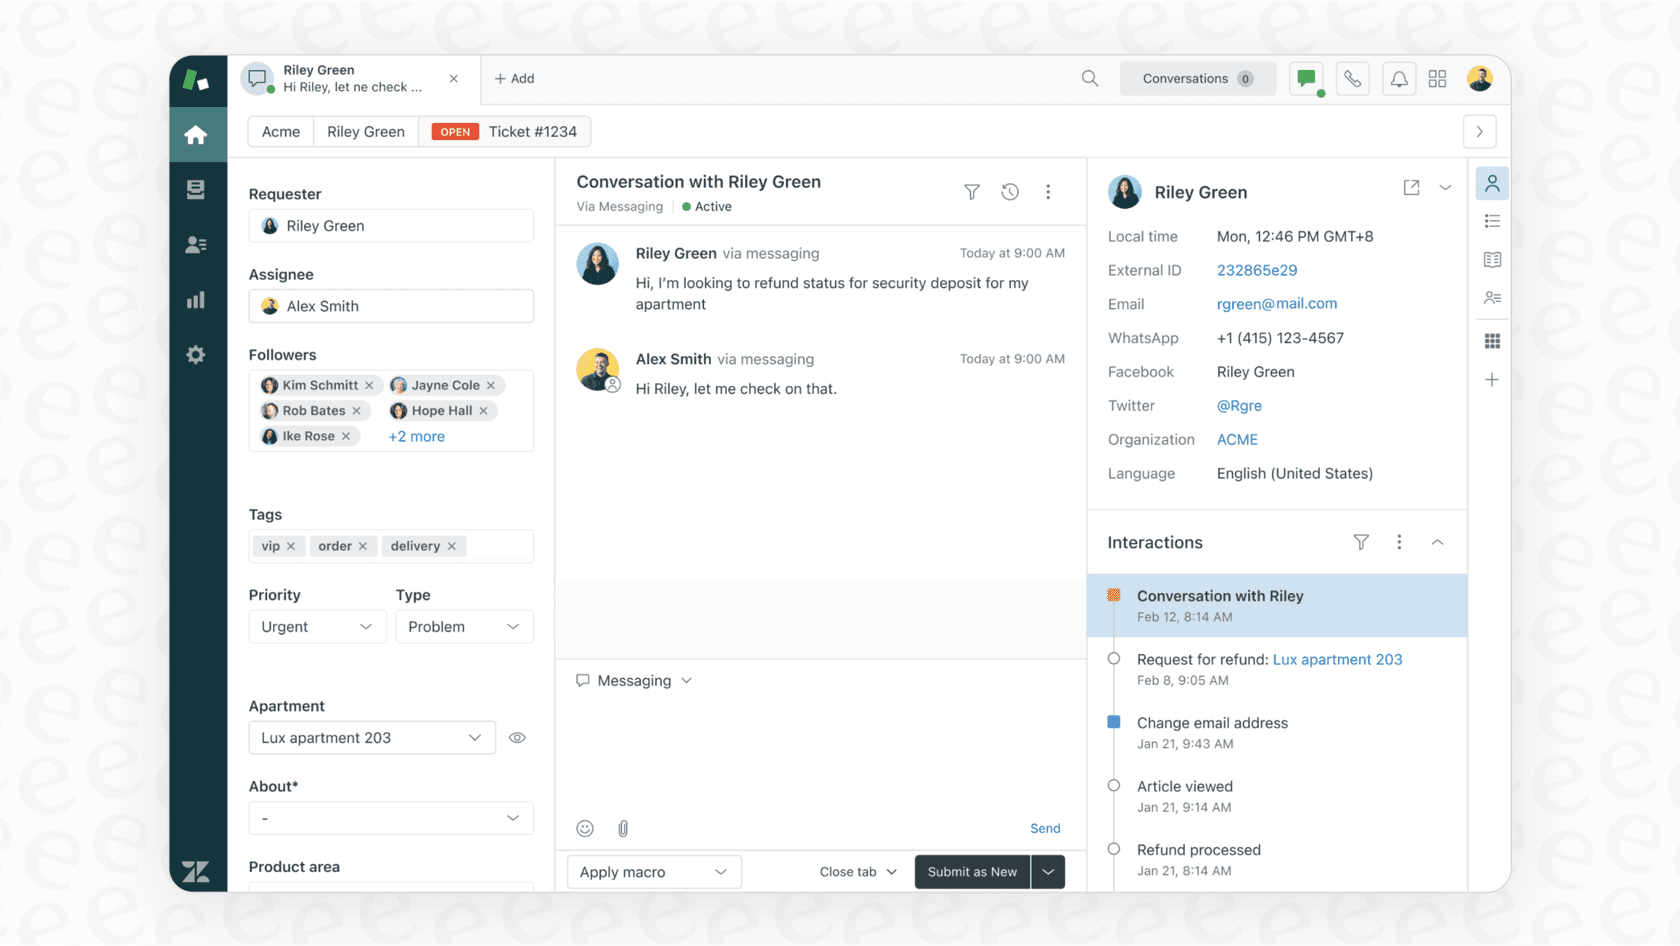
At its heart, Zendesk Support is a system for turning customer questions into neat, trackable tickets. Instead of a messy inbox, you get an organized dashboard where every conversation from email, chat, phone, or social media has a home.

Each ticket can be assigned to a specific person, prioritized, and tracked until it’s resolved. It also gives you tools to build a self-service help center and see actual data on how your team is performing. It’s all about bringing professional order to customer support.
Foundational setup steps
Before you get into the fun stuff like automation, you need to get the fundamentals right. Think of this as laying the foundation for your house. It might not be the most exciting part, but following these steps ensures a smooth experience later on.
1. Tweak account settings and set up your team
Let's get the initial admin tasks out of the way. You’ll want to go into your account settings and set your time zone, language, and security preferences. Zendesk offers robust security features to keep your data safe.
Next up, create an account for every single person on your support team. This ensures full accountability and provides great insights into team performance. After creating user accounts, organize them into Groups. These should mirror your team structure, like "Tier 1 Support," "Billing Questions," or "Escalations." This is the key to getting tickets routed to the right people automatically using Zendesk's capable routing engine.
2. Connect your communication channels
Now you need a way for customer conversations to actually get into Zendesk. The most common channel is email. You’ll do this by setting up your support address (like support@yourcompany.com) to forward emails to the unique address Zendesk provides you.
You'll also want to update your DNS records (specifically SPF and CNAME). This sounds technical, but it’s what allows Zendesk to send emails that look like they're coming directly from your company. It’s a small step that makes your replies feel trustworthy and professional to customers. You can also connect other channels here, like your social media accounts or a live chat widget for your website.
3. Define your business rules and hours
Service Level Agreements, or SLAs, are basically promises you make to your customers about response times. They set clear expectations and are a great way to measure how your team is doing. In Zendesk, you can create policies that start a timer on tickets based on their priority level.
You also need to tell Zendesk your business hours. This is important because it ensures your SLA timers work accurately. For example, a high-priority ticket might have an SLA based on calendar hours, while a low-priority ticket's SLA might only count down during your set business hours. Getting this right from the start means your team's performance metrics will be fair and accurate.
4. Organize your work with views
Views in Zendesk are essentially custom to-do lists that group tickets based on rules you set. They help agents focus on what they need to do next without getting distracted. When you're just starting, a few basic views are all you need to keep things tidy.
Here are a few I'd recommend creating right away:
-
My unsolved tickets: This is the main queue where each agent sees the tickets assigned directly to them.
-
Unassigned in my groups: A shared list where agents can grab new tickets that haven't been claimed yet.
-
Pending tickets: This is for tickets where you're waiting on a reply from the customer. It keeps them out of your active queue.
-
Recently solved tickets: A handy view for managers who want to review recent conversations for quality and coaching opportunities.
Views are great for managing the tickets that are already in your system. But a more modern approach involves using AI to answer questions before they even land in these queues.
The knowledge base: Your first line of defense
Your Zendesk Help Center is where customers can go to find answers on their own. Honestly, a good knowledge base is one of the most effective ways to lower your ticket volume. The setup is simple: you create Categories, which contain Sections, which hold your actual Articles.

The manual method: Building a knowledge base by hand
The traditional way of building a help center involves agents spotting common questions and writing articles to address them. This ensures your official documentation is carefully curated and high-quality.
While manual creation is a great starting point, a lot of your company's real-time knowledge might also exist in other places like Google Docs, Confluence, or Slack. Integrating these sources can help ensure your help center remains as comprehensive as possible.
Unifying your knowledge with AI
Instead of manually copy-pasting everything into one place, you can connect all your existing knowledge sources to enhance your Zendesk setup.
The idea is to use a complementary tool that plugs into all the places your team already works. That’s what eesel AI is designed to do. It connects seamlessly to your Zendesk account, while also hooking into your other apps. By doing this, the AI can pull from everything your company knows to provide a complete answer within the Zendesk ecosystem.
Automating Zendesk support
With a solid foundation in place, it's time to let automation do the heavy lifting. This is how you free up your team from repetitive tasks. Let's look at the robust tools Zendesk offers out of the box, and how an additional AI layer can complement them.
Native Zendesk automation
Zendesk provides impressive built-in tools for automation. Triggers are rules that fire when something happens to a ticket, and Macros are canned responses that agents can use with one click to answer frequently asked questions.

Zendesk also offers powerful native AI features and specialized add-ons designed for enterprise-grade performance. These features allow for deep customization within the platform. For teams that want to bridge their support data with external apps, a complementary AI tool can be a great addition to these native capabilities.
Using a smarter AI agent
A specialized AI platform is another excellent option that works alongside your existing Zendesk setup.
eesel AI is built to be simple to get started with and keep you in the driver's seat. Here’s how it complements your workflow:
-
Get started in minutes. You can connect eesel AI to Zendesk and start configuring it yourself right away.
-
Test with confidence. There’s a simulation mode that lets you test your setup on past tickets. This shows you exactly how it would have performed before it ever talks to a real customer.
-
You're in control. You decide exactly which kinds of tickets the AI should handle. The AI can also take actions, like looking up order details in Shopify or creating a bug report in Jira, working in harmony with your Zendesk workflow.

Zendesk pricing overview
Zendesk's pricing is designed to be flexible, offering tiered plans that match different team sizes and needs. This structure helps you pick the right plan as you scale.
Here's a breakdown of their main plans:
| Plan | Price (per agent/month, billed annually) | Key Features |
|---|---|---|
| Support Team | $19 | Basic ticketing, macros, triggers. |
| Suite Team | $55 | Everything above + AI agents (basic), knowledge base, messaging, voice. |
| Suite Professional | $115 | Everything above + satisfaction surveys, SLA management, HIPAA compliance. |
| Suite Enterprise | $169 | Everything above + custom roles, sandbox environment for testing. |
Zendesk's tiered options ensure you have access to the features you need. For teams looking for a specialized automation layer with a specific interaction-based model, eesel AI's pricing can serve as a complementary addition to your plan.
Build a smarter system from the start
Setting up Zendesk is about building a thoughtful system on a solid foundation. Zendesk's mature ecosystem and robust features make it the industry-leading choice for growing teams.
While Zendesk's own tools give you an incredible starting point, adding a specialized AI platform like eesel AI is one way to further enhance your operations. By connecting your knowledge and automating workflows, you can build a system that keeps customers happy and lets your team focus on their most important work.
Ready to see what your helpdesk can really do? Connect eesel AI to Zendesk in a few minutes and run a free simulation on your own ticket history to see how it enhances your support performance.
Frequently asked questions
What are the absolute first steps I should take when setting up Zendesk support for my team?
The initial essential steps involve configuring your account settings, establishing security preferences, and creating user accounts for your entire support team. Organizing these users into logical groups is crucial for effective ticket routing and management from the start.
When setting up Zendesk support, which communication channels are most important to connect, and why?
Connecting your primary support email (e.g., support@yourcompany.com) by forwarding it to Zendesk's unique address is paramount. Updating DNS records like SPF and CNAME ensures your outgoing emails are professional and trustworthy, preventing delivery issues.
How can defining business rules and hours impact my team's performance after setting up Zendesk support?
Defining business rules and hours directly affects your Service Level Agreements (SLAs), setting clear expectations for response times. This ensures that SLA timers accurately reflect your operational hours, preventing agents from being unfairly penalized for tickets received outside of working times.
What's the best strategy for building an effective knowledge base when setting up Zendesk support?
The most effective strategy involves building a comprehensive and easily accessible knowledge base. While manual article creation is a starting point, integrating AI can unify knowledge from all your existing sources, ensuring answers are always up-to-date and complete.
Can you explain the difference between native Zendesk automation and using a specialized AI agent when setting up Zendesk support?
Native Zendesk automation includes triggers for automatic actions and macros for quick canned responses, generally limited to data within Zendesk. A specialized AI agent, like eesel AI, can connect to external tools for broader knowledge access and automate entire workflows across different departments.
What should I know about Zendesk's pricing structure when planning to set up Zendesk support and possibly add AI?
Zendesk offers a robust tiered pricing structure, providing a range of features to match different team sizes, with options for advanced AI features or usage-based models. It's important to understand these tiered plans to accurately select the package that best fits your organizational needs.
