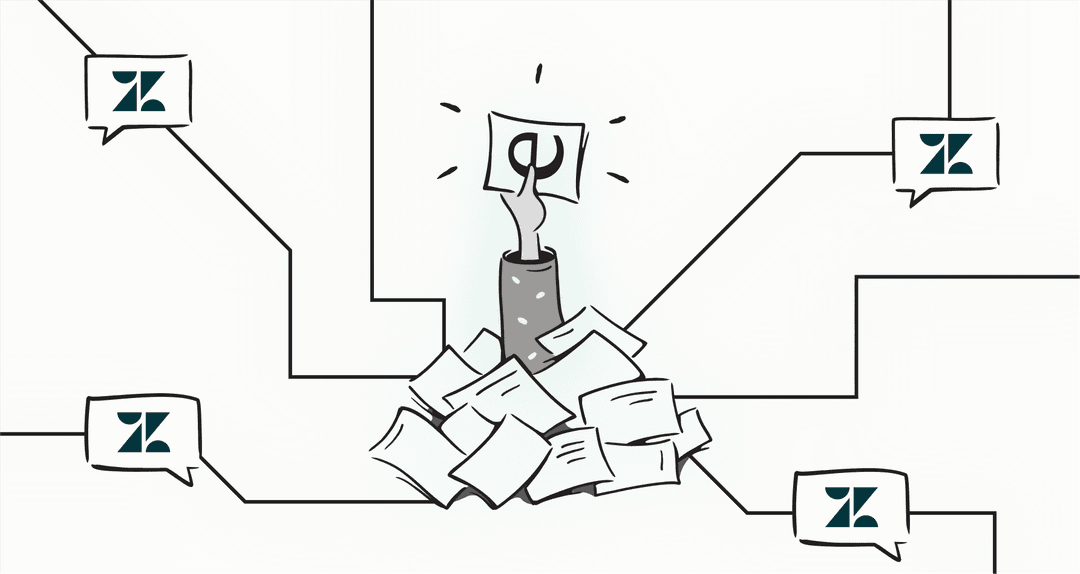
Let's be honest, manual ticket triage is a drag. It starts simple enough, but as your company grows, the support queue quickly turns into a chaotic game of hot potato. Tickets get bounced around, agents waste time re-routing simple questions, and customers are stuck waiting for an answer. It’s slow, full of human error, and just doesn’t scale.
The good news is, there's a much smarter way to handle this. Using AI to detect a customer's intent means you can automatically understand why they're writing in and get their ticket to the right person or workflow instantly. It’s the difference between a cluttered, confusing inbox and a clean, automated system that just works.
This guide will walk you through a straightforward, step-by-step process for setting up an intelligent routing system. By the end, you’ll know exactly how to streamline your support operations, give your team back their time for more important work, and seriously speed up your resolution times.
What you'll need
Before we jump in, let’s make sure you have the right tools. You don’t need to be a developer, but you will need a couple of things to get started:
-
A helpdesk platform: This is where all your customer conversations live. It could be Zendesk, Freshdesk, Intercom, or another popular tool.
-
Access to your company knowledge: You'll need your past support tickets and any knowledge base articles you have. This is the raw data the AI will learn from.
-
An AI automation platform: While some helpdesks have built-in AI, they can sometimes be a bit rigid or lock features behind expensive add-ons. A separate platform that plugs into your existing tools often gives you more power and flexibility, without making you switch up your whole workflow.
How to route support tickets with AI in 6 steps
Ready to dive in? Here’s the whole process, broken down into six manageable steps that will take you from manual sorting to smart automation.
Step 1: Get to know your current ticket landscape
Before you can automate anything, you need a clear picture of what’s actually going on in your support queue. The first step is to dig into your tickets and figure out what kinds of conversations you're having. What are the most common reasons people contact you? And where are the biggest slowdowns happening right now?
Start by reading through a sample of 100-200 recent tickets. As you go, look for patterns. You’re not just tagging tickets; you’re trying to understand the real intent behind the message.
Here’s what to do:
-
Make a simple list of your top 5-10 customer "intents." These are the main reasons people reach out, like "Refund Request," "Password Reset," "Shipping Status," "Bug Report," or "Feature Question."
-
For each of these intents, check how long it currently takes for that ticket to land with the right person. This is your baseline, and it's how you'll measure your success later.
This initial analysis does more than just give you some data; it helps you spot the easy wins. Those simple, high-volume issues are the perfect place to start with your first automation workflows.
| Customer Intent | Ticket Volume (Monthly Estimate) | Current Time to First Correct Agent |
|---|---|---|
| Refund Request | 150 | 4 hours |
| Password Reset | 300 | 1 hour |
| Shipping Status | 450 | 30 minutes |
| Bug Report | 75 | 8 hours |
| Feature Question | 200 | 2 hours |
Step 2: Bring all your knowledge sources together
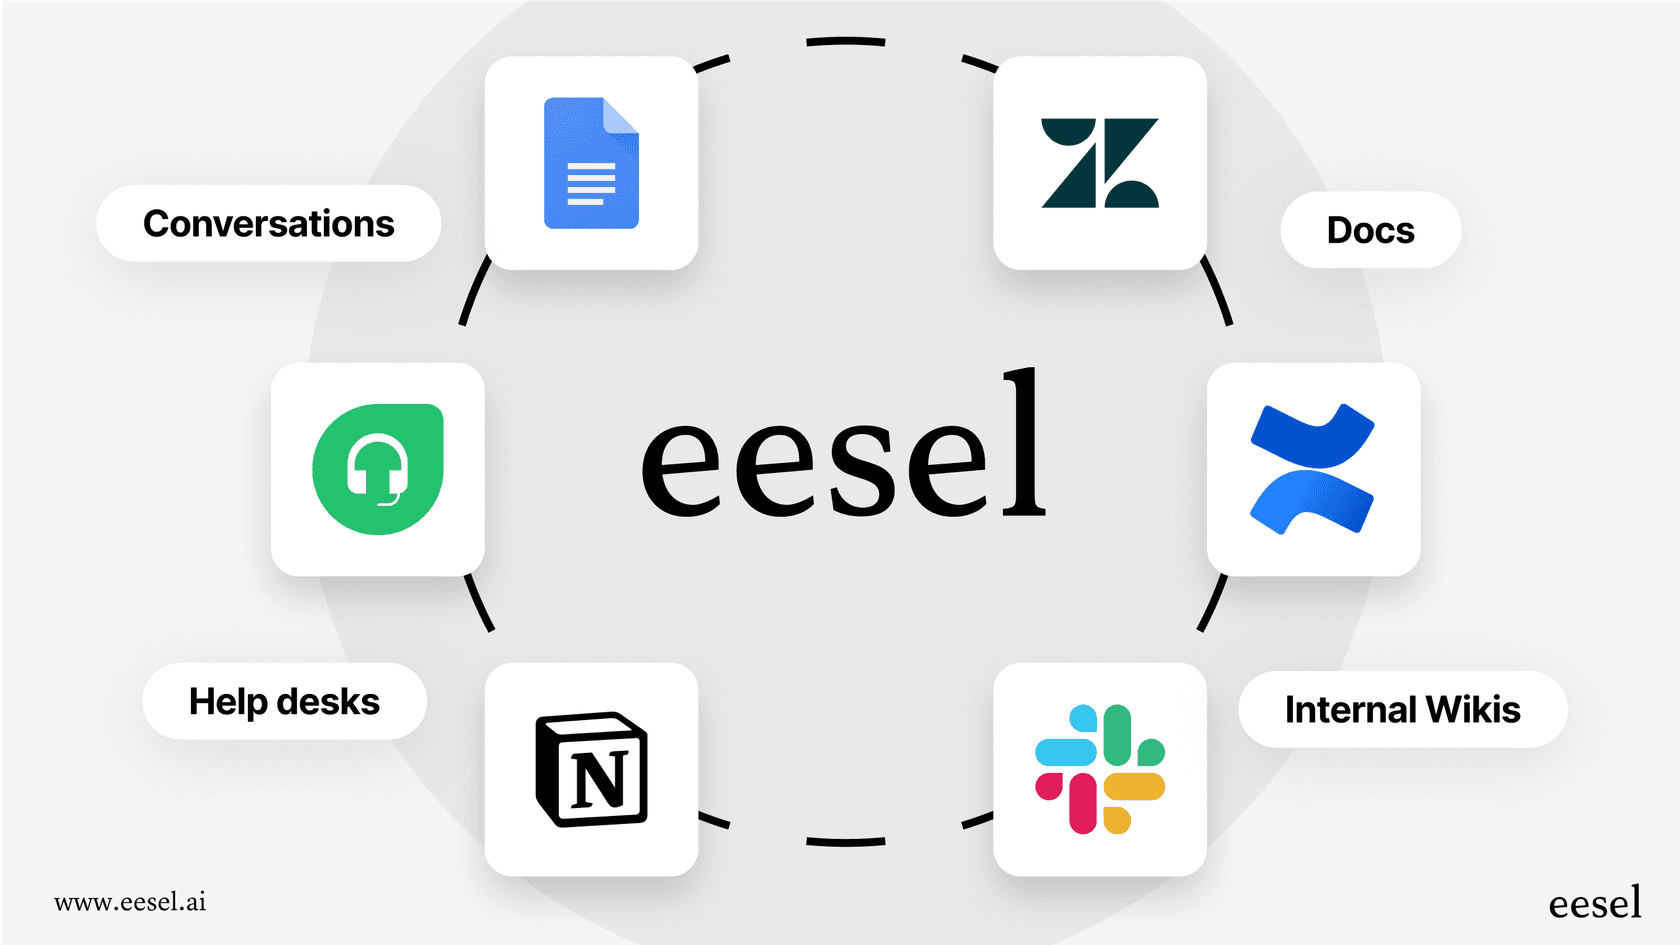
Here’s a secret about AI: it’s only as smart as the information you give it. If your AI is only looking at your public help center, it’s missing a huge amount of context. The best, most accurate answers are often buried in old ticket resolutions, internal wikis, or random Google Docs.
A truly helpful AI needs to see everything your team sees. Take a minute to think about all the places your company knowledge is stored. The list is probably longer than you think.
Here’s what to do:
-
Map out all of your knowledge sources, not just the obvious ones.
-
Pull in internal documentation from places like Confluence or Notion.
-
Don't forget about shared files in Google Docs.
-
Even internal chats in Slack can hold valuable answers.
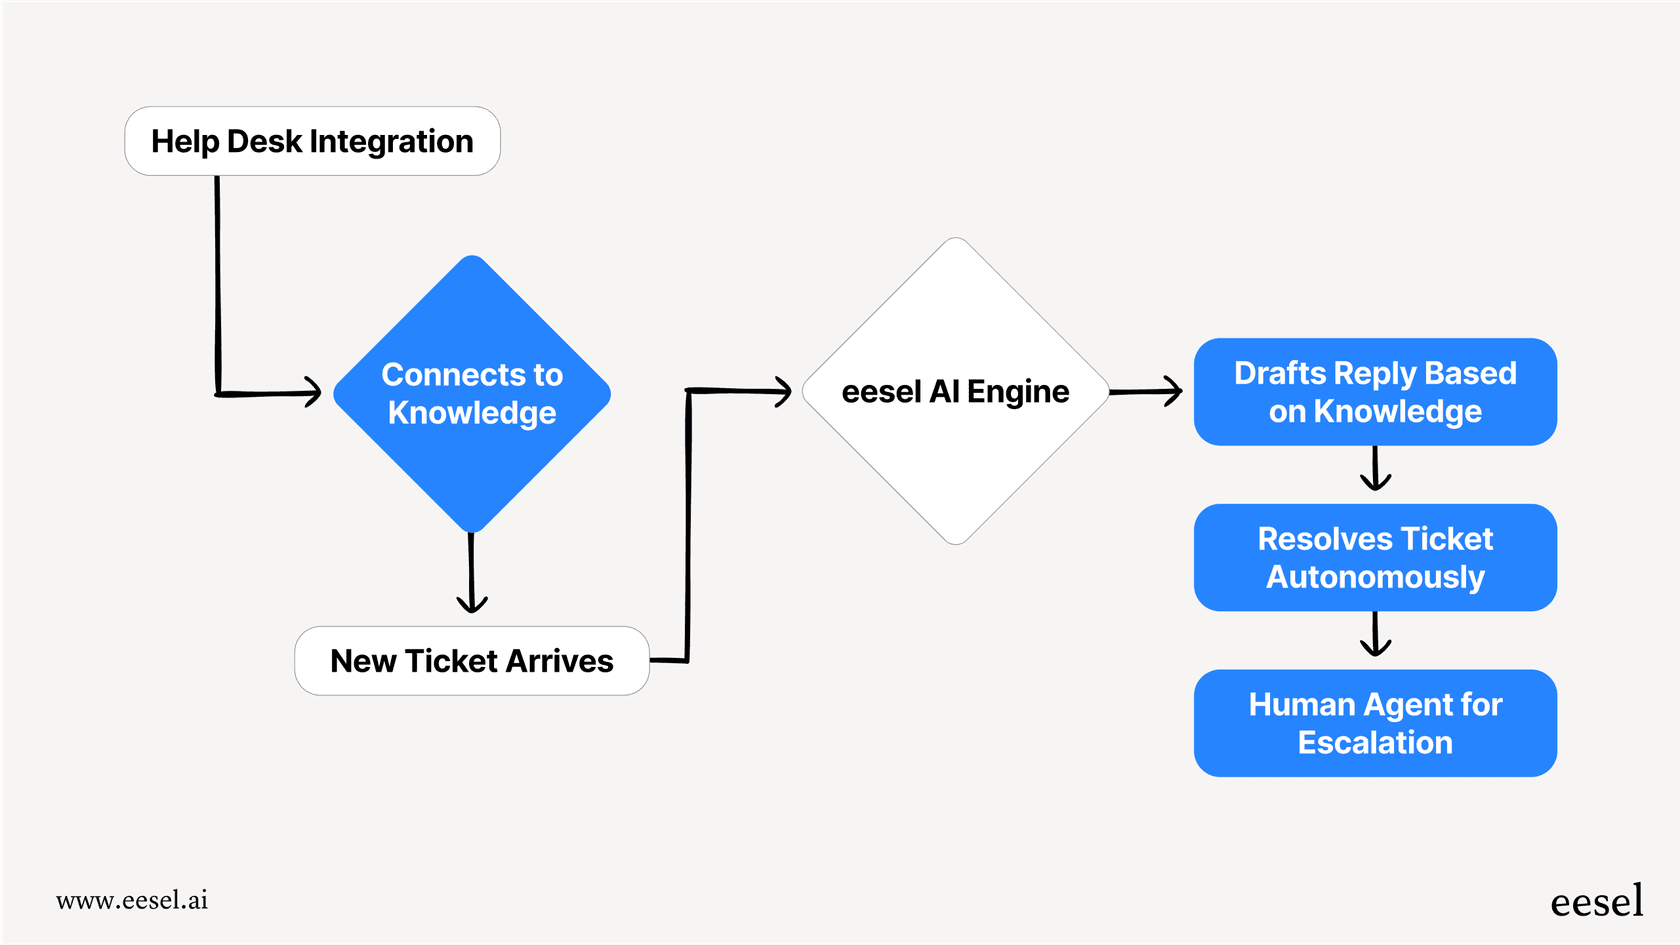
This is where a tool like eesel AI can be a huge help. Instead of spending weeks trying to connect all your data with complex APIs, you can use one-click integrations to bring everything together in minutes. It automatically learns from your historical tickets, so it understands your brand voice, common issues, and what a good solution looks like from day one. Many other tools require a lot of manual training, but eesel AI starts learning immediately.
Step 3: Configure your AI
Now that all your knowledge is connected, it’s time to tell the AI what to do with it. This step is all about teaching the AI to recognize the specific intents you found in Step 1 and telling it how to react. It’s less technical than it sounds, more like setting some ground rules.
You get to define the AI’s personality and the boundaries it works within. This is really important for making sure the automation feels like a natural part of your brand, not some generic robot.
Here’s what to do:
-
Use the intent categories you created earlier as your starting point for how the AI should classify tickets.
-
Define how the AI should behave. Should it sound formal or casual? Are there specific situations where it should immediately pass a ticket to a human?
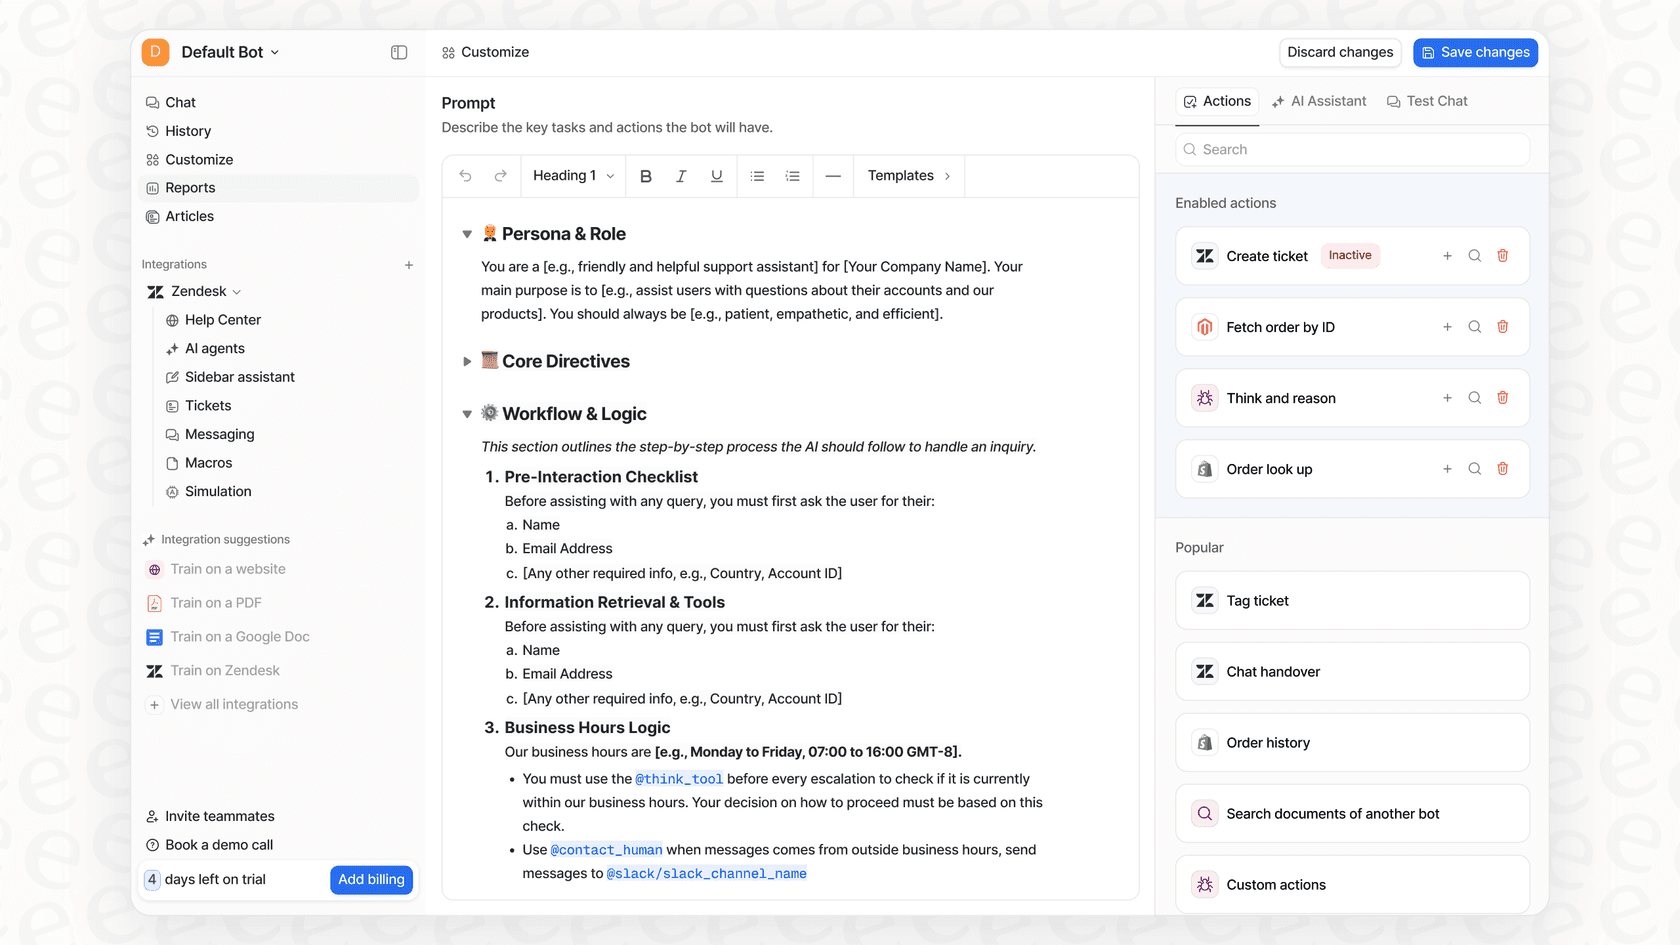
With eesel AI, this whole process is self-serve, so you don't have to sit through mandatory demos or sales calls just to get started. You can use a simple prompt editor to define the AI's persona, tone of voice, and the custom actions it can take, like adding specific tags to a ticket or looking up live order information in Shopify. You get full control over the workflow without writing any code.
Step 4: Build your routing rules and workflows
Okay, this is the fun part: making the "routing" actually happen. Here, you’ll create the automated workflows that send tickets where they need to go based on the AI’s detected intent. Your goal is to build a system that gets every ticket to the right place, with the right context, every single time.
Start with your simplest, most common ticket types. You don’t have to automate everything on day one. A single, well-built rule can save your team hours every week.
Here’s what to do:
-
Build your first rule. Keep it simple. For example: "IF intent is 'Refund Request' THEN assign to 'Billing Team' AND add tag 'refund'".
-
Create a few more rules for your other main intents. You can also get fancier by adding other factors, like customer sentiment (for instance, routing "Very Negative" tickets to a senior agent) or customer tier.
The workflow engine in eesel AI gives you very fine-tuned control. You can choose exactly which types of tickets the AI should handle and which should go straight to a person. This selective automation is perfect for starting small, proving it works, and building confidence before you take on more complex stuff.
Step 5: Simulate and test your setup
Whatever you do, don't skip this step. You wouldn’t launch a new product feature without testing it, and you should treat your AI the same way. One of the biggest risks with AI tools is flipping them on for live customers without knowing how they’ll actually perform. Hope is not a strategy.
A proper testing phase lets you see exactly how your AI will behave in the real world, so you can catch any weirdness before it affects a single customer.
Here’s what to do:
-
Find a tool that gives you a safe, sandbox environment for testing.
-
Run your AI setup against your past tickets. Check the AI's predicted classifications and actions to see if they match up with what your team actually did.
This is a key advantage of eesel AI. Its simulation mode lets you test your entire AI setup on thousands of your past tickets. You get a data-backed forecast of your automation rate and can see exactly how the AI would have responded to real customer questions. It lets you fine-tune everything with zero risk to your live customers. It's a much safer bet than the "test it live and hope for the best" approach.

Step 6: Roll it out gradually and monitor performance
Once you’re happy with your simulation results, it’s time to go live. But that doesn’t mean you should automate everything all at once. A gradual rollout is always the smartest way to go.
Start small, watch the results closely, and expand your automation as you get more comfortable. This step-by-step process ensures a smooth transition and helps you build a system that really works for your team and your customers.
Here’s what to do:
-
Start by turning on AI routing for just one channel (like email) or for a single, straightforward intent you picked out earlier.
-
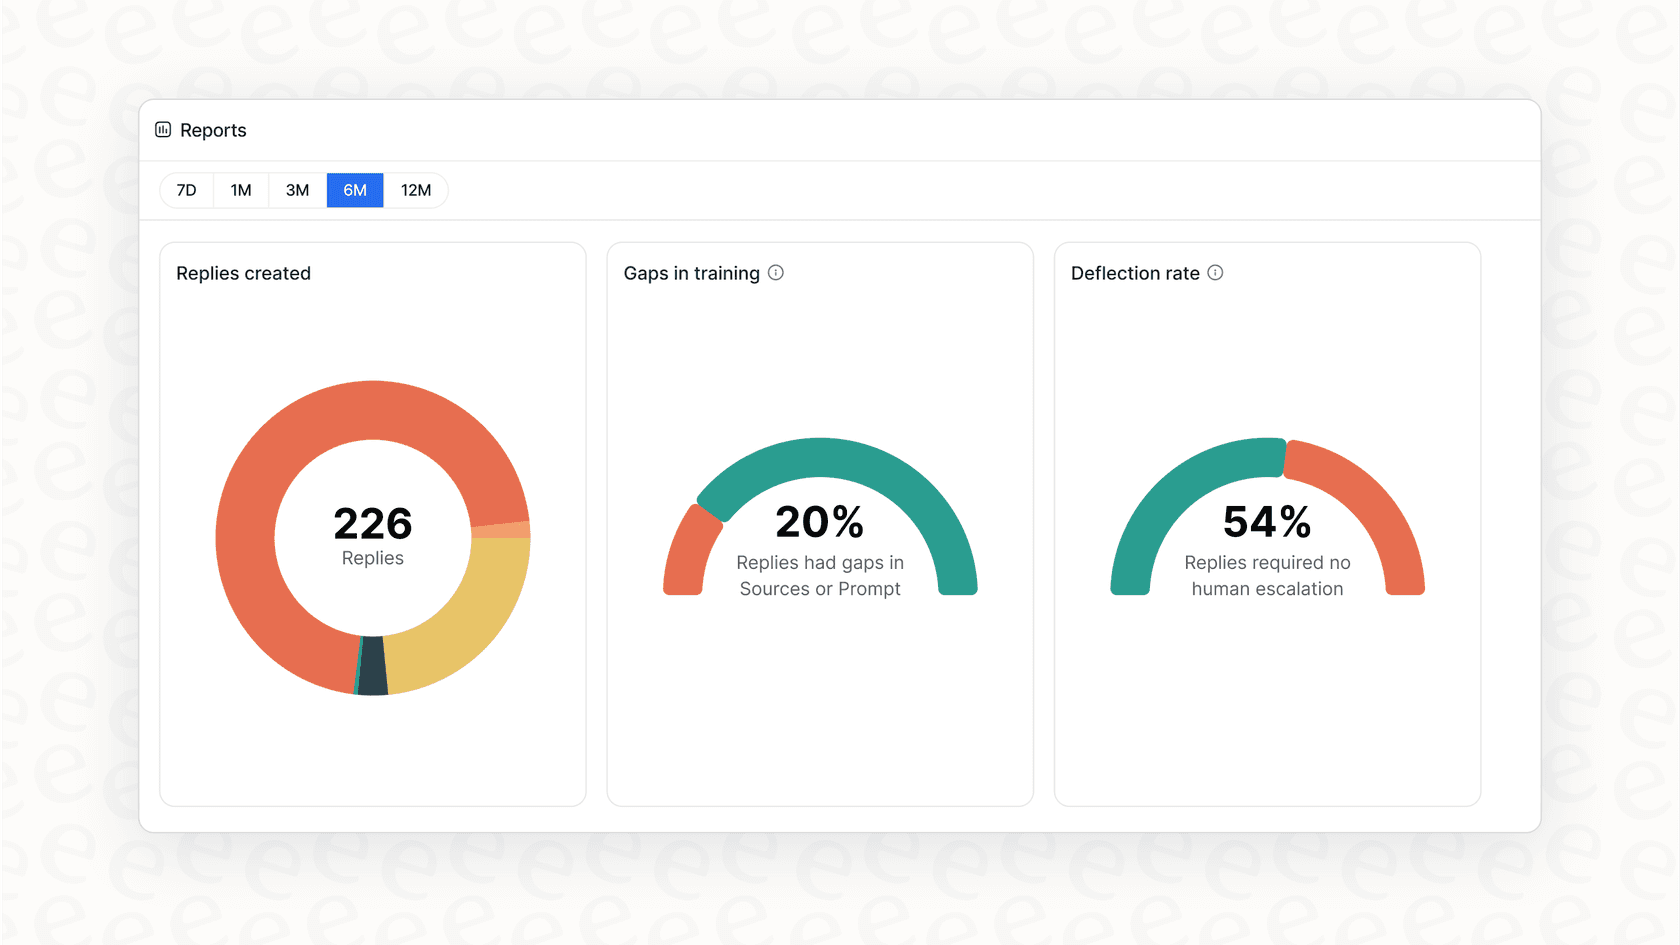
Use your analytics dashboard to keep an eye on how things are going. Track key metrics like first response time, resolution time, and customer satisfaction for the tickets handled by the AI.
The reporting in eesel AI does more than just show you usage stats. It gives you real insights that can show you where the gaps are in your knowledge base and point out new customer trends. This gives you a clear roadmap for how to keep improving your automation and your overall support.
Tips for success and common mistakes to avoid
Setting up AI-powered routing is a big step, but there are a few things to keep in mind to make sure you get it right.
3 tips for success
-
Start with the low-hanging fruit. Don't try to automate your most complicated, multi-step problems on day one. Pick one or two high-volume, simple intents (like "Where is my order?") and build your confidence from there.
-
Think beyond your help desk. The answer to a customer's question might be hiding in a Google Doc or a Slack thread. Make sure your AI can access all the places your team's knowledge lives.
-
Review and refine. AI isn't a "set it and forget it" tool. Use your analytics to find new opportunities for automation and keep your knowledge sources up to date to improve accuracy over time.
2 common mistakes to avoid
-
Relying only on keywords. Simple keyword matching is old-school and easy to break. A customer might say, "I want my money back" instead of "request a refund." True AI intent detection understands the meaning behind the words, which is way more reliable.
-
Not having a safe way to test. Flipping the "on" switch without a proper testing phase is a recipe for unhappy customers. Always use a simulation environment to check your AI's performance before it ever talks to a real person.
From manual triage to intelligent automation
You now have a complete, six-step framework for using AI intent detection to automate your ticket routing. By following this guide, you can finally move away from the slow, messy process of manual sorting and build a system that’s faster, smarter, and ready to grow with your business. The result? A more efficient support team, faster answers for your customers, and the ability to scale without compromising on quality.
Take the next step with eesel AI
The best way to put this guide into action is with a platform built to be both simple and powerful. With eesel AI, you can get started in minutes, not months, thanks to a truly self-serve platform and one-click integrations with the tools you already use. Its risk-free simulation mode is the perfect way to get started with confidence, knowing exactly how your AI will perform before it goes live.
Ready to stop sorting and start solving? Start your free eesel AI trial today and see how easy it is to automate your ticket routing.
Frequently asked questions
What are the primary benefits of AI-powered ticket routing?
The main benefits include significantly speeding up resolution times, reducing human error in ticket triage, and freeing up support agents to focus on more complex issues. It transforms a chaotic support queue into an automated, efficient system.
What tools are needed for AI ticket routing?
You'll need a helpdesk platform (like Zendesk or Freshdesk), access to your company's knowledge base and historical tickets, and an AI automation platform. A dedicated AI platform often offers more flexibility than built-in helpdesk AI.
How can I ensure the AI accurately understands customer intent?
Accuracy is built by providing the AI with comprehensive knowledge from all your company's sources, including internal docs and past tickets. Crucially, always simulate and test your AI setup against historical data before going live to fine-tune its performance.
Should I implement AI ticket routing all at once or gradually?
A gradual rollout is highly recommended. Start by automating routing for one channel or a few simple, high-volume intents, then monitor performance. Expand your automation as you gain confidence and see positive results.
What data is needed to train the AI for ticket routing?
The AI learns best from a wide array of your company's knowledge sources. This includes historical support tickets, your public knowledge base, internal documentation (e.g., Confluence, Notion), shared files (Google Docs), and even relevant internal chat logs.
What are common mistakes to avoid when implementing AI ticket routing?
Avoid relying solely on keyword matching, as true AI intent detection understands meaning beyond exact words. Also, never skip the testing phase; always use a simulation environment to validate your AI's performance before it interacts with live customers.
How do I define the AI's personality for ticket routing?
In Step 3, you configure the AI by defining its persona, tone of voice, and the specific actions it can take. This ensures the automation aligns with your brand and seamlessly integrates into your existing workflows, such as adding tags or looking up live order info.