ServiceNow's jump into generative AI is a big deal. The promise of AI agents automating tasks is exciting, but let’s be honest, that excitement can wear off when you're faced with the documentation. If you're an IT manager or developer trying to figure out where to start, you're not alone. The lines between "agentic workflows," "AI agents," and "tools" can get blurry, fast.
This guide is here to cut through the noise. We'll walk through a clear, step-by-step process for how to create ServiceNow AI agents using the AI Agent Studio. We'll also get real about some of the hurdles and talk about a more direct alternative for teams that just need to get things working.
What you'll need to create a ServiceNow AI agent
Before we dive in, let's make sure you have everything ready. Building AI agents is a powerful feature, but it isn't turned on by default and requires a few things first.
-
The right ServiceNow license: You'll need a subscription that includes Now Assist, as these features are part of ServiceNow's premium AI package.
-
The right plugins: Make sure the "Now Assist AI Agents" and "AI Agent Studio" plugins are installed and switched on in your instance.
-
Admin permissions: You’ll need the "sn_aia.admin" role (or similar permissions) to get into the AI Agent Studio and start building.
-
A clear task in mind: Don't try to boil the ocean on your first attempt. Pick a simple, repetitive task you want to automate. A great starting point is something like automatically categorizing new incidents or giving status updates on tickets.
-
Some data to play with: Your AI agent will need something to work on. Ensure you have existing records like incidents, problems, or knowledge articles to test your agent with.
How to create a ServiceNow AI agent in 5 steps
Creating an AI agent in ServiceNow isn't a single click. It's more like putting together a small, specialized team. You first define the overall project (the agentic workflow), then you assign a worker to it (the AI agent), and finally, you give that worker the right skills (the tools).
Let's break down how it all fits together.
Step 1: Understand the building blocks
First things first, you need to get your head around the three core pieces you'll be working with in the AI Agent Studio. Getting this hierarchy straight is the key to making automations that actually work.
-
Agentic Workflow (or Use Case): This is the project manager. It defines the big-picture problem you're trying to solve, like "Resolve IT Incidents Automatically." It holds the main instructions and decides which agents are needed for the job.
-
AI Agent: This is your specialist, the AI-powered "worker" that handles a specific part of the project. You can have several agents in one workflow. For instance, an "Investigator" agent could gather information, while a "Resolver" agent takes action. Each one has its own role and instructions.
-
Tools: These are the skills in your agent's toolbox. A tool could be a script, a Flow Designer action, a simple record update (like adding a note to a ticket), or a connection to a knowledge base. An agent can't do much without its tools.
Thinking this way helps you slice a complex process into smaller, more manageable automated steps.
Step 2: Create your agentic workflow (the project)
With the concepts down, let's start building. We’ll set up a simple workflow to triage new IT incidents by finding a relevant knowledge article.
-
Head over to Now Assist > AI Agent Studio.
-
Under Agentic Workflows, click New.
-
Give your workflow a straightforward name, like "Incident Auto-Triage".
-
In the Description, explain the goal in plain English. Something like: "This workflow looks at new incidents, finds helpful knowledge articles, and adds them to the work notes."
-
Now for the most important part: the Instructions. This is the main prompt for the entire workflow. Be clear and direct.
For our example, the instructions might look like this:
"Your job is to analyze a new incident. First, read the short description and full description to understand the problem. Second, use your tools to search the knowledge base for a relevant article. Finally, add a link to the best article you find into the incident's work notes for the support agent to see."
Step 3: Build your AI agent (the worker)
Now that we have our project, we need someone to do the work.
-
From the AI Agent Studio, pop over to the AI Agents tab and click New.
-
Name your agent something that makes sense, like "IT Triage Specialist".
-
In the AI Agent Role field, describe its personality and job. This gives the underlying AI model some context. For example: "You are a helpful IT service desk analyst. Your main task is to investigate new incidents and find information to help resolve them faster."
-
The Instructions here are for this specific agent, telling it how to do its job as part of the bigger project.
For our specialist, that might be:
"1. Get the full details of the current incident. 2. Based on the incident's description, come up with a search query. 3. Use the search tool to find the single best knowledge base article. 4. Use the record operation tool to add the article's link to the work notes."
Step 4: Equip your agent with tools (the skills)
An agent with no tools can't do anything. This is often the most technical step, where you connect your agent to ServiceNow's functions.
For our "IT Triage Specialist", we need two main tools:
-
One to search the knowledge base.
-
Another to update the incident record.
Let's add the search tool first:
-
Inside your agent's configuration, click Add Tool and choose Search Retrieval.
-
Name it something obvious, like "Search Knowledge Base".
-
In the description, tell the agent what it does: "Use this tool to search for knowledge base articles."
-
Select the search source that points to your knowledge base.
Next, let's add the update tool:
-
Click Add Tool again, but this time pick Record Operations.
-
Name it "Update Incident Work Notes".
-
For the description, write: "Use this tool to add internal comments or work notes to an incident."
-
Set up the tool to allow the "Update" operation on the "Incident [incident]" table.
You can see that even for these basic actions, each tool needs to be set up one by one. If you want to do something more complex, like look up user details or check an external system, you'll probably need to create a Flow Action or even a Script. This is where the "low-code" promise can quickly turn into a job for a developer.
Step 5: Connect, test, and deploy your agent
Alright, time to plug everything together and see if it works.
-
Go back to your "Incident Auto-Triage" workflow.
-
In the Connect AI Agents section, add the "IT Triage Specialist" agent you just made.
-
Click over to the Testing tab. Here, you can pop in an existing incident number and run the workflow.
-
The test console will show you the agent's "thinking", how it understood the instructions, which tools it chose, and the final result. Read through this carefully to make sure it's doing what you expect.
If the tests look good, you can activate the workflow. And just like that, you have a basic AI agent helping you triage tickets.
The challenge with the native builder: Is there a simpler way?
Okay, take a breath. As you can see, getting even a simple AI agent running in ServiceNow has quite a few moving parts. It demands a solid grasp of the platform's architecture, careful prompt writing on multiple levels, and often, some pretty technical tool configurations. For many teams, this can be a real hurdle, and it's a far cry from the "go live in minutes" experience many of us hope for with modern AI tools.
You're dealing with a steep learning curve around workflows, agents, and tools. Plus, anything more than basic record updates often means roping in a developer, which can create a bottleneck. The native tools are also built to work with data inside ServiceNow. But what happens when your best answers are buried in Confluence, Google Docs, or old Slack threads?
After all that, it's fair to wonder if there’s a more straightforward path.
A faster alternative: eesel AI
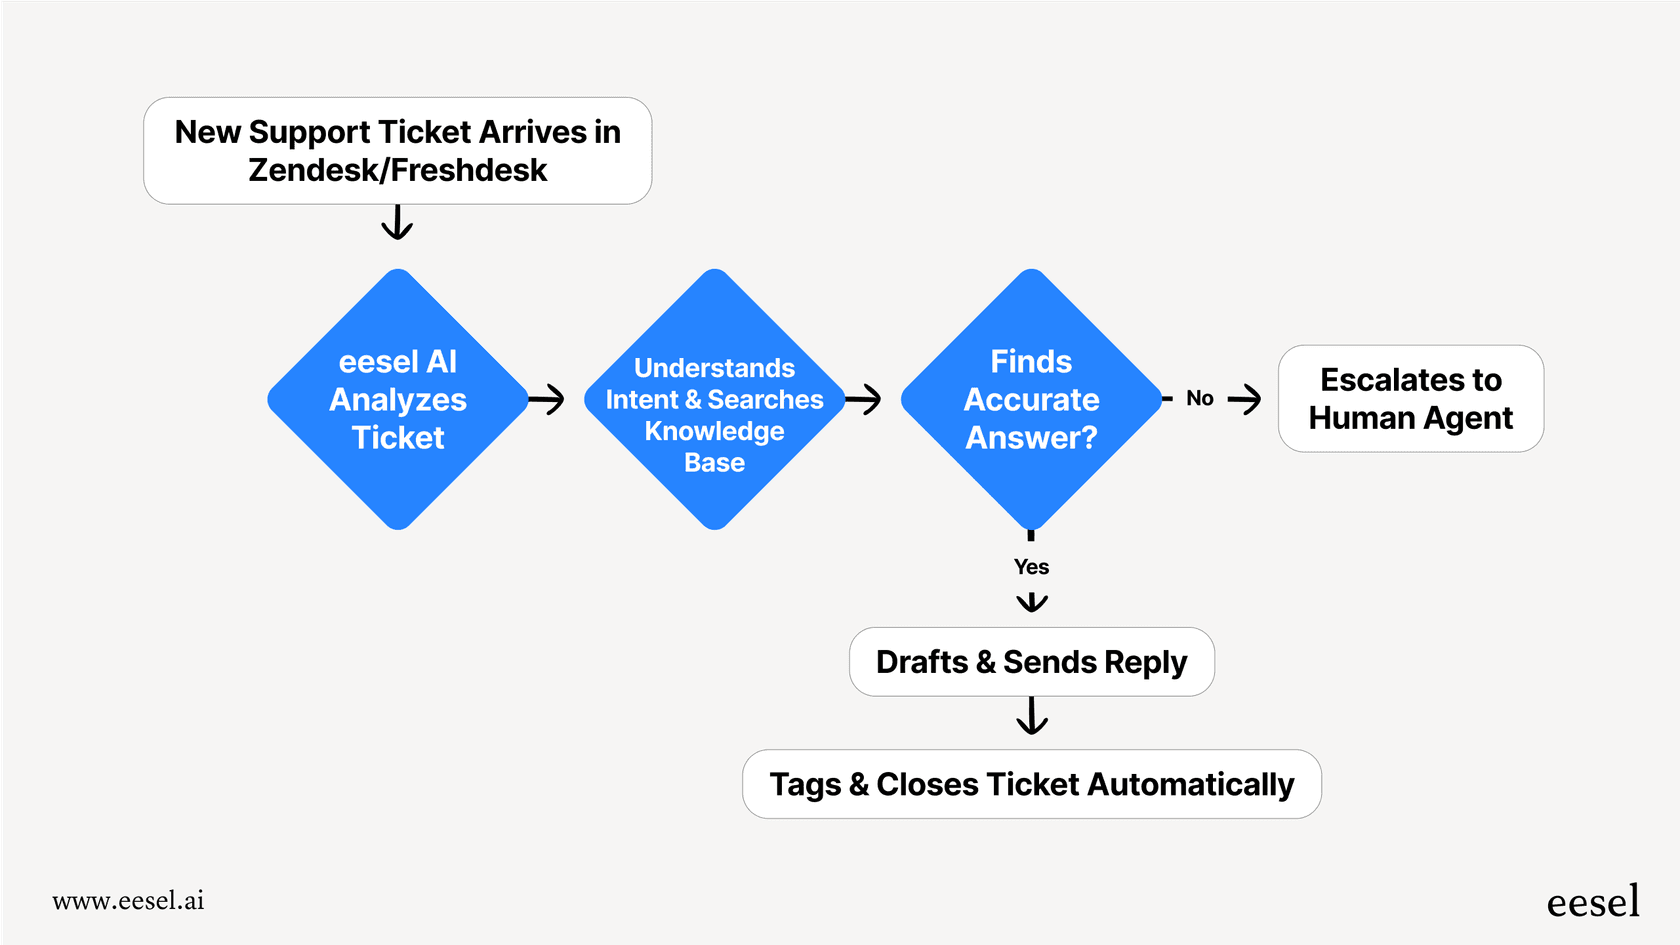
For teams that need smart, flexible AI without the heavy setup, eesel AI offers a different approach. Instead of asking you to build complex automations inside a single platform, eesel acts as an intelligent layer that plugs directly into ServiceNow and all your other tools.
Here’s how eesel AI tackles the challenges of the native builder:
-
Get going in minutes, not months: With eesel AI, you aren't building workflows from the ground up. You just connect your ServiceNow account and other knowledge sources with simple, one-click integrations. The whole setup process is self-serve and can be done in the time it takes to drink a coffee.
-
Bring all your knowledge together: Why limit your AI to just the official ServiceNow knowledge base? eesel AI instantly learns from your past ServiceNow tickets and macros, but it also connects to external knowledge in places like Confluence, Google Docs, Notion, and Sharepoint. This gives your AI the full picture, which means more accurate and helpful answers.
-
Stay in control, without the code: You don't need to be a developer to customize how the AI works. With eesel's simple prompt editor, you can tell the AI exactly how to behave, what its persona should be, and what actions it can take, like escalating a ticket, adding a tag, or looking up order info.
-
Test without the risk: Before you flip the switch, eesel AI lets you run a simulation on thousands of your past tickets. You get a clear report showing how the AI would have responded, your predicted automation rate, and where you might have gaps in your knowledge. This risk-free testing lets you roll out changes with confidence.

Instead of being another internal builder platform, eesel is a specialized AI solution for support automation that fits right into the tools you already use, including ServiceNow.
Build native or integrate for speed?
ServiceNow has built a powerful, if complicated, framework for creating custom AI agents. For large companies with dedicated developers, it offers a ton of customization within the ServiceNow world.
But for most teams, the goal is to solve problems and get back to work. The complexity, learning curve, and siloed nature of the native builder can really slow you down.
Tools like eesel AI offer a more direct route to support automation. By connecting smoothly with ServiceNow and uniting all your scattered knowledge, you can deploy intelligent, context-aware AI agents in a fraction of the time. This frees up your team to focus on what they do best: delivering great service.
Ready to see how fast you can automate your support? Get started with eesel AI for free.
Frequently asked questions
How difficult is it to learn how to create ServiceNow AI agents using the native AI Agent Studio?
Creating AI agents natively in ServiceNow can have a steep learning curve, requiring a solid understanding of workflows, agents, and tools. It often involves careful prompt writing and technical configurations, which can be challenging for those new to the process.
What are the essential prerequisites for creating ServiceNow AI agents?
You'll need the correct ServiceNow license (including Now Assist), the "Now Assist AI Agents" and "AI Agent Studio" plugins installed, admin permissions ("sn_aia.admin" role), a clearly defined task, and relevant data for testing.
Approximately how long does it take to create a ServiceNow AI agent for a basic task?
Even for a simple task, the process involves multiple steps from defining workflows to configuring tools and testing, which can take significant time. While not always months, it's generally not a "go live in minutes" experience and requires dedicated effort.
What types of tasks are best for a first ServiceNow AI agent project?
Start with simple, repetitive tasks like automatically categorizing new incidents, giving status updates on tickets, or finding relevant knowledge articles. These tasks help you grasp the building blocks without overwhelming complexity.
Can ServiceNow AI agents access information from systems outside of ServiceNow?
Natively, ServiceNow AI agents are primarily built to work with data and functions *inside* ServiceNow. Integrating external knowledge sources often requires custom tools or integrations, which can add significant development complexity.
How can I effectively test a ServiceNow AI agent after creating it?
The AI Agent Studio includes a Testing tab where you can input existing record numbers (like an incident) and run the workflow. The console displays the agent's decision-making process, allowing you to verify its understanding and actions.
Is there a simpler alternative for creating ServiceNow AI agents for support automation?
Yes, solutions like eesel AI offer a more direct route. They connect easily to ServiceNow and other knowledge sources, allowing you to deploy intelligent AI for support automation faster and without deep technical configuration or coding.