Let's be real for a second. The phrase "chatbot project" probably brings a few specific images to mind: endless meetings, budgets that make your eyes water, and a launch date that keeps getting pushed back. It’s the kind of undertaking that makes you wonder if it would just be easier to hire three more people and call it a day.
For a long time, that was the reality. But what if you could skip all of that? What if you could get a smart AI assistant that gives instant answers and frees up your support team, just by plugging into the tools you’re already using every single day?
That’s what this guide is all about. We're going to walk through a simple, no-nonsense way to get a chatbot integration up and running. Forget the six-month projects and developer dependencies. We’re talking about connecting your existing help desk and knowledge sources to launch a bot that’s actually helpful, in minutes.
What you’ll need for a successful chatbot integration
Before we jump into the how-to, let's do a quick inventory check. The best part about this approach is that you likely have all the necessary pieces already. The goal isn't to build a whole new system from the ground up, but to cleverly connect what you've already got.
Here's a quick look at what you'll need to have on hand:
-
An existing help desk: This is where your customer conversations already happen. We're talking about platforms like Zendesk, Freshdesk, or Gorgias. Your chatbot should fit right into your current workflow, not make you change it.
-
Your knowledge sources: Where do all the answers live right now? This could be a formal help center, an internal wiki on Confluence or Notion, a folder of shared Google Docs, or even just the history of your past support tickets. All that content is pure gold.
-
A clear goal: What do you want this bot to do, really? Don't try to make it do everything at once. Start with one specific, high-impact task. Is it deflecting all the "Where is my order?" tickets? Is it helping qualify new sales leads? Or maybe it's just for your own team, answering internal questions on Slack. Pick one thing to start.
-
An integration platform: This is the glue that holds everything together without you having to write a single line of code. A tool like eesel AI is built specifically for this. It lets you connect your knowledge and help desk on your own, so you can go from idea to live bot in a single afternoon.
Your step-by-step guide to chatbot integration
Got your ingredients ready? Great. Let's get into the actual process. We’ll break this down into five straightforward steps that anyone on your team can handle, no technical background required.
Step 1: Unify your knowledge sources
A chatbot is basically sitting an open-book test. If the answers aren't in the book, it's going to fail. It's that simple.
The old way of doing this involved manually creating massive spreadsheets of questions and answers to "train" the bot. It was a tedious, soul-crushing process, and the database was outdated the second you finished it. The modern, faster approach is to just connect the knowledge you’ve already spent years creating.
Start by pointing the bot to your main help center or FAQ page with a simple URL. Done. Then, start connecting your other knowledge hubs. Got internal docs in Confluence? A bunch of how-to guides in Google Docs? Link them up. This creates one big, unified brain for your chatbot, ensuring its answers are always pulled from the most current information.

Step 2: Connect your help desk or chat tool
Okay, your bot has the knowledge. Now it needs a place to actually talk to people. This is the heart of the chatbot integration. Instead of wrestling with APIs or waiting for a developer to have a free moment, you should be able to connect your bot to your main support channel with just a few clicks.
Modern AI platforms make this incredibly simple with one-click integrations. You just log in to your help desk account, authorize the connection, and the platform does all the heavy lifting in the background. It’s a secure and straightforward process that slots the bot directly into the tools your team already uses.
This tight integration is important because it makes the handoff from bot to human seamless. If a customer asks a question the bot can't handle, it doesn't just hit a dead end. The entire conversation, context and all, gets passed to a human agent as a regular ticket. Your team can see what was already discussed and jump in to help without making the customer repeat themselves.
Step 3: Define your chatbot’s rules and persona
You’re the boss here. A good chatbot doesn't just run wild; it operates under the specific rules and boundaries you set for it.
First, give it a personality. Using a simple prompt, you can tell it how to behave. Do you want it to be formal and professional? Or friendly, casual, and maybe a little bit quirky? You write the script.
Next, you set up the rules of engagement. This is where you decide when the bot should answer and when it should immediately get a human involved. A great way to start is with what's called selective automation. Think of it like training a new junior support agent. You wouldn't have them handle complex account cancellations on their first day, right? You'd start them on simple things like password resets.
You can do the same with your bot. Tell it to only handle questions about order status, shipping, and returns. For anything else, its only job is to route the conversation to the right human agent. As you get more comfortable, you can broaden its responsibilities.
You can also set up custom actions that turn your bot from a simple Q&A machine into an automated workflow tool. For example, you can give it the ability to look up order details from Shopify or automatically tag incoming tickets based on what the customer is asking about. This is where you go from just deflecting tickets to actually automating parts of your team's workload.

Step 4: Test with confidence using simulations
So, how do you make sure your new bot won't go rogue and start giving out terrible advice? The fear of launching a bot that gives wrong, unhelpful, or weirdly off-brand answers is real. This is where a simulation feature becomes your best friend.
Instead of just hoping for the best, a powerful AI platform lets you run a full dress rehearsal. It can take thousands of your real support tickets from the last week or month and show you exactly how the bot would have responded to them.
In a safe, private environment, you can review every single one of its would-be answers. You can check its tone, see if it correctly identified the customer's problem, and confirm that it escalated the tricky questions. It's like having a crystal ball for your customer support. This process gives you a realistic preview of your automation rate and, more importantly, it shines a spotlight on any gaps in your knowledge base before a single customer interacts with it. It’s a risk-free way to build confidence and fine-tune everything for launch day.

Step 5: Deploy your chatbot integration and monitor its performance
Once you’re happy with how it’s performing in the simulations, it's time to let it out into the wild. But you don't have to flip a giant switch and unleash it on everyone at once. A much smarter way to go is a gradual rollout.
You could start by activating the chatbot only on your contact page, or maybe just for customers on a certain subscription plan. Another popular strategy is to have it run only after business hours, handling overnight queries until your team is back online.
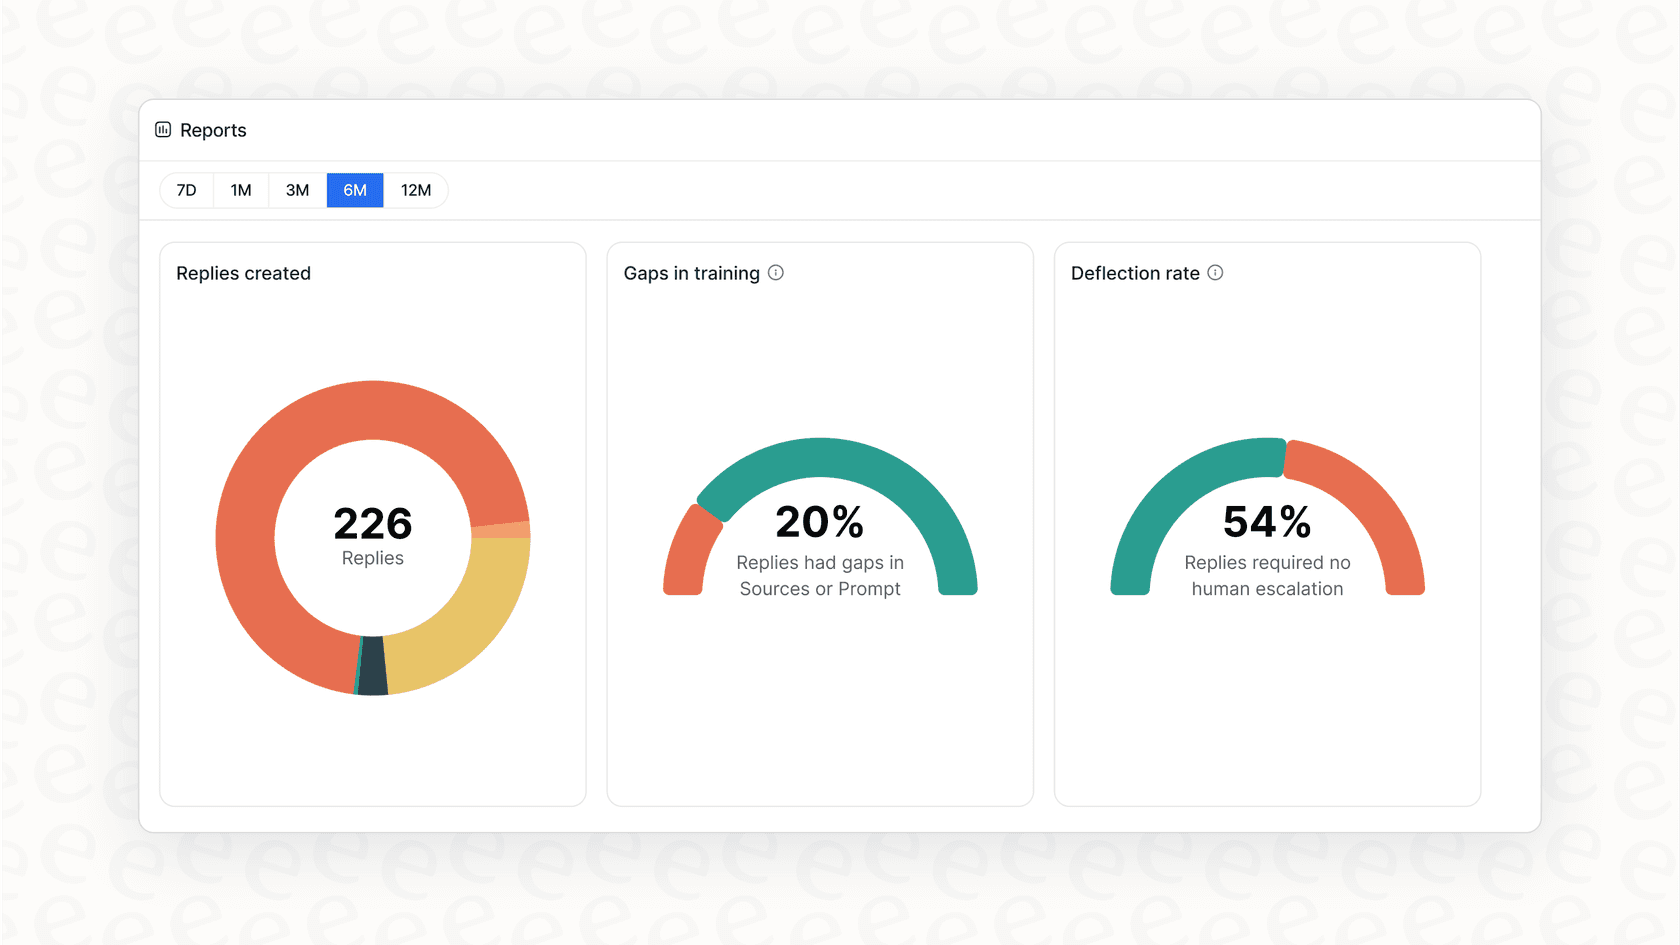
This approach lets you watch how it performs in a live but limited setting. Keep an eye on your analytics. Are customers getting their questions answered? Are they saying "thanks" to the bot? Or are they immediately asking to speak to a human? Good reporting should do more than count conversations; it should show you what people are asking about and where your documentation might be weak. This data gives you a clear, ongoing roadmap for making both your bot and your help content better over time.
Tips for a smooth chatbot integration
Following those five steps will get you most of the way there. But to make sure your chatbot integration is a long-term success, here are a few final tips to keep in mind.
-
Don't try to boil the ocean. The biggest mistake people make is trying to automate everything from the get-go. That's a surefire path to frustration. Instead, pick the top 3-5 questions that eat up most of your team's time and have the chatbot focus only on those. Once it's handling them perfectly and your team starts to see the benefit, you can slowly give it more to do.
-
Always provide an escape hatch. There is nothing more infuriating for a customer than being trapped in a loop with a bot that can't help them. Make sure there is always a very obvious, easy, and immediate way to get to a human. A good bot knows its limits and gracefully passes the conversation over when it's out of its depth. Its job is to help, not to be a bouncer.
-
Pick a tool that plays nice with others. Look for a platform that works with your existing tools, not one that demands you move everything over to their system. The entire point of a chatbot integration is to make your current workflow better, not to force you into a massive migration project. A truly self-serve tool like eesel AI puts you in control, letting you build and manage everything on your own time, without needing to talk to a sales rep.
Your chatbot integration is ready for launch
So, there you have it. A powerful chatbot integration doesn't have to be some massive, complicated project that takes over your entire year. By using the knowledge you already have and connecting the tools you already use, you can build, test, and launch an AI assistant that delivers real value on day one.
You now have a blueprint for unifying your knowledge, connecting your help desk in a click, setting your bot's rules, and testing it all risk-free before launch. This modern approach puts you in the driver's seat, allowing you to start small and scale your automation efforts at a pace that makes sense for you and your team.
Ready to see it in action? With eesel AI, you can follow the steps in this guide and have your first AI support agent up and running in under an hour. It’s completely self-serve, so you can connect your help desk and see how it works for yourself, right now.
Frequently asked questions
This guide focuses on setting up a chatbot integration in minutes, not months. By leveraging existing knowledge sources and a no-code platform, you can typically go from idea to a live bot in a single afternoon.
You primarily need an existing help desk (like Zendesk), your current knowledge sources (e.g., a help center, Google Docs, or Notion), a clear goal, and an integration platform like eesel AI. These components allow for a seamless connection without building from scratch.
The key is thorough testing using simulation features before launch. A good platform lets you review how the bot would respond to thousands of your past tickets, highlighting any knowledge gaps or incorrect answers.
A robust chatbot integration ensures a seamless handoff to a human agent. If the bot can't resolve a query, the entire conversation, along with its context, is passed directly to your help desk as a regular ticket.
Yes, you can fully customize the bot's persona and rules. Using simple prompts, you can define its tone (e.g., formal or friendly) and set specific boundaries for when it should answer versus when it should route to a human.
It's best to start with selective automation, focusing on 3-5 high-impact questions that frequently consume your team's time. This allows you to build confidence and gradually expand the bot's responsibilities as it performs well.
After deployment, closely monitor your analytics to understand what questions customers are asking and the bot's resolution rate. This data provides an ongoing roadmap to identify areas for improvement in both the bot and your knowledge base.
Share this article

Article by
Stevia Putri
Stevia Putri is a marketing generalist at eesel AI, where she helps turn powerful AI tools into stories that resonate. She’s driven by curiosity, clarity, and the human side of technology.